So you have been having problems with your FPV video quality? Don’t worry, it’s a common problem and the good news is that it is fairly easy to fix a majority of the issues!
In this article we will walk through the process of checking and optimising a typical FPV video setup and I will break things down into 5 steps.
Prerequisite
This guide is aimed at FPV drones for enthusiasts and we will assume that you have built your own FPV drone already, or are planning to do so.
This guide also applies to bind-n-fly (BNF) drones. However as these drones are pre-built by the supplier, I would not expect there to be such problems with video under normal circumstances.
In which case I would recommend first contacting the appropriate technical support to discuss the problem prior to trying to improve the FPV video. You could invalidate any warranty that you may have been given!
If you are unsure about the type of drone you have, go ahead and check this article out first.
This guide also assumes that you have a basic understanding of what a good FPV video feed should look like.
For example if you are flying with an analog setup, it is normal for the picture quality to be inferior to digital images and you will also likely experience some breakup from time to time.
To get an idea of what a good FPV video feed should look like, the following video gives a great example side by side.
Obviously you can expect the digital system to provide a better image, but an analog system should also provide a clear and stable video for most of the time.
1. Check Your Local Environmental Factors
The first thing to be sure about is that you are not getting any problems with your video feed due to surrounding environmental factors.
In almost all cases FPV uses the 5.8GHz frequency for the video feed. The reason this frequency is used is because it is part of the 5GHz band, which is internationally allocated for amature use.
Now the idea of amature radio may conjure up ideas of a bunch of geeks with huge radio antenna in their yard, but actually we all use devices that make use of these amature frequencies.
WiFi and Bluetooth devices began primarily on the 2.4GHz band, which is also allocated internationally for amature use.
However a demand for faster data transfer rates and the growing problem of the 2.4GHz band becoming cluttered has led to the 5.8GHz band being used more widely.
So, what does this have to do with our FPV drone?
Think of your goggles and your drone as being two people having a conversation.
If those two people are sat in a park with no one around, they have no problem talking to each other.
Move them into a noisy bar full of people and they can still have a conversation, but it is more difficult because of the background noise.
If those two people are stood too far from each other, or the background noise becomes too loud, they will no longer be able to hear each other.
The same thing is happening with your drone and your goggles.
Under normal circumstances your goggles are ‘listening’ for the picture being sent from your drone.
If there are a load of big ol’ WiFi routers in the adjacent buildings making a load of noise, things may work ok until your drone gets a little further away.
Your goggles then begin to struggle to ‘listen’ for the images coming from the drone amongst all of the background noise from other sources of 5.8GHz radio waves.
Before you jump to conclusions that your FPV video is bad because of some problem with the equipment, make sure you rule out any problems that could be environmental:
- When you pick a spot to fly, you may need to consider other sources of radio noise that are causing problems with your video.
- Try your FPV video feed in a completely different location to rule out any local interference.
- Try and fly in a completely rural area, free of any overhead power lines, cellular towers or other possible sources of radio interference.
- Try using different channels or bands.
- Make sure the goggles and drone are using a matching channel and band.
- Use the spectrum analyser in your video receiver to check the levels of noise. My recommendation for video receiver that has this function is the TBS Fusion.
2. Mitigate Problems with Jello and Vibrations
Another common cause of poor quality FPV video can come in the form of vibrations or ‘jello,’ whereby the image actually shakes.
If you are not familiar with jello or are unsure if it is jello that is giving you a poor quality FPV video, here is a good example of what terrible jello looks like:
There are a whole multitude of things that can cause jello, none of which are directly a result of the FPV video equipment.
Jello can be caused by any of the following problems:
- Unbalanced / damaged motor(s).
- Unbalanced / damaged propellor(s).
- Suboptimal PID tune.
- A bad camera mount.
- Frame resonance.
If you recently noticed jello and this is the cause of bad FPV video for you then I would first recommend checking that all of your motors spin freely and without any wobble.
If your motors are good then I would recommend trying a different set of props. Unbalanced props can certainly cause problems with video.
Bi-blade props can also be more prone to jello, plus props of a larger diameter. You could try switching to tri-blade props to see if you get an improvement.
In most cases modern FPV drone frames are designed so as not to have problems with resonance. Some recommend soft mounting motors. I have never tried so I cannot personally comment.
I also find that a good quality modern setup can handle all manor of bent and unbalanced props. I would recommend trying Kiss.
If you are having jello problems in your HD camera recording then it could either be due to the camera mount or the PIDs can also have an effect.
In which case the following video would certainly be worth checking out.
3. FPV Video Antennas: Choose Wisely
There are a few factors to consider with regards to how the antenna can affect the performance of your FPV video feed:
- The type of antenna.
- The position and installation of the antenna.
- Ensuring that your antennas have matching polarisation.
- Ensuring that your antennas are not damaged and are properly connected.
There are many different choices of antenna available and designs have now become well refined. Stick to the known brands and you shouldn’t have a problem.
You should however ensure that the antenna on your drone has matching polarization to the antenna on your goggles.
In most cases using circular polarized antennas for video will yield the best results. If you are not already using them, then it would be worth changing them.
Check out my recommendations for antenna here.
For further information on antenna selection, take a look at this guide.

The other things that is important is the way in which you mount the antenna to the drone.
It has become fairly industry standard to mount the video transmitter antenna at the back, sort of like a cute little tail…
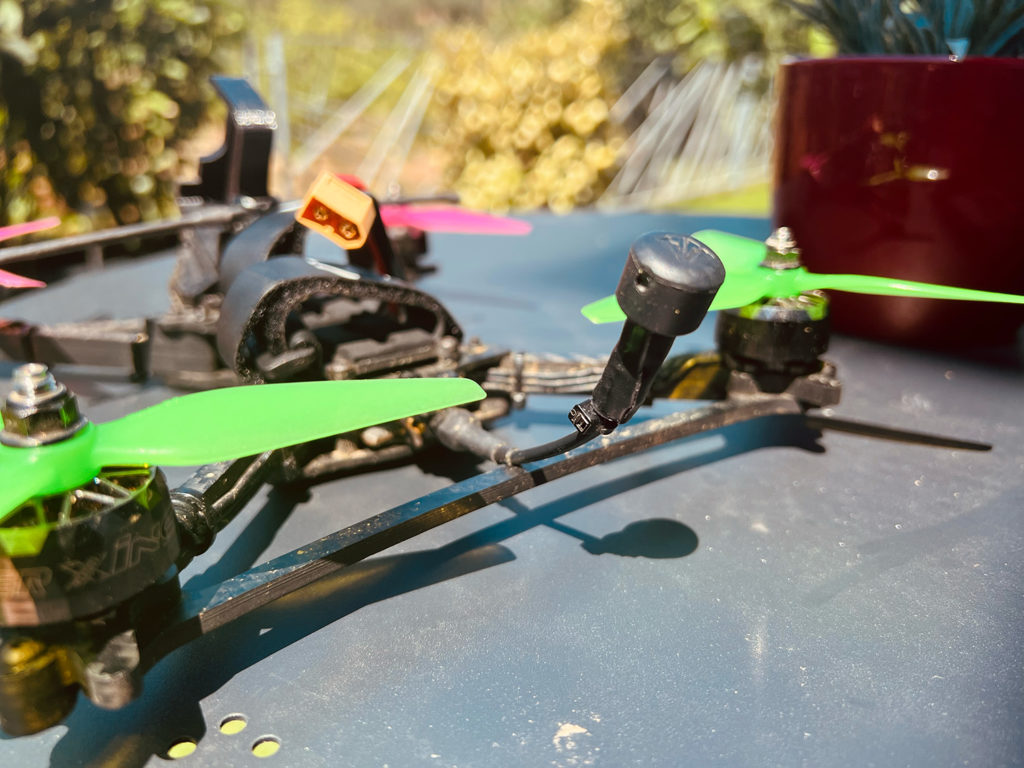
Mostly all frames come with the necessary hardware to mount the VTx antenna in such a way.
I would recommend mounting your antenna in this way both to ensure the best signal whilst also being durable.
VTx antennas can take a bit of a beating, my Triumph Pro in the picture above is good evidence of that, although it is still working great.
However if your antenna really is past its best and you are experiencing a lot of breakup and loss of video, don’t hesitate to replace it.
Here are some tips to follow regarding your VTx antenna:
- Keep the antenna away from carbon fibre as much as possible, especially the ‘business’ end.
- Keep the antenna away from other ‘noisy’ components, such as motors or other transmitting antenna (don’t forget receivers can also be transceivers, your Crossfire receiver will also be transmitting telemetry data).
- Make sure your antenna is securely attached to your quad and not able to vibrate. I prefer using two cable ties.
- Make sure the antenna connector/cable is not touching carbon fibre, including the metal casing of the SMA connector. Use shrink tube or electrical tape to isolate it.
- Ensure that the antenna is in good working order. If you crashed and it is a little beaten up, maybe it is time to replace it.
4. Rock Solid Wiring and Soldering
One of the most difficult skills to learn when building or repairing FPV drones is undoubtedly soldering, and in general wiring the smaller components.
It goes without saying that in order to have rock solid video you need to have rock solid wiring and soldering within your build.
First and foremost, make sure you have a decent soldering iron.
Now it is possible to buy a fantastic temperature controlled soldering iron that can be powered from your LiPo batteries or even USB-C.
If you don’t have one then I would highly recommend making a small investment in a good soldering iron, such as this one.
There are plenty of good guides on YouTube that will walk you through the basics of soldering. Here is one that is concise and not too lengthy.
5. Use an Optimal Power Configuration
In my own personal experience I have found that the way in which you power your video transmitter onboard the quad can most affect the quality of video.
In this case we are talking about lines on the screen that move in a certain pattern or rhythm, sometimes proportional to the amount of throttle applied.
Noise on the ‘high power’ portion of the drone’s power supply can leak through into the video. If you don’t know what this looks like, have a watch of this short video:
The best way to mitigate problems with interference caused by electrical noise is to use a seperate power supply for the VTx.
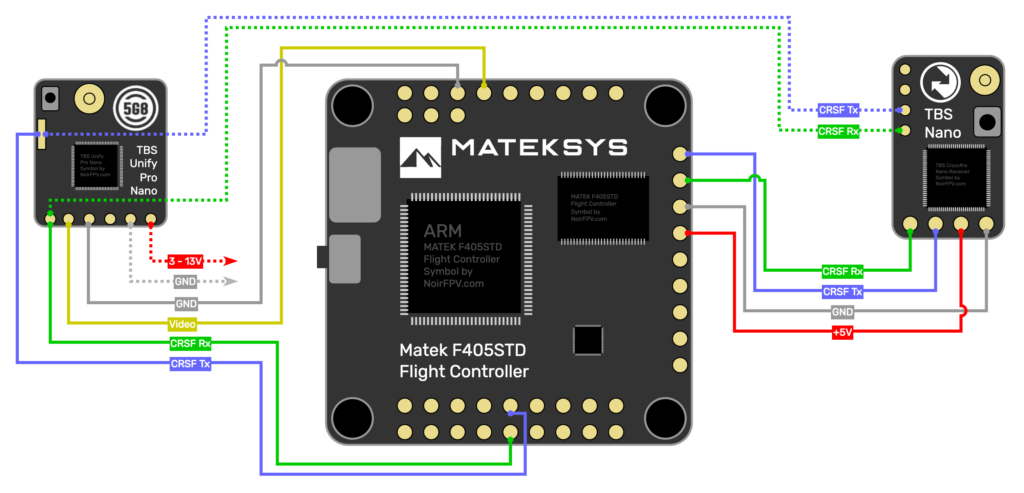
Some video transmitters have their own built-in voltage regulators, meaning they have their own power supply and can be connected directly to the battery.
Signal and Ground (GND) connections can be made between the flight controller and video transmitter, however the main power input is seperated.
Using a low ESR capacitor with a value of 470uF or above is a great way to somewhat stabilize the battery voltage.
The capacitor acts as a little reservoir which supplies a little extra power when the motors demand it during a throttle punch, for example.
Stabilizing the battery power supply in such a way helps mitigate ‘noise’ leaking through the power supply to the video transmitter.
I run my own setup with a TBS video transmitter as shown in the diagram above and with the addition of a capacitor on the main power input (the ESC), giving great results.
You can also power the video transmitter from a BEC (battery eliminator circuit).
This is a small device that takes the (noisy) battery voltage and steps it down to a stable voltage for the video system.
It is possible to get BECs with different output voltages. For example a 12V BEC could be used in the configuration above to power the VTx instead of connecting directly to the battery to give even more stability.
Another common choice is 5V, which can be paired with compatible video transmitter.
Most flight controllers have a 5V BEC built in so you can connect directly to that rather than have to use a separate module.
It is important to check that a BEC can supply an adequate amount of current, especially when using one that is built into a flight controller.
Lastly, if you are still having problems and you have taken the previous measures to use the optimum method of powering your VTx, you can use an LC filter to remove unwanted noise.
An LC filter is one of the most basic analog electronics circuit, which uses an inductor and capacitor to suppress electrical noise.


Conclusion
Finding the problem with an FPV video feed can sometimes be frustrating. A little knowledge and experience goes a long way to achieving good quality video.
In this article we have covered many of the basic considerations with regards to achieving a good solid FPV video feed.
It is certainly worth investing the time to get well rehearsed at building and repairing FPV systems, so hang in there and keep working towards that sweet clean video!