I bet you a set of Johnny FPV props that your question about TBS Crossfire is answered here…
Ok, maybe, maybe not, but I have compiled a list of a whole load of questions that people are asking regarding the fantastic TBS Crossfire!
So without further ado, I present to you the NoirFPV FAQ for TBS Crossfire!
Let us know if you think that there is a question which should be answered here!
- What Is TBS Crossfire?
- What Does TBS Crossfire Do?
- When Will TBS Crossfire Be Back In Stock?
- How Does TBS Crossfire Work?
- What Frequency is TBS Crossfire?
- How To Setup TBS Crossfire?
- How To Connect TBS Crossfire?
- How To Update TBS Crossfire?
- How Do I Use TBS Crossfire with TBS Fusion?
- How To Update the TBS Crossfire Nano Receiver?
- What Antenna for TBS Crossfire Nano Receiver?
- How To Bind TBS Crossfire to the Nano Receiver?
- How To Wire The TBS Crossfire Nano Receiver?
- Will TBS Crossfire Work With Spektrum?
- Which TBS Crossfire for Taranis QX7 / QX7S?
- Which TBS Crossfire for Taranis X9D?
- Which TBS Crossfire for Radiomaster TX16S?
- Can TBS Crossfire be Connected to Pixhawk?
- Can TBS Crossfire be used for RC Planes?
- Can TBS Crossfire be used for an RC car?
- Is TBS Crossfire Worth it?
What Is TBS Crossfire?
The TBS Crossfire is a long range R/C link based on the LoRa chip, a long range low power consumption digital radio transmitter.
Crossfire is a high performance, cutting-edge solution for connecting your drone to the ground. It is capable of self-healing two-way communications, ultra-low latency, and range beyond comprehension.
It now comes in three flavours:
- Full size Crossfire – the OG Crossfire transmitter with built in OLED display, capable of a whopping 2W output power.
- Crossfire Micro – Unlike the full-sized module that sits on top of a JR module adapter, the Micro is designed to go directly into the JR module bay of your transmitter.
- Crossfire Nano – The same concept as the Micro, but it fits into the ‘lite’ module bay.
What Does TBS Crossfire Do?
Crossfire has the ability to create both an uplink and downlink, utilizing bidirectional transmission in order to receive telemetry and other data from the model it is linked to.
Crossfire also features built-in WiFi and some modules also have Bluetooth. This allows data to be shared with other devices.
There Crossfire can be linked to other TBS products, such as TBS Fusion. It can also be linked to a computer in order to share telemetry data to a ground station, for example by using MAVLink.
When Will TBS Crossfire Be Back In Stock?
Like many desirable products in the FPV industry, the Crossfire can be difficult to get hold of. This is simply due to demand being greater than supply.
FPV is a relatively new development and outside of the corporate world of DJI products, it is also very niche. This means most of the companies developing the technology are fairly small.
This means that at times it can be difficult for them to keep up with the demands. This is also not helped unavoidable circumstances such as the current (at the time of writing) global chip shortage.
Personally I have successfully ordered directly from Team Black Sheep and GetFPV, both will ship internationally.
I would also recommend checking Amazon as TBS Crossfire is often available there.
How Does TBS Crossfire Work?
TBS Crossfire strives to provides a seamless experience for the user, linking the RC radio to the model for both control and telemetry data.
It is installed in much the same way as a traditional RC radio. A receiver module is installed in the model and a transmitter module is installed in the radio.
When the Crossfire transmitter is plugged into the expansion bay of a radio, it communicates with the radio over a serial connection.
The radio feeds various data to the Crossfire module, including but not limited to stick position, knob position and switch state.
The Crossfire transmits relevant data to the model over a LoRa radio link, where it is received by the Crossfire receiver. Most commonly the Crossfire Nano receiver.
In a modern system, such as an FPV drone, there is a flight controller that acts as the ‘brains’ of the model.
The Crossfire receiver communicates with the flight controller over a serial link. It passes data to the flight controller transmitted by the radio on the ground, such as stick, knob and switch movements.
The Crossfire receiver also receives telemetry data from the flight controller and transmits it back to the radio on the ground.
The Crossfire transmitter module receives the data from the model and is able to process the data in various ways.
Received data can be shared with OpenTX, the software running on the radio in order to display Telemetry data on the screen.
The data can also be sent from the Crossfire transmitter module over WiFi or Bluetooth. This data can then be shared with a ground station or another TBS product such as the Fusion.
What Frequency is TBS Crossfire?
TBS Crossfire can operate either on 868MHz or 915MHz, depending on the global region.
TBS Crossfire also makes use of the 2.4GHz band for WiFi/Bluetooth connections to other equipment, such as TBS Fusion or a laptop ground station.
In Europe, India and Russia, Crossfire should be used on the 868MHz setting. In the rest of Asia, Australia and both North and South America, Crossfire should be used on the 915MHz setting.
TBS Crossfire makes use of a long range LoRa radio chip in order to establish a bidirectional data link between the UAV and the ground.
The bands that should be used by geographical region are as follows (source):
Europe
- Band: EU868
- Frequency: 863MHz – 870/873MHz
- Crossfire setting: 868MHz
South America
- Band: AU915/AS923-1
- Frequency: 915MHz – 928MHz
- Crossfire setting: 915MHz
North America
- Band: US915
- Frequency: 902MHz – 928MHz
- Crossfire setting: 915MHz
India
- Band: IN865 (7 channels are legal)
- Frequency: 865MHz – 867MHz
- Crossfire setting: 868MHz
Asia
- Band: AS923
- Frequency: 915MHz – 928MHz
- Crossfire setting: 915MHz
Australia
Band: AU915/AS923-1
Frequency: 915MHz – 928MHz
Crossfire setting: 915MHz
How To Setup TBS Crossfire?
The following details a brief summary of what is required in order to set up Crossfire in a common FPV build:
- Install the Crossfire Tx module in the radio expansion bay where applicable.
- Full sized Crossfire modules need to be connected to included JR module bay adapters and stuck with included adhesive tape.
- Micro and Nano modules are simply inserted directly in the radio expansion bay.
- Wire the Crossfire Rx +5V pin to a +5V output pin on the flight controller.
- Wire the Crossfire Rx GND pin to a GND pin on the flight controller.
- Wire the Crossfire Rx signals to the flight controller receiver input.
- SBUS requires SBUS Tx pin to flight controller.
- CRSF requires CRSF Tx pin to flight controller.
- CRSF can optionally receive CRSF, usually from the flight controller or directly from the VTx. Use the CRSF Rx pin.
- PPM requires PPM out to flight controller.
- Install the shrinkwrap around the Crossfire Rx where applicable.
- Install the Crossfire Rx in the chassis of the drone.
- Sixty9 Rx can be mounted with screws on the stack.
- Nano Rx can be mounted with cable ties and/or a sticky pad.
- Power up the drone and press the small bind button on the Crossfire Rx.
- Power up the radio / Crossfire Tx module and choose bind from the menu to connect to the Rx.
- Connect the Crossfire Tx to the USB port of a computer and use Agent M to update the firmware on the Tx modules (must use Chrome browser).
- During the Crossfire Tx firmware update, also update the Crossfire Rx firmware over the air when prompted.
How To Connect TBS Crossfire?
The best method of connecting TBS Crossfire to a modern flight controller is to use the TBS proprietary protocol, CRSF.
This protocol is designed to get the most out of TBS Crossfire and is supported by mostly all modern flight controllers.
CRSF is fully supported on Betaflight and Kiss flight controller software. It is also supported by other well known software solutions, such as Ardupilot and iNAV.
However it is also possible to connect TBS Crossfire by various different methods to allow for a very wide range of setup configurations.
Some examples of different supported standards are as follows:
- CRSF – Bidirectional serial communication between Crossfire and other devices.
- SBUS – Unidirectional serial communication from the receiver to other devices.
- PPM – A modulating analog output, suitable for connecting older devices.
- PWM – Analog output for direct connection to servos or ESCs.
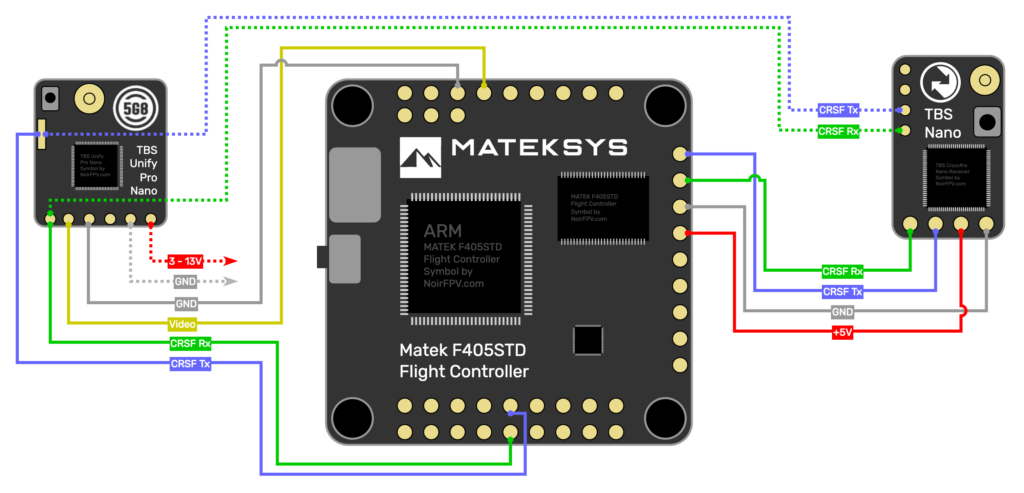
The following diagram shows a typical setup using Crossfire and a Matek F405STD flight controller.
For further information about how to connect TBS Crossfire, check out the guide for either Crossfire Nano or Crossfire Nano Diversity receivers.
How To Update TBS Crossfire?
The easiest way to update TBS Crossfire is to use Agent M and complete the following steps:
- If you do not have Chrome browser, download and install it first.
- Connect your Crossfire transmitter module to the computer using a USB cable (a good quality is advised to prevent problems).
- Power up the Crossfire receiver, either by;
- Removing the propellers from the drone and then connecting a LiPo battery.
- Plugging the flight controller into a spare USB port.
- Navigate Chrome browser to the TBS Agent M page.
- Click link to device and choose TBS Crossfire. Click the connect button.
- Choose XF Transmitter from the list of connected devices.
- Click the firmware tab at the bottom of the page.
- Click the version of firmware you wish to update to and click the update button.
- Allow the firmware update to complete. It is important you leave the browser tab in focus.
- Once the firmware has updated, click the back arrow in the top left to return to the devices screen.
- Choose the XF receiver from the list of connected devices.
- Repeat from step 8 to update the receiver firmware over the air.
That’s it! Your Crossfire transmitter and receiver should have been successfully updated. For further information on how to use Agent M, check out this post.
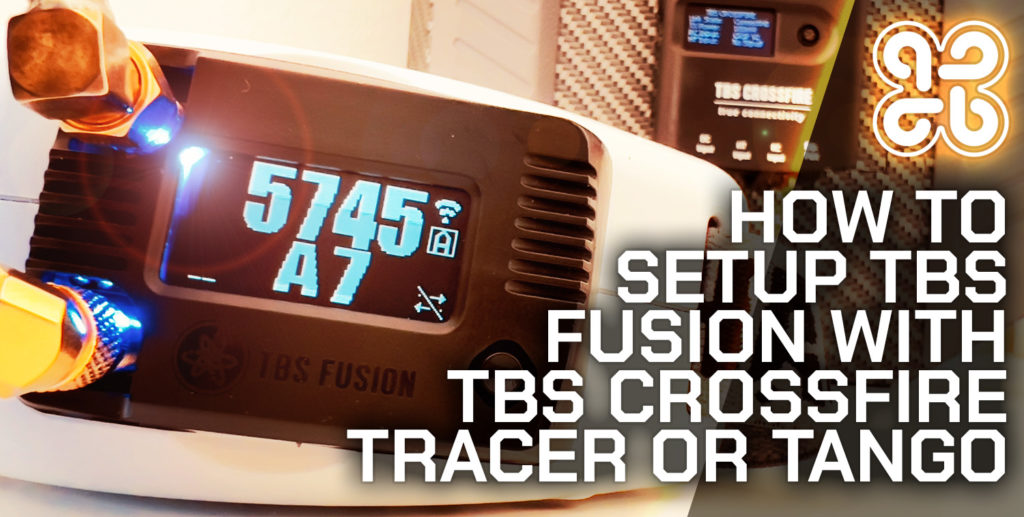
How Do I Use TBS Crossfire with TBS Fusion?
Linking your TBS Fusion with your TBS Crossfire, Tracer or Tango is definitely worth the effort! This is the secret weapon that makes the Fusion the only choice for Crossfire/Tracer owners and TBS fans.
It unlocks some really cool new features, most notably the ability for your Fusion to sync with your video transmitter.
I have written an entire guide on how to get the most out of TBS Fusion, you should check out this section which details how to connect TBS Crossfire with TBS Fusion.
How To Update the TBS Crossfire Nano Receiver?
The easiest way to update the TBS Crossfire Nano receiver is by using Agent M, which is a Chrome browser based firmware updater.
The TBS Crossfire Nano receiver is updated over the air (OTA) via the TBS Crossfire transmitter. A summary of the process is as follows:
- Connect the TBS Crossfire transmitter to the computer with a USB cable.
- Power up the Crossfire receiver, either by;
- Removing the propellers from the drone and then connecting a LiPo battery.
- Plugging the flight controller into a spare USB port.
- Make sure the transmitter and receiver modules are linked. If not then you need to bind them first.
- Open Agent M and connect to the TBS Crossfire transmitter.
- Once connected, the Nano receiver will appear as separate device in Agent M. From there you can update the firmware like any other TBS device.
For a complete guide on how to complete this process, simply follow the section in this guide detailing how to update TBS Crossfire. It covers updating the firmware for both the transmitter and any Crossfire receiver.
What Antenna for TBS Crossfire Nano Receiver?
The best performing antenna to use on the TBS Crossfire Nano receiver is the full-sized immortal-T antenna.
The best antenna to use when weight is the primary concern, such as when racing, is the XF Race antenna.
The best antenna to use on a small build is the miniaturized version of the immortal-T.
Immortal-T

XF Race

Mini T

Immortal T
This antenna has been designed to give the best performance from the TBS Crossfire system, whilst being as practical as possible in terms of surviving crashes.
Where weight is not so much a concern, this antenna is capable of insane range, even when transmitting telemetry!
When reliability and durability are a key concern, such as when flying freestyle, the Immortal-T is the best choice of antenna.
Check the price of the Immortal-T at Amazon.
XF Race
Although this antenna is idea for 5-inch freestyle quads and macro quads, in many cases the full-sized Immortal-T will perhaps be too large and bulky.
Racing quads would certainly benefit from using the XF Race antenna. The goal of this antenna is to be as small and light as possible.
It will not give the same range as the Immortal-T but it will easily compete with a long range 2.4GHz, which is more than adequate for most racing scenarios.
Check the price of the XF Race antenna at Amazon.
Mini T
For smaller builds such as sub 3-inch and tinywhoops there are smaller versions of the Immortal-T antenna that bring some of the same benefits.
You will not get the same range as with the full size antenna but usually they provide more than enough range, considering the total capability of the Crossfire!
Check the price of the Mini-T antenna at Amazon.
How To Bind TBS Crossfire to the Nano Receiver?
TBS Crossfire makes the binding process very straightforward. Simply complete the following steps:
- Power up the TBS Crossfire transmitter module, either by:
- Powering up the radio in which it is inserted into.
- Connecting it to a computer using a USB cable.
- Power up the Crossfire receiver, either by;
- Removing the propellers from the drone and then connecting a LiPo battery.
- Plugging the flight controller into a spare USB port.
- Ensure that both the transmitter and receiver firmware are matching and up to date. See here to learn how to update the Crossfire firmware.
- Put the TBS transmitter module into bind mode;
- Full sized Crossfire modules / TBS Tango – use the OLED menu to navigate to the bind option.
- Micro Crossfire modules – push the button on the module once.
- Agent / Lua script – locate the bind option in the menu system.
- Press the small bind button on the receiver (within 1 minute of powering up).
- Go ahead and update the receiver firmware if you are prompted.
- Once binding is complete you should get a;
- Sold green or blue LED on the transmitter, depending on the mode.
- Sold green LED on the receiver.
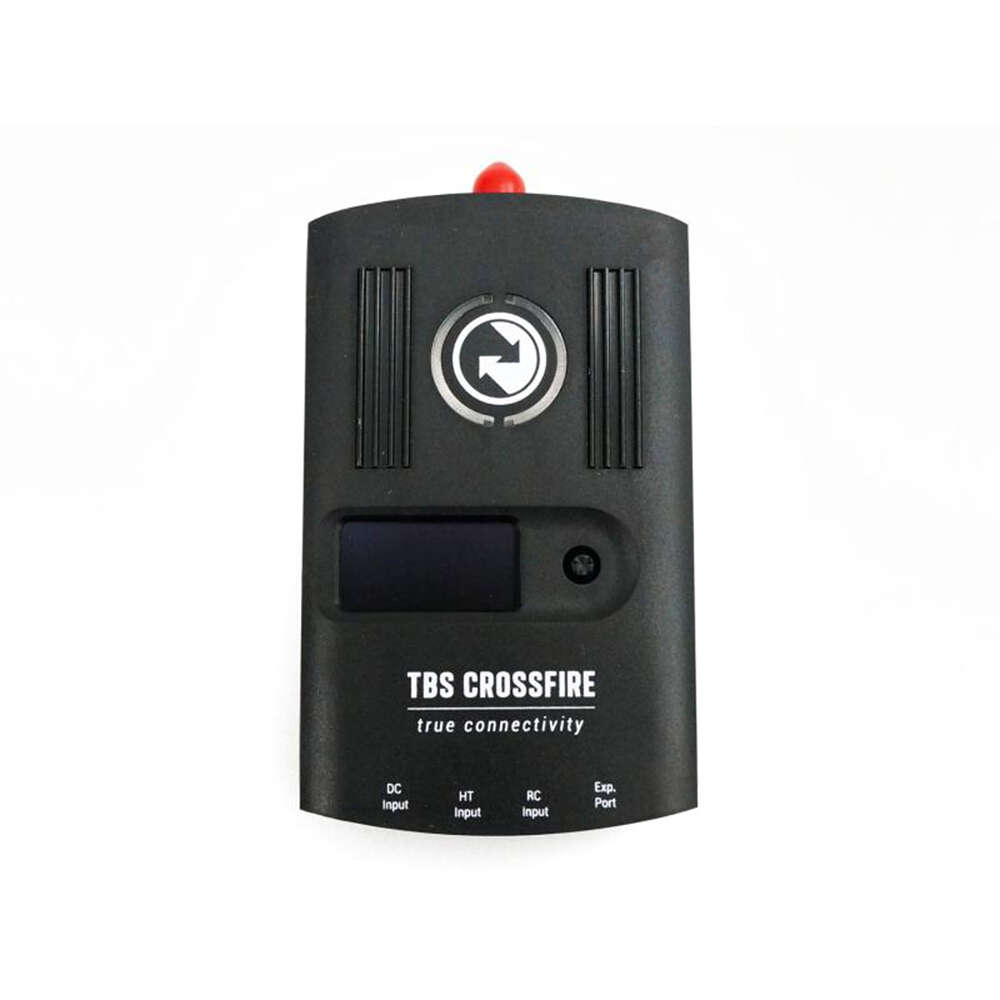
How To Wire The TBS Crossfire Nano Receiver?
The TBS Crossfire Nano receiver has 8 through-hole solder pads which need to be soldered either to a header or wiring harness.
Not all pads needs to be connected, it depends on the application. However it is common the most common setups use the following 4 solder pads:
- +5V to supply the XF Nano with power.
- GND to complete the power supply circuit.
- CH1 for the RC signal.
- CH2 for telemetry data.
The following diagram shows a typical setup using Crossfire and a Matek F405STD flight controller.
In a common setup, the 4 aforementioned solder pads on the XF Nano receiver should be soldered to the included wires.
These wires should be soldered to the corresponding pads on the flight controller.
Each flight controller is different, so you should consult the manual for your particular flight controller in order to know which pads to use.
For more information, check out the guide to wiring either the TBS Nano Receiver or the TBS Nano Diversity Receiver.
Will TBS Crossfire Work With Spektrum?
TBS Crossfire will work with Spektrum radios, however the setup process is not as straightforward as with other radios due to the lack of an expansion bay.
Spektrum radios are only compatible with the original full sized Crossfire module.
Due to the lack of an expansion bay it is not possible to use the Micro or Nano Crossfire modules, both of which need an expansion bay for installation.
In absence of an expansion bay, the Spektrum user must find a way to mount the Crossfire module to the back of the radio. 3D printing a mount would be a good idea but double-sided sticky pads would suffice.
Some of the higher end Spektrum radios already have a serial port on the back. In which case you can connect the Crossfire to the radio with an adapter lead.
Spektrum radios that do not have a serial port can be modified to include a serial port. US customers can have this done by Spektrum to preserve the warranty. Alternatively it can be done at home as a DIY job.
Which TBS Crossfire for Taranis QX7 / QX7S?
The Taranis QX7, QX7S, QX7 ACCESS and QX7S ACCESS all feature a JR module bay, therefore both the full sized Crossfire and Crossfire Micro are compatible.
The primary difference between these two modules is the output power and the way in which the settings are changed.
It is also possible to convert a Crossfire Nano to work in the JR bay using this conversion kit.

Full-sized Crossfire
The full-sized Crossfire module can output a whopping 2W (when connected to an additional battery) and has a built-in OLED display and hat switch.
I would recommend the full-sized Crossfire to anyone who wants to fly ultra-long range. By ultra-long range I mean with a GPS, possibly using a ground station and likely with iNAV or Pixhawk.
The full-sized module has both Bluetooth and WiFi built in, the former of which can be used to link to a ground station with MAVLink.
There is also a Lite version of the full-sized module that omits the Bluetooth function if you don’t wish to use a ground station.
Check the latest price of full-sized Crossfire on Amazon.
Micro Crossfire
The Micro Crossfire is a cheaper and more compact offering, still capable of outputting a very respectable 1W of power and it can be configured by OpenTX within the QX7 menu (via a Lua script).
In most cases the Micro Crossfire is going to be the correct choice of module for a QX7 owner.
The output power is likely more than anyone would ever need, unless they are doing ultra-long range (see above).
The built-in WiFi allows connectivity between other devices such as Fusion and the TBS cloud.
For anyone who enjoys casually flying in fields or flying freestyle, the Micro Crossfire is the ideal choice, even when flying some distance.
With a normal setup comprising of a video receiver and antenna attached to goggles, you will run out of video range well before Crossfire Micro starts to struggle!
Check the latest price of Crossfire Micro on Amazon.
Which TBS Crossfire for Taranis X9D?
The Taranis X9D features a JR module bay, therefore both the full sized Crossfire and Crossfire Micro are compatible.
The primary difference between these two modules is the output power and the way in which the settings are changed.
It is also possible to convert a Crossfire Nano to work in the JR bay using this conversion kit.
In terms of choosing the most suitable module, the process is the same as with the QX7 family.
Which TBS Crossfire for Radiomaster TX16S?
The Radiomaster TX16S features a JR module bay, therefore both the full sized Crossfire and Crossfire Micro are compatible.
The primary difference between these two modules is the output power and the way in which the settings are changed.
It is also possible to convert a Crossfire Nano to work in the JR bay using this conversion kit.
In terms of choosing the most suitable module, the process is the same as with the QX7 family.
Can TBS Crossfire be Connected to Pixhawk?
TBS Crossfire can be connected to Pixhawk and it is also possible to use the CRSF protocol, which is supported by both Ardupilot and PX4.
Crossfire also supports MAVLink serial bridge, which allows Pixhawk to communicate with a ground station via the Crossfire radio link.
This can be achieved by using a full-sized Crossfire module equipped with Bluetooth.
Connecting the Crossfire Bluetooth to a laptop creates a Bluetooth serial port, which can be selected in ground station software such as APM Planner.
Therefore it is possible to achieve a completely bidirectional serial link between Pixhawk and ground station software as well as a rock solid control uplink.
Crossfire is an excellent choice for Pixhawk users. If you are trying to decide whether Pixhawk is right for your project there is some further reading here.

Can TBS Crossfire be used for RC Planes?
TBS Crossfire can be used with RC planes and it is an excellent choice. It is not even necessary to have a flight controller.
It is possible to configure Crossfire as a direct radio link, with the Crossfire receiver connecting directly to servos and ESCs using PWM.
For example the Nano receiver has 6 outputs which can be configured either as digital IO for serial data to be transmitted and received, or they can be configured as PWM channels to drive servos or ESCs directly.
The easiest way to use Crossfire without a flight controller is to mount the receiver on a PWM adapter.
This adapter gives your Nano receiver standard servo/ESC plugs, turning it into a more traditional RC receiver!

Nano RX PWM Adapter
It is of course possible to use TBS Crossfire in an RC plane that has a flight controller suitable for a wing. In this case the setup is very similar to that of a drone.
Although TBS Crossfire is a very well known radio link for quadcopters, it was designed as a universal RC link by a company that has roots in ultra-long range FPV.
Can TBS Crossfire be used for an RC car?
TBS Crossfire can be used for an RC car, as it is possible to output stick movements directly as a PWM signal.
These PWM signals can be fed to the steering servo and either the throttle servo (in a Nitro car) or electronic speed controller (ESC in an electric car).
Setting the TBS Crossfire to directly output stick movements allows Crossfire to function in the same way as a traditional RC radio.
It is also possible to use TBS Crossfire with a Pixhawk running Ardupilot Rover, which would give autonomous functionality to an RC car. Awesome!
Is TBS Crossfire Worth it?
Yes, the TBS Crossfire is certainly a worthwhile investment for anyone who has dipped their toe in the world of FPV and become addicted!
Total beginners should invest in a decent radio first and ensure that it has a JR or X-lite expansion bay. The native receiver to the radio can be used in a first drone build as it will suffice for a total beginner.
However if FPV is something that you become serious about, it would absolutely be worth getting a Crossfire system.
I have been a Crossfire user since the OG full-sized module was first released and I put the original diversity receiver in a very large wing with MAVLink and Pixhawk / Ardupilot.
I have always loved TBS products and I really like what they are doing with the TBS ecosystem. I now have Crossfire linked to Fusion for freestyle flying and I love it!
Since I began travelling I no longer have a large wing and I only fly freestyle, therefore the full-size module is a little overkill for me. Had I been buying today, I would choose the Micro Crossfire.
With that said, I do have an ultra-long range itch and some plans to join the cinematic 7-inch pilots soon so perhaps that 2W transmitter will be pushed a little further in the future… 😉
I hope this article helped you with Crossfire and many thanks for visiting! I would love to hear from you if you think there is something that could be added.