If you want a solid and reliable return to home function, or even the ability to fly waypoint missions, INAV is the ultimate choice of firmware for your flight controller.
This guide can help you quickly set up and start using INAV configurator on your Windows, Linux, or Mac system to download, install, and configure the INAV firmware for flashing, all within 5 minutes.
Choose your operating system to get started, or continue reading for an introduction to INAV.

- What is INAV Configurator?
- How to Install INAV Configurator on Windows
- How to Install INAV Configurator Mac OS
- How to Install INAV Configurator on Ubuntu Linux
- Troubleshooting: My Flight Controller is Not Recognised
- How to Flash the INAV Firmware Using INAV Configurator
- Troubleshooting INAV Firmware flashing
What is INAV Configurator?
INAV Configurator is a graphical user interface (GUI) tool used to configure and flash the INAV firmware on flight controllers that are commonly used in multirotor drones, fixed-wing planes, and other unmanned vehicles.
It allows users to change various settings related to the vehicle’s flight behavior and features, such as PID tuning, receiver and sensor calibration, and GPS configuration, among others.
INAV Configurator supports various operating systems, including Windows, Linux, and macOS, and is an essential tool for anyone who wants to use the INAV firmware on their quad.
One of the stand-out features of the most interest is the return to home (RTH) functionality.
Those who are looking for a considerably more reliable system for bringing their quad home in the event of signal loss or similar failure will be delighted at the performance of INAV RTH.
Unlike the Betaflight rescue mode, the INAV RTH system firmware is has been developed over a much longer period of time and is far more capable, making use of the magnetometer for guidance.
INAV RTH therefore outperforms Betaflight rescue mode both in terms of functionality and reliability.
How to Install INAV Configurator on Windows
To install INAV Configurator on Windows, simply follow these steps:
- Go to the INAV Configurator Github page at https://github.com/iNavFlight/inav-configurator/releases.
- Scroll down to the “Assets” section and find the latest release version that matches your system’s architecture (Win 32-bit or Win 64-bit).
- Click on the relevant download for your system, “INAV-configurator_winXX_X.X.X-setup.exe” in order to start the download process.
- Once the download is complete, locate the downloaded file and double-click on it to start the installation process.
- Follow the on-screen instructions to complete the installation process.
- Once the installation is complete, launch the INAV Configurator by double-clicking on its icon on your desktop or in the Windows Start menu.
- That’s it! You should now have INAV Configurator installed and ready to use on your Windows system.
That’s it! With INAV Configurator installed on your Windows machine and your flight controller connected, you can customize your drone’s flight characteristics and achieve the best possible performance.
Next, learn how to install the INAV firmware on your flight controller using the INAV configurator.
How to Install INAV Configurator Mac OS
To install INAV Configurator on Mac OS, you can follow these steps:
- Go to the INAV Configurator Github page at https://github.com/iNavFlight/inav-configurator/releases.
- Scroll down to the “Assets” section and find the
.dmgimage file for Mac OS. The installer is universal so will work on both Intel and Apple Silicon machines. - Click on the “INAV-configurator_MacOS_x.x.x.dmg” file to start the download process.
- Once the download is complete, locate the downloaded file and double-click on it to mount the disk image.
- Drag and drop the INAV Configurator app into your Applications folder.
- Launch the INAV Configurator by opening the Applications folder and double-clicking on its icon.
That’s it! With INAV Configurator installed on your Mac OS, you can customize your drone’s flight characteristics and achieve the best possible performance.
Next, learn how to install the INAV firmware on your flight controller using the INAV configurator.
How to Install INAV Configurator on Ubuntu Linux
- Download the latest release of INAV Configurator for Linux from the official INAV Github page: https://github.com/iNavFlight/inav-configurator/releases
- Once the download is complete, open a terminal window and navigate to the directory where you downloaded the file using the terminal.
- Extract the contents of the downloaded file by running the following command. Replace
<version>with the version that you downloaded:
tar -xvzf INAV-configurator_<version>.tar.gz
- Navigate to the extracted directory by running the following command:
cd INAV\ Configurator/
- Set the permissions for the INAV Configurator executable file by running the following command:
chmod +x inav-configurator
- Run the INAV Configurator by executing the
inav-Configuratorbinary in the current directory:
./inav-Configurator
- In the INAV Configurator window, select the appropriate serial port from the drop-down menu in the top-right corner of the screen.
- Next, click the Connect button to establish a connection with your flight controller.
- Once the connection is established, you can use the INAV Configurator to configure and flash the INAC firmware and adjust INAV parameters.
That’s it! With INAV Configurator installed on your Mac OS, you can customize your drone’s flight characteristics and achieve the best possible performance.
Next, learn how to install the INAV firmware on your flight controller using the INAV configurator.
Troubleshooting: My Flight Controller is Not Recognised
If your INAV flight controller is not recognized when you plug it in via USB, there are a few things you can try:
- Verify that the USB cable you are using is functioning properly. Consider using a different USB cable as some cables meant for charging may not have the extra wires necessary for data communication (this has caught me out before!).
- Attempt plugging the flight controller into a different USB port on your computer as certain USB ports may be malfunctioning.
- Check if your flight controller has a bootloader mode, which may be required to establish communication. Instructions for entering bootloader mode vary by flight controller and can be found in the user manual or manufacturer’s website.
- Install the necessary drivers for your flight controller. Most flight controllers use either the CP2102 or FTDI chipset for USB communication.
- Test the flight controller with a different computer to confirm the issue. If the problem persists, the flight controller may be defective and need to be replaced.
How to Flash the INAV Firmware Using INAV Configurator
It is recommended to make a backup of your current configuration before flashing new firmware. Also, make sure to read the release notes and instructions carefully before updating the firmware.
To update or install the INAV firmware with INAV Configurator, you can follow these steps:
- Connect your flight controller board to your computer using a USB cable.
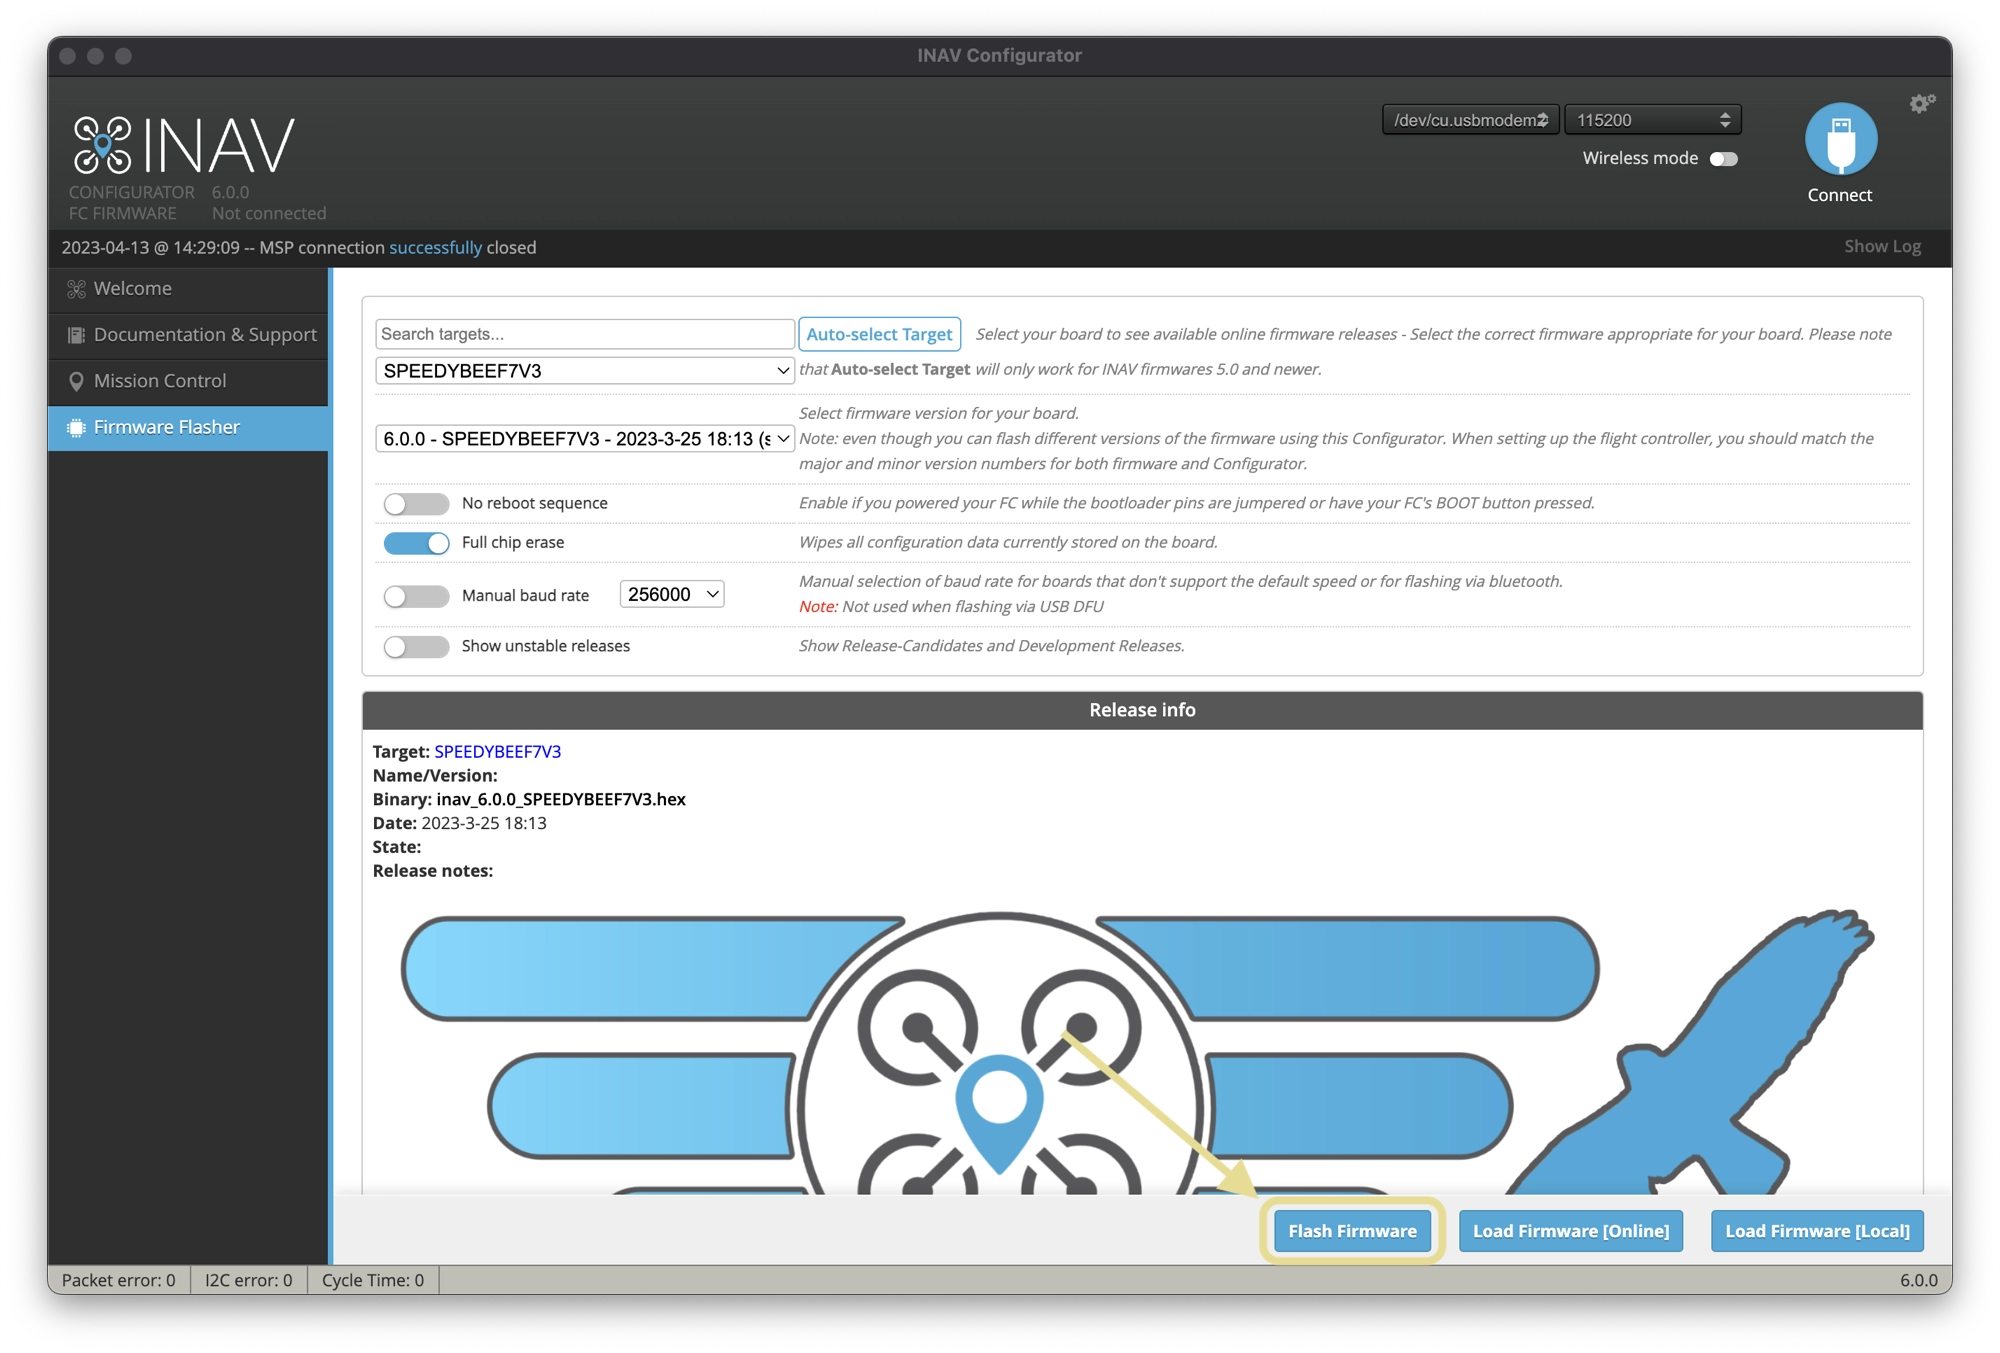
- Open INAV Configurator and click Firmware Flasher in the left-hand sidebar.
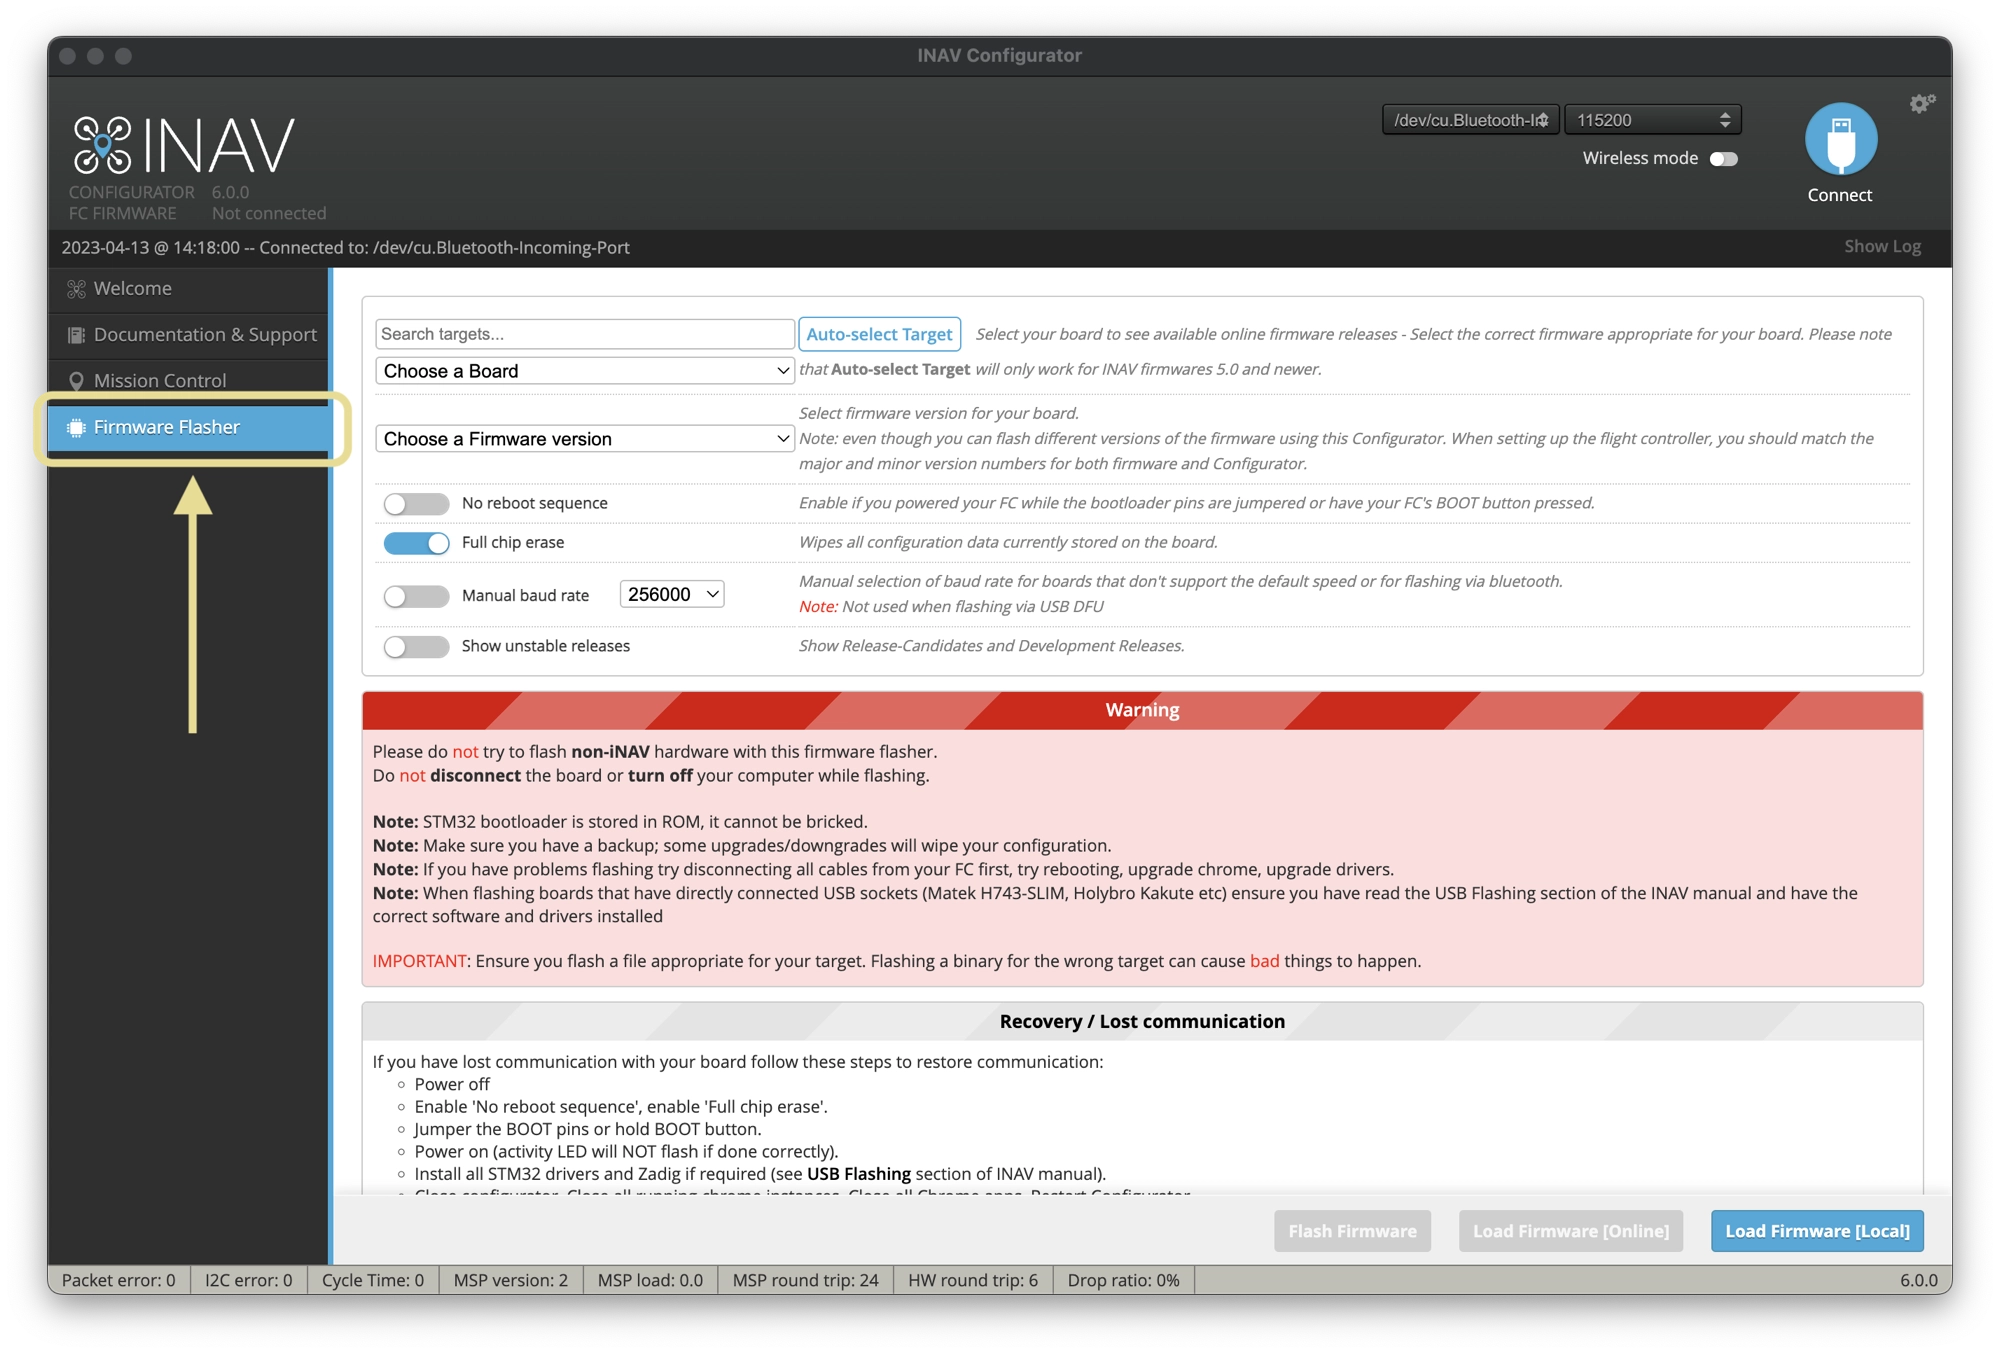
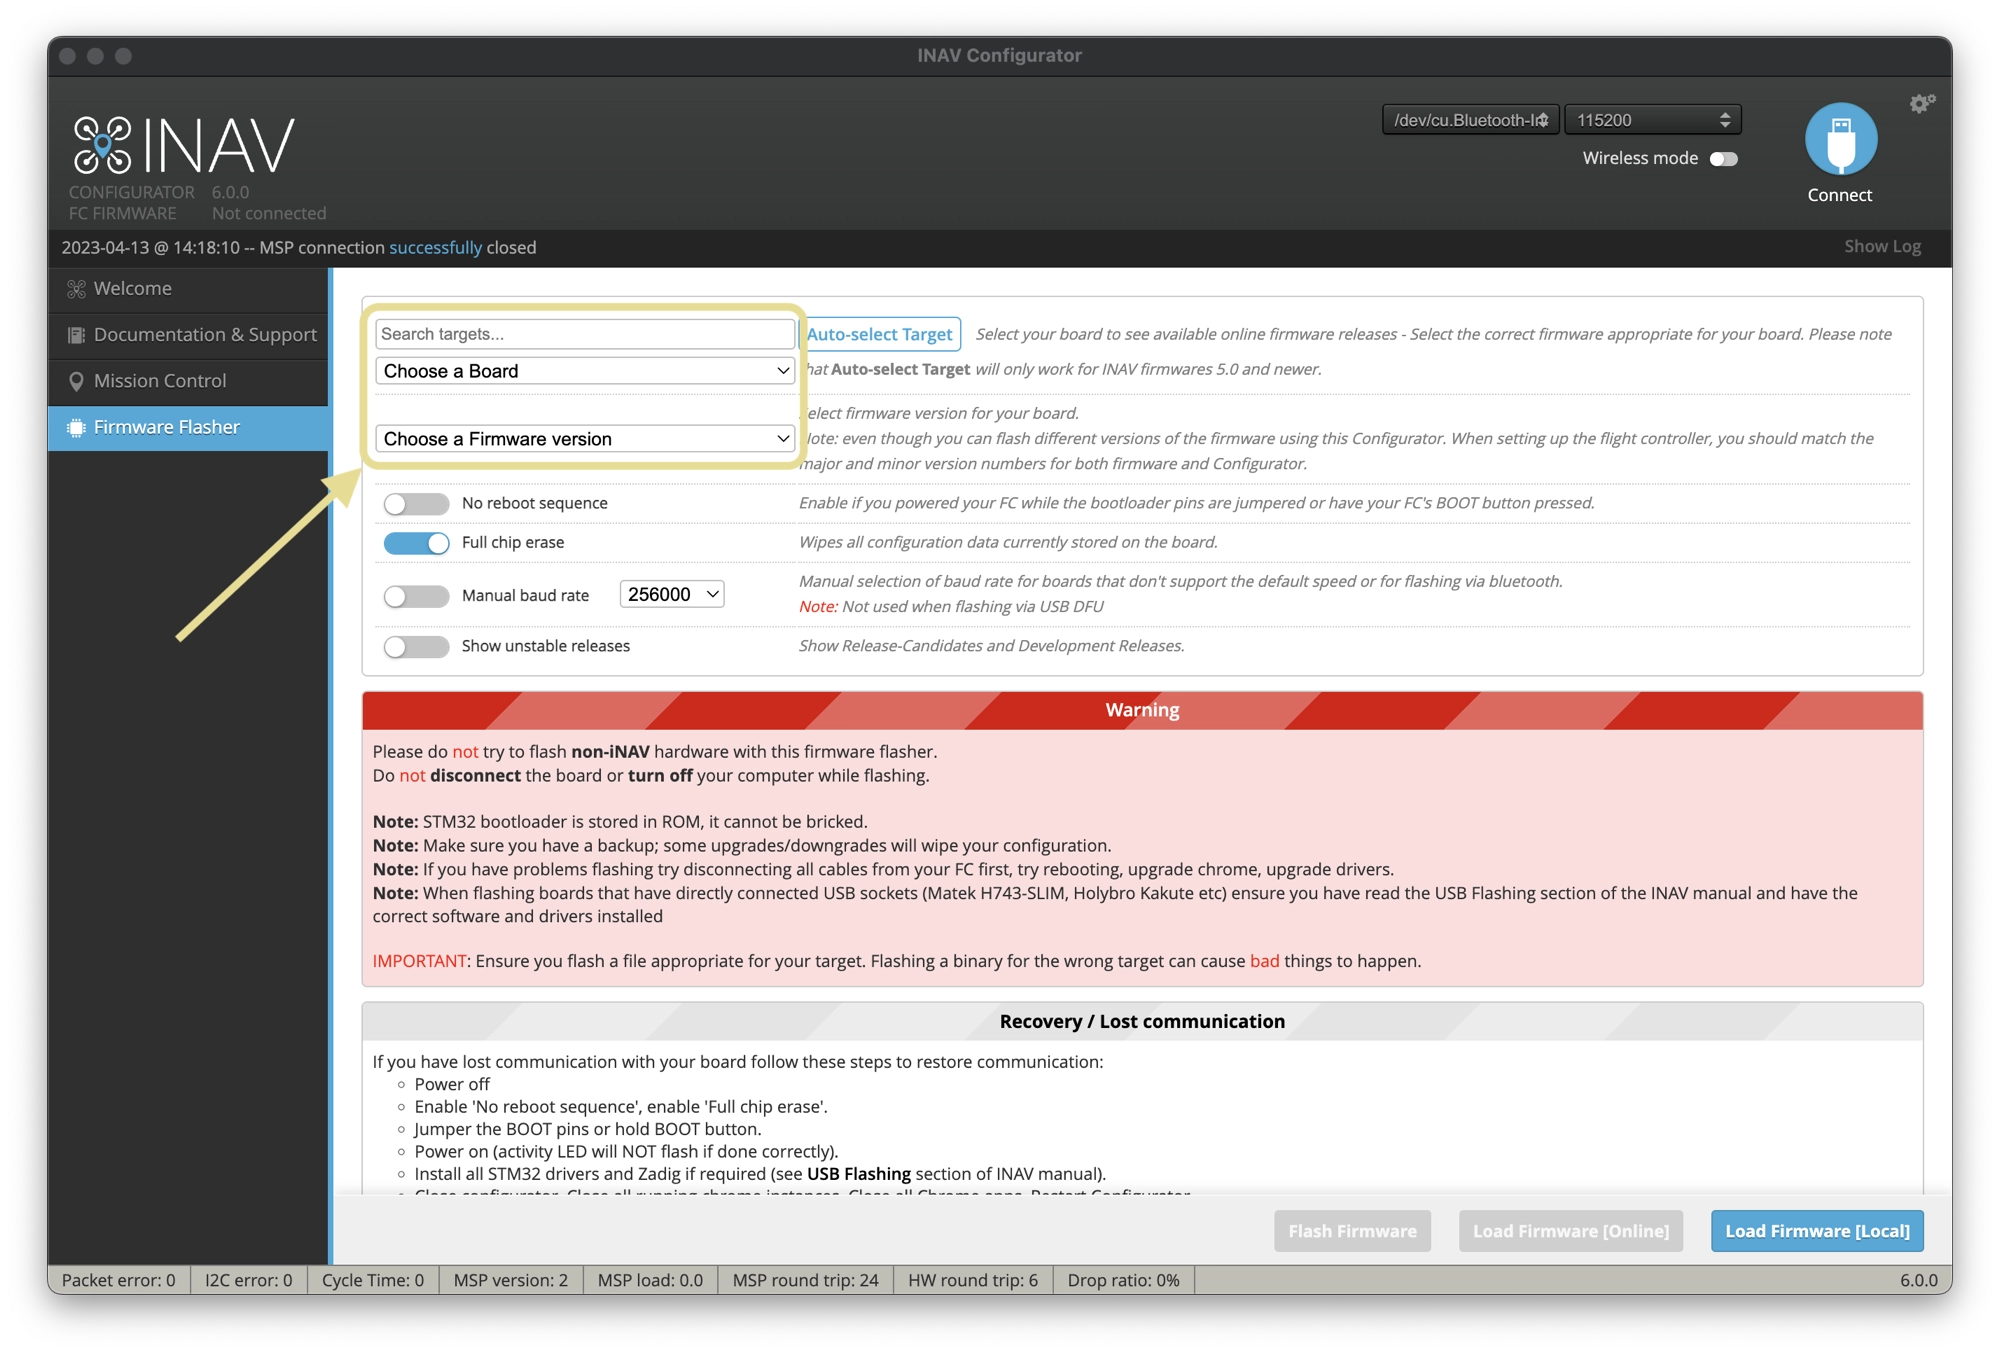
- Select the firmware version you want to install from the dropdown menu. It is recommended to use the latest stable release version. If you are updating from INAV 5.0, you can use the Auto-select Target function.
- Make sure the firmware target matches your flight controller board. You can check this information on the board’s product page or user manual.
- Click on the Load Firmware [Online] button to download the firmware file from the INAV server. Alternatively, you can load a locally saved firmware file by clicking on the Load Firmware [Local] button.
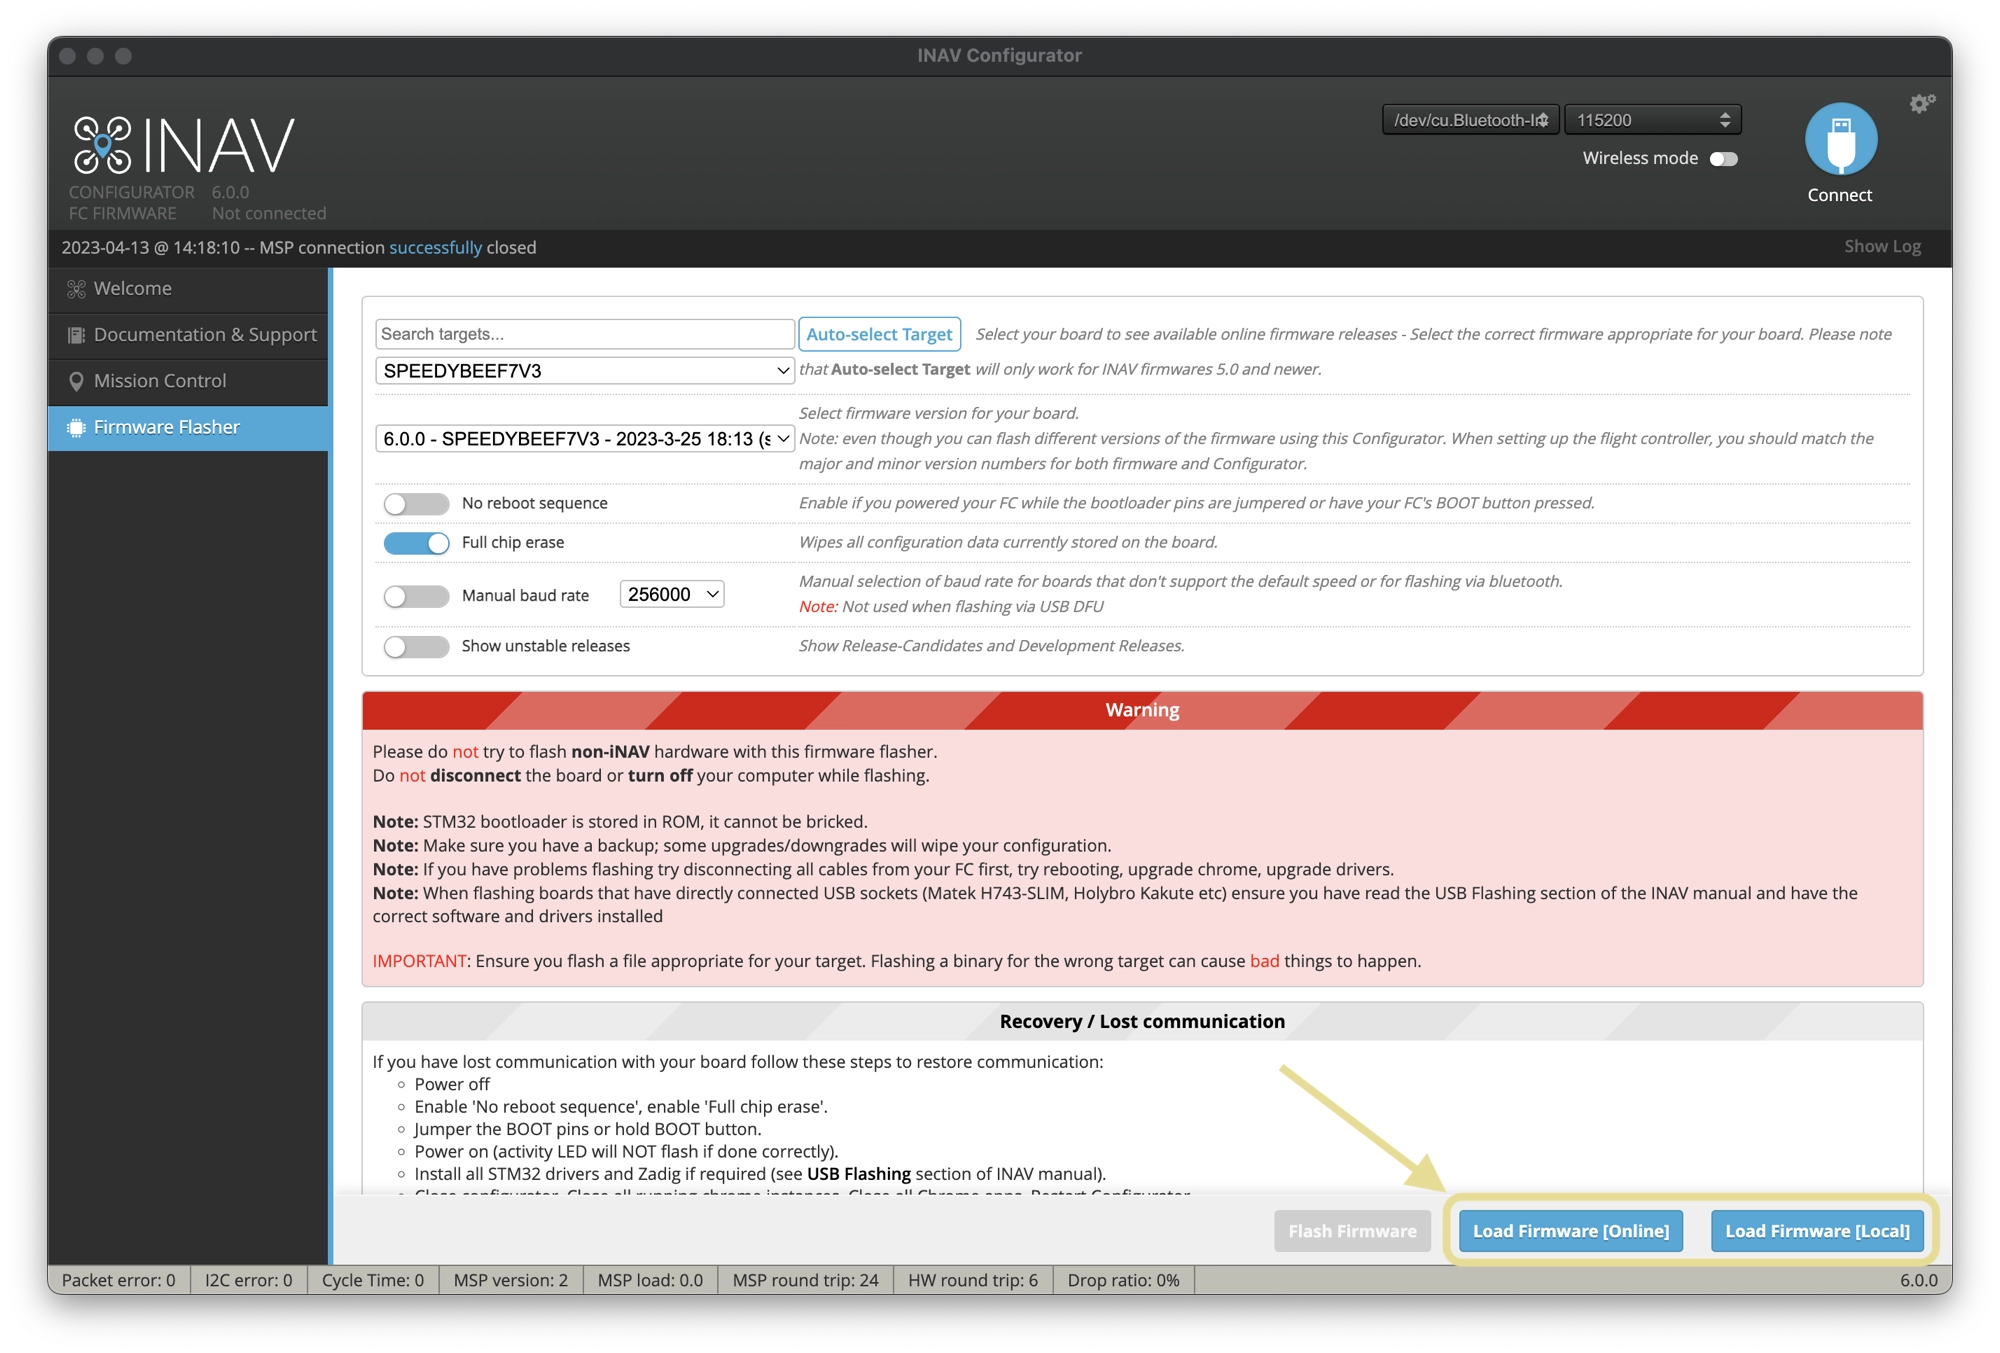
- Once the firmware file is loaded, click on the Flash Firmware button at the bottom of the screen to start the flashing process.
- If you are switching from a different firmware (such as Betaflight), switch on the Full Chip Erase option.
- Wait for the process to finish. It may take a few minutes. Do not disconnect the USB cable or power off your flight controller board during the flashing process.
- After the firmware is flashed successfully, disconnect and reconnect your flight controller board, then go to the Setup tab to configure your flight controller settings as needed.
Troubleshooting INAV Firmware flashing
If you are having difficulties with flashing the firmware, first try the following steps:
- First, turn the flight controller and quad off (disconnect the USB cable).
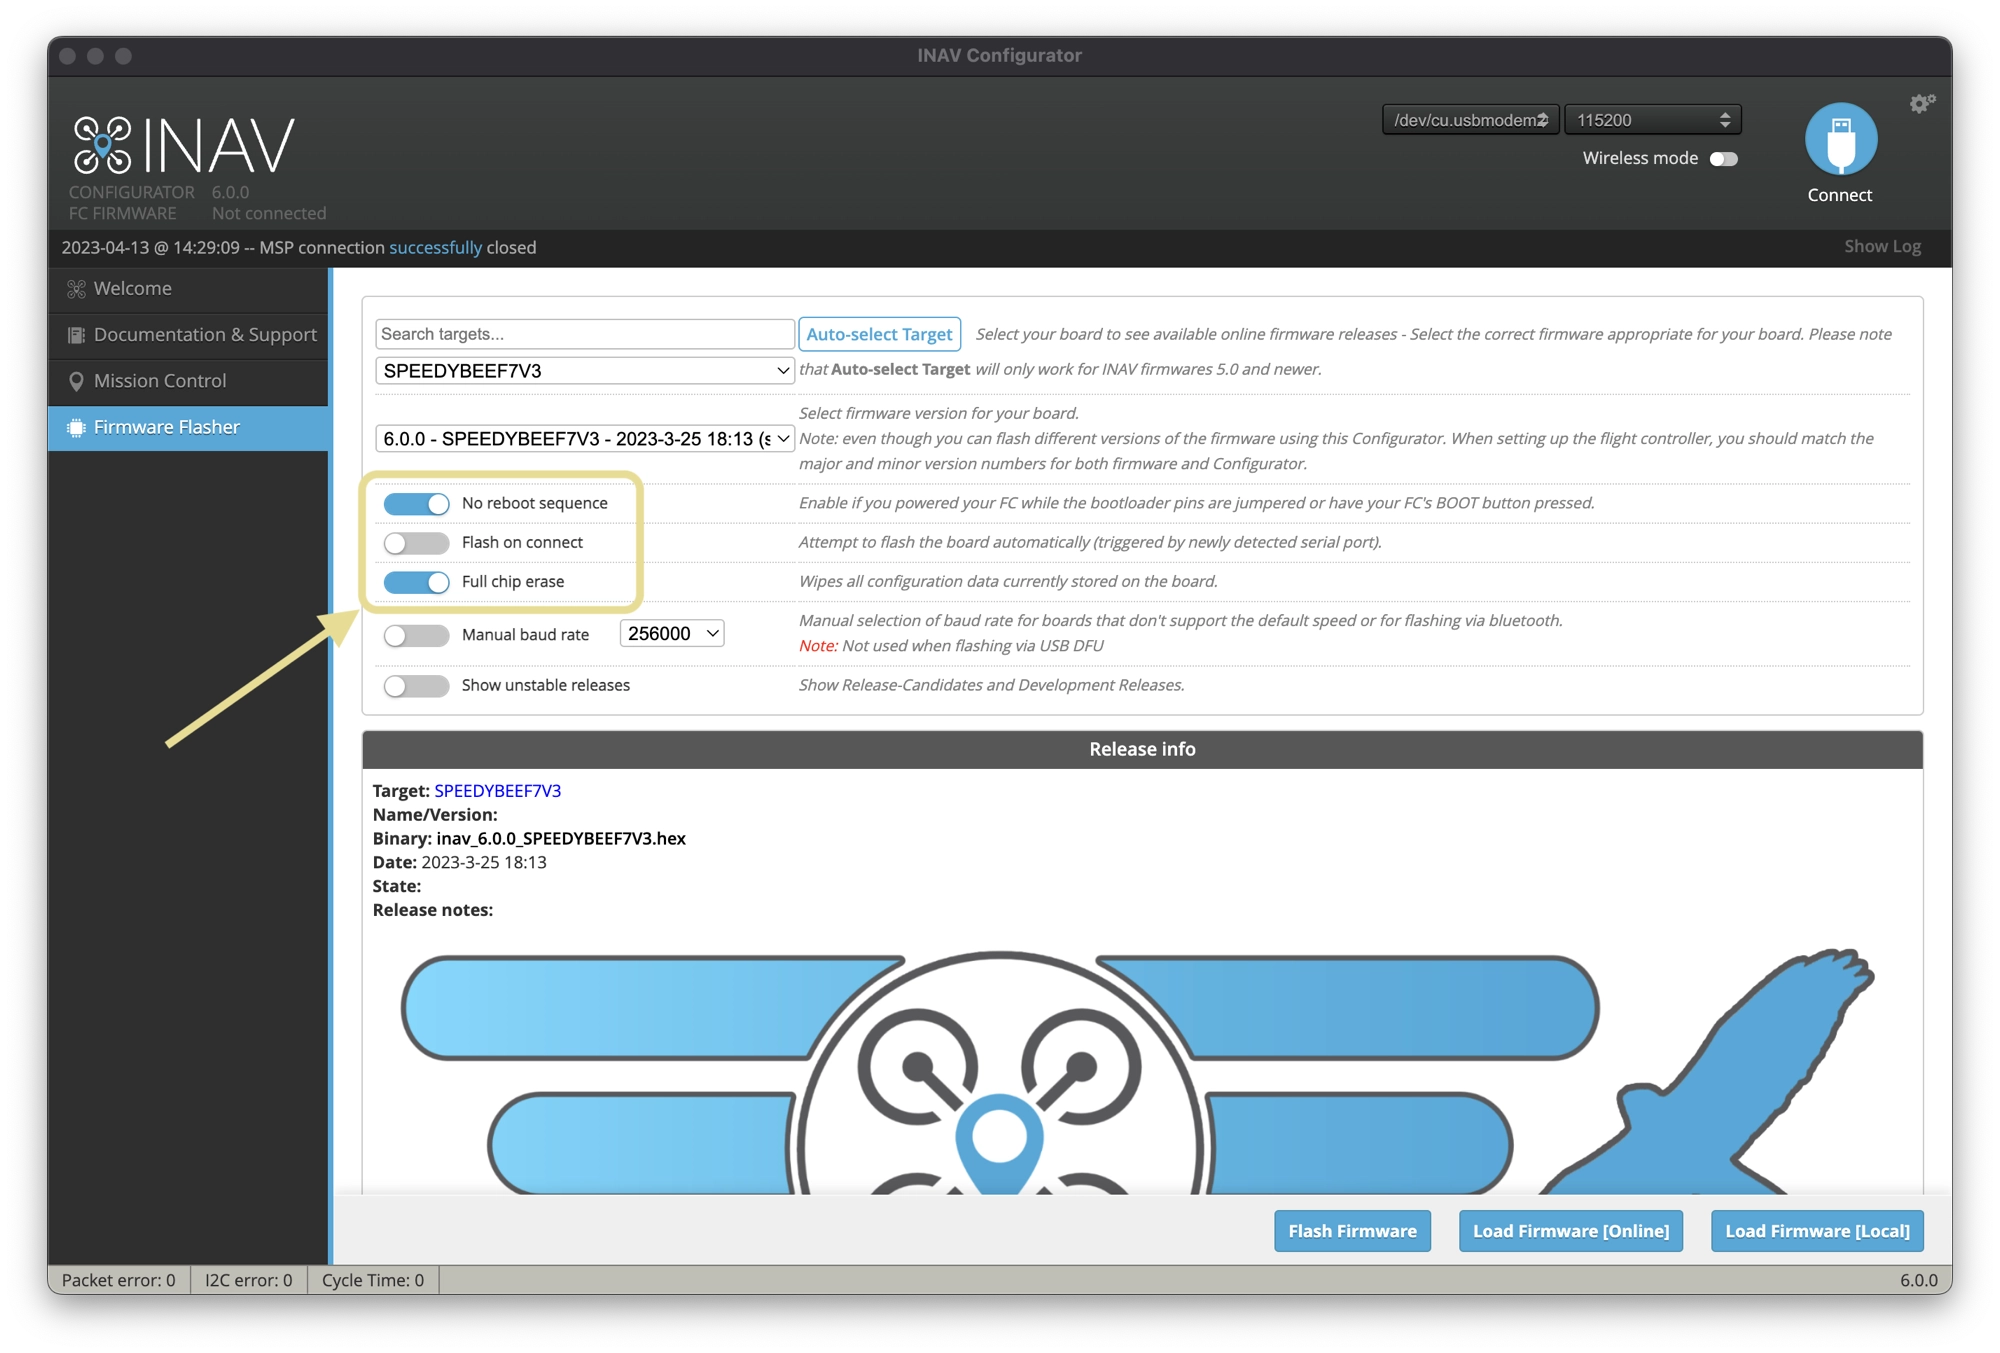
- Repeat the process above, ensuring that Full Chip Erase and No Reboot Sequence are enabled.
If you are still having problems or you have lost communicate with your flight controller, try the following steps:
- Power off the flight controller
- Enable No Reboot Sequence and enable Full Chip Erase.
- Jumper the BOOT pins or hold BOOT button (see your flight controller manual for how to put it into DFM bootloader mode).
- Power on the flight controller (activity LED will NOT flash if done correctiv).
- Install all STM32 drivers and Zadig if required (see USB Flashing section of the INAV manual).
- Close and rester INAV Configurator.
- Release BOOT button if your FC has one.
- Flash with correct firmware (using manual baud rate if specified in your FC’s manual).
- Power off the flight controller again.
- Remove BOOT jumper if you installed one.
- Power on the flight controller (activity LED should flash).
- Connect normally.

Pingback: relx
Pingback: ปริ้นแผ่นพับ
Pingback: Massage
Pingback: จดทะเบียนบริษัท
Pingback: พิมพ์การ์ดแต่งงาน
Pingback: Nonameauto
Pingback: รับเขียนแบบบ้าน
Pingback: สีพ่นรถยนต์
Pingback: Pepe Agent
Pingback: Aviator
Pingback: lg96
Pingback: chimney sweep liverpool
Pingback: เว็บปั้มไลค์
Pingback: lazywin888
Pingback: dark168
Pingback: กระดาษสติ๊กเกอร์ความร้อน
Pingback: บริษัทรับเขียนโปรแกรม
Pingback: เช่ารถตู้พร้อมคนขับ
Pingback: coreswap exchange
Pingback: Your Guide to Seattle Luxury Real Estate
Pingback: sugarrush1000philippines.com
Pingback: ปั้มวิวไลฟ์สด
Pingback: เว็บตรงฝากถอนง่าย
Pingback: therapist norwalk ct
Pingback: adolescence dizisi izle
Pingback: บาคาร่า ufa11k
Pingback: Thai restaurant Oregon
Pingback: ระบบสมาชิก
Pingback: slot ค่ายใหญ่ครบวงจร
Pingback: Lowara
Pingback: สายคาดกล่องอาหาร
Pingback: Back Surgeon
Pingback: Flowserve
Pingback: นำเข้าสินค้าจากจีน
Pingback: javtogel togel
Pingback: fortunabola
Pingback: freshbet
Pingback: เครื่องเป่าแอลกอฮอล์
Pingback: hello world
Pingback: where can i get cialis
Pingback: allopurinol 100mg tablets
Pingback: lansoprazole brand
Pingback: sémaglutide oral nom commercial
Pingback: toradol clinical overview
Pingback: ketoconazole action overview