Flyduino have kept their Kiss platform super simple by comparison with other flight controller offerings (such as Betaflight).
It can be said however that this should be expected, given the renowned acronym baked into their brand name… Keep It Super Simple (or, Keep It Simple, Stupid!).
If you are new to the world of kiss, whether a complete beginner or moving from another platform such as Betaflight, this article will get you up and running on the GUI in no time!
This guide is specifically about the GUI, so we will assume that you have already built or bought a completed Kiss Quad and it is ready to connect to the computer.
Keep It Super Simple Graphical User Interface
Or Kiss GUI for short… Flyduino have done a superb job of designing a flight controller that performs exceptionally well, whilst also being very easy to use.
The Kiss GUI is also very easy to use by comparison to some of the other offerings.
Admittedly the GUI would not win any awards for being the more pretty looking software, nor has it changed much over a period of time.
It is however very functional. It will get the job done quickly and easily.
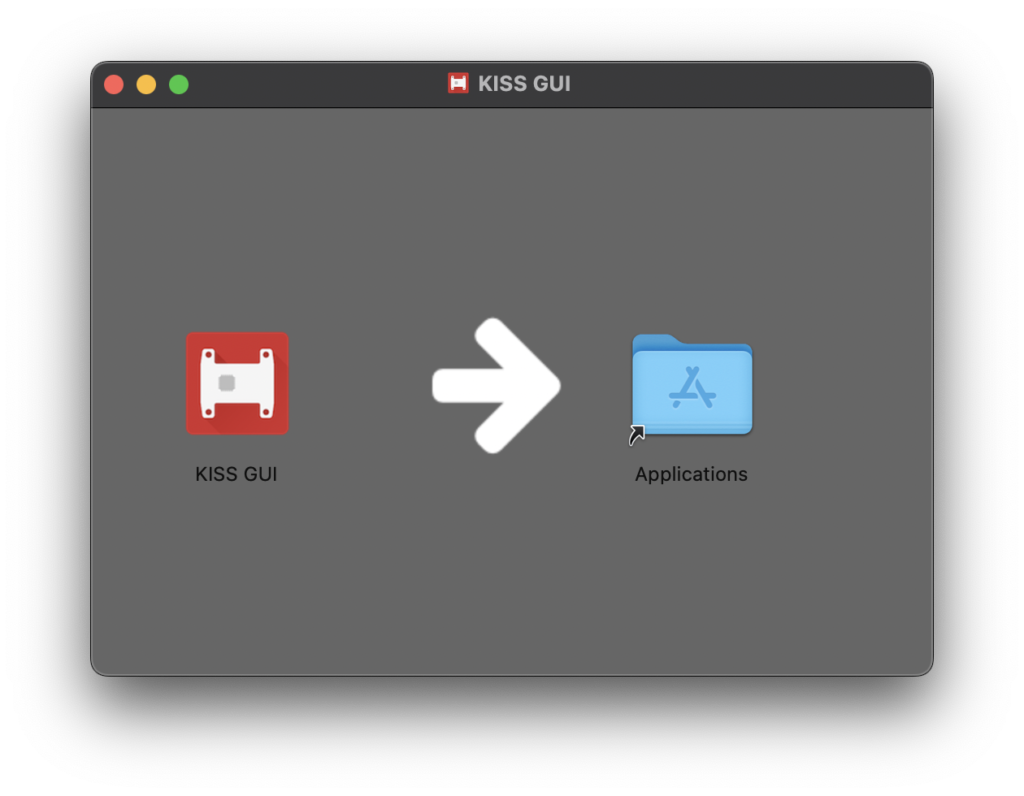
How To Install The Kiss GUI
Much like the GUI, the Flyduino website is somewhat basic and would not win any design awards!
I actually like this because I realise Flyduino are a cottage industry and I think they spend their valuable time where it matters… on the Kiss hardware and software.
How Do I Download Kiss GUI?
In order to download Kiss, just head to their download page to download everything you need, including the GUI, LUA scripts and files for the Kiss OSD.
The download link for the GUI will actually just take you to GitHub. To download the GUI just go here and download the latest release.
Once downloaded, simply follow the installation instructions for your relevant system.
How To Use The Kiss FC GUI
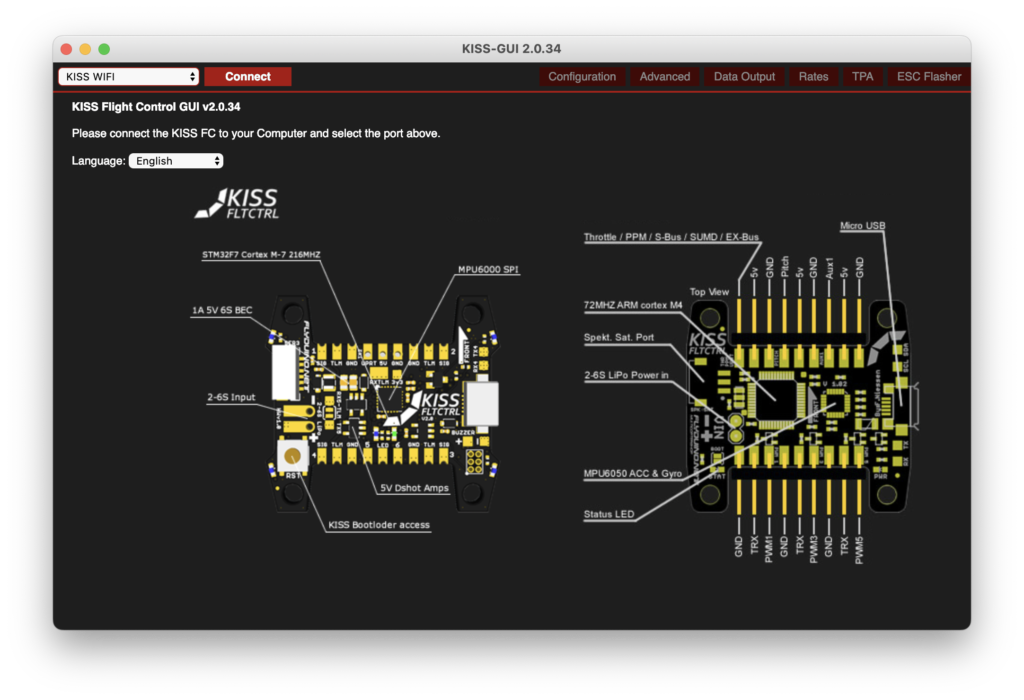
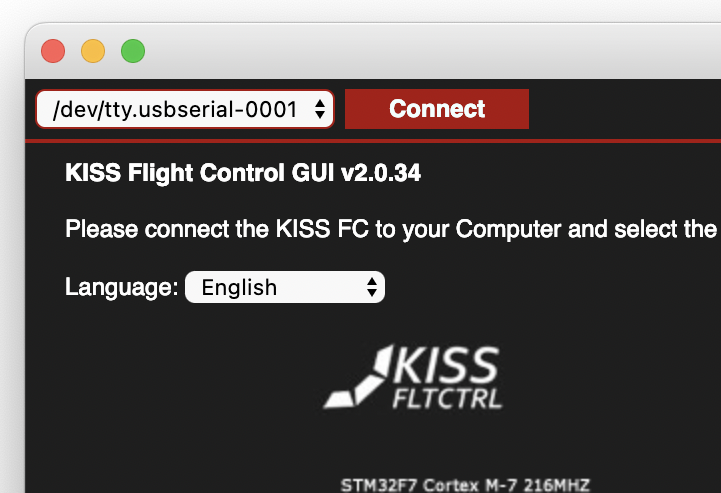
When first opening the Kiss GUI you will be presented with a screen that serves two purposes.
Firstly in the top left you will see the button to connect to the Kiss Flight Controller (a.k.a Kiss FC) with the accompanying connection method drop-down menu.
Just below these options there is a drop down menu where you can choose your prefered language;
English, German, Russian, French, Spanish, Italian, Swedish, Portuguese, Romanian, Polish, Korean or Chinese are currently available.
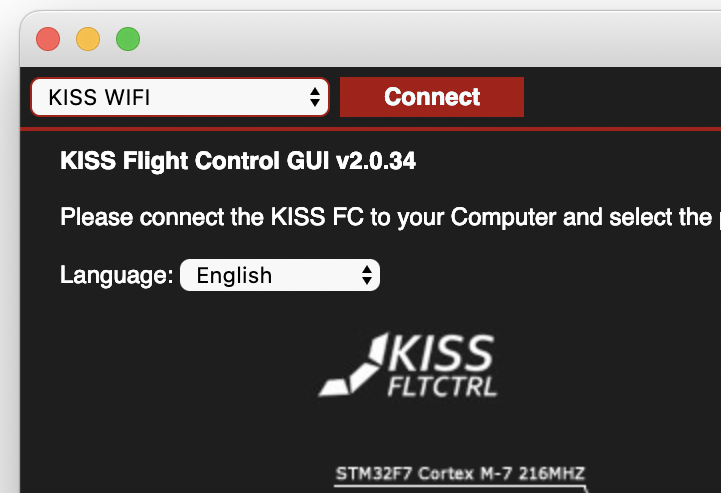
In the top right there are some more detailed configuration options, however these are not accessible before connecting to the FC, so we can ignore these for now.

Beneath the language selection is a diagram showing the Kiss FC features and ports.
I find it a little unusual that this information has been slapped there as it could be a little confusing, especially if you chose the FETtec FC, which looks completely different!
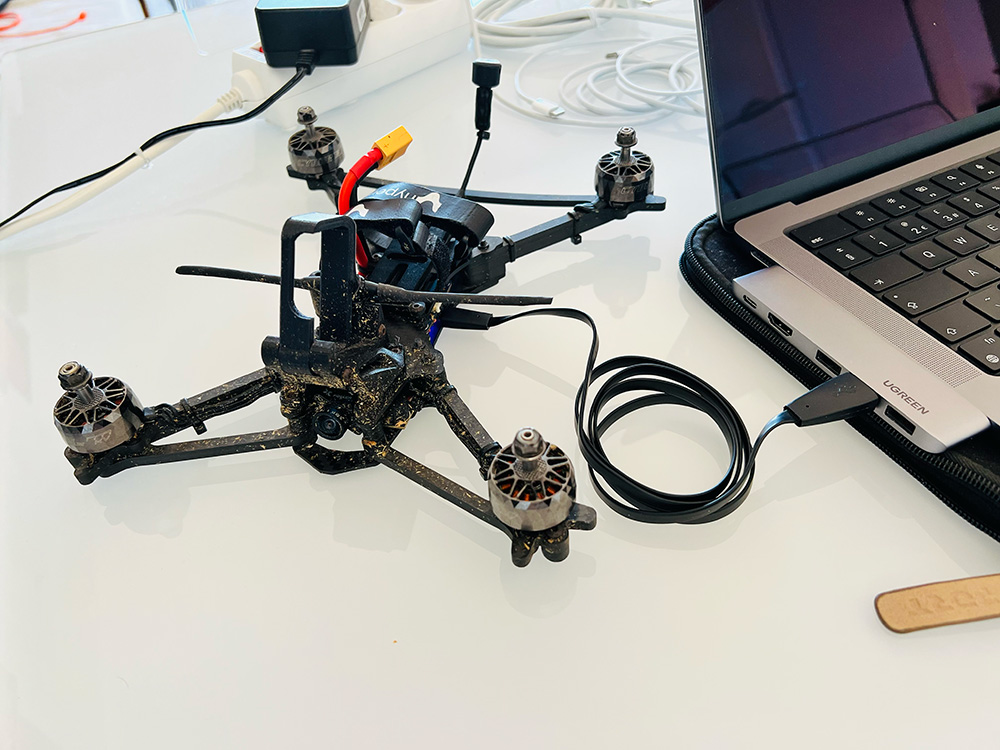
Connect Your Kiss Quad to the USB Port
Before you connect your Kiss Quad to the computer, you need to have the correct drivers installed.
Mac should not need to do anything, the drivers should already be installed by default on Mac OS.
Windows users may need virtual COM port drivers, which can be found here.
Once you have the correct drivers installed and have selected your prefered language, simply connect your Kiss Quad to the USB port.
Note that it would be advisable to remove the propellers when powering your quad without the intention on flying.
When you connect your Kiss Quad to the USB port, the GUI software should automatically detect the flight controller.
On Mac and Linux systems the port should appear as something like /dev/tty.usbserial-0001 and on Windows systems, something like COM3.
Troubleshooting Kiss FC USB Connections
If you connect your Kiss Quad and do not see the port appear in this drop-down box (still saying KISS WIFI) then there are some things that you can check.
Check the USB Cable
Yes I know, this is the first thing that the tech support person in a call center tells your grandmother to do when the printer doesn’t work.
However this REALLY has been a problem for me several times with flight controllers. They seem very sensitive to the cable.
Plus some cables totally cheap out and omit the data wires, so only work for charging or powering stuff with a USB port.
If you don’t have a good quality USB cable that you know works flawlessly, I would recommend getting one.
Check if you computer recognises the FC
If you have a good quality USB cable that you know works for data and you are getting illuminating LEDs on the flight controller, the next thing to check is whether the computer recognises the USB.
Mac Users
Mac users click the Apple in the top right of the screen, followed by About This Mac > System Report… > USB and you should see the following:
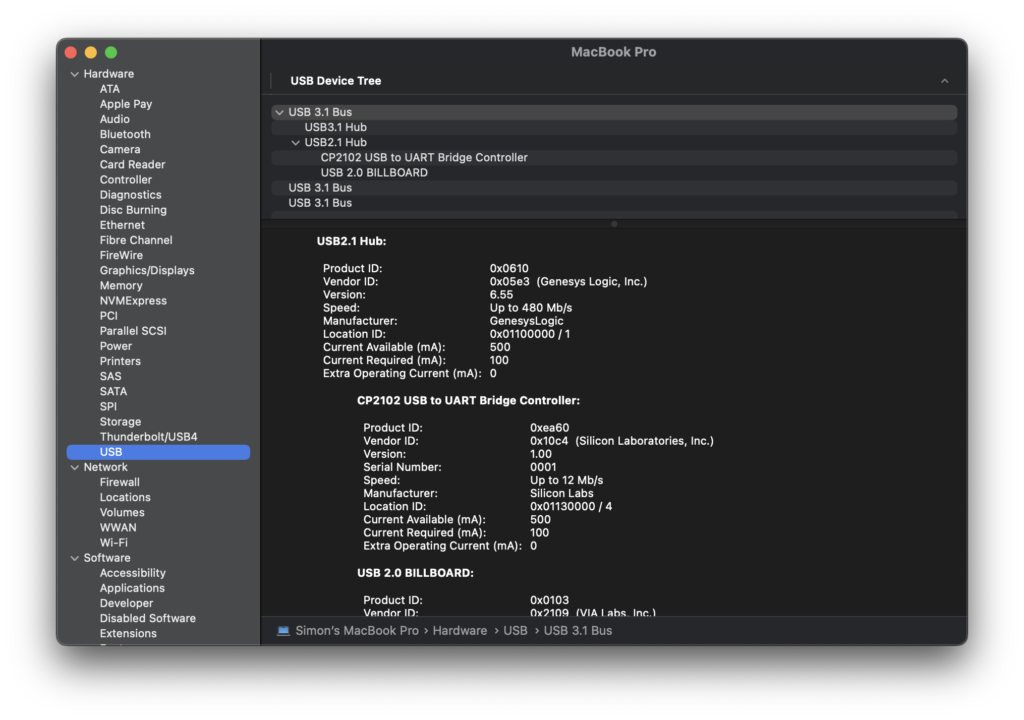
If you can see something like CP2102 USB to UART Bridge in the list, your FC is connecting successfully.
If you cannot see something like this or if you are unsure, try disconnecting and reconnecting the USB port with a 10 second pause between.
If you observe an item being added and removed from the USB Device Tree when you connect and disconnect the FC, your FC is connecting successfully.
If your FC is connecting successfully and you are sure that your USB cable is of good quality, try a full reboot. You may need to delete and reinstall the latest version of Kiss GUI.
Windows Users
Windows users open control panel and double-click the systems icon. Then click the hardware tab in the system properties window.
Then click the Device Manager button to open Device Manager:
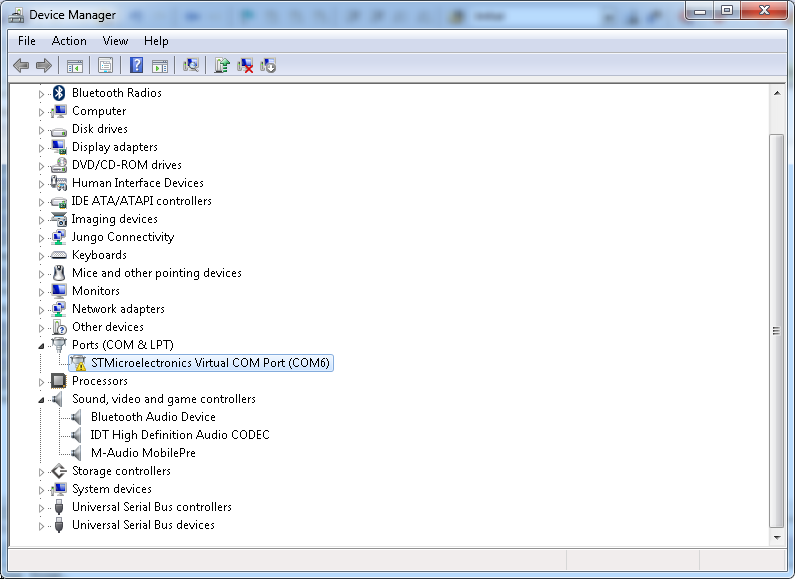
You should see a Virtual COM Port type driver appear under the Ports section in Device Manager.
Open the ports section of the tree and if you observe a virtual COM port here without a warning symbol then the FC is connecting successfully.
If the tree is open and displaying a yellow warning icon like shown in the above screenshot, check out the guidance here on the Flyduino website.
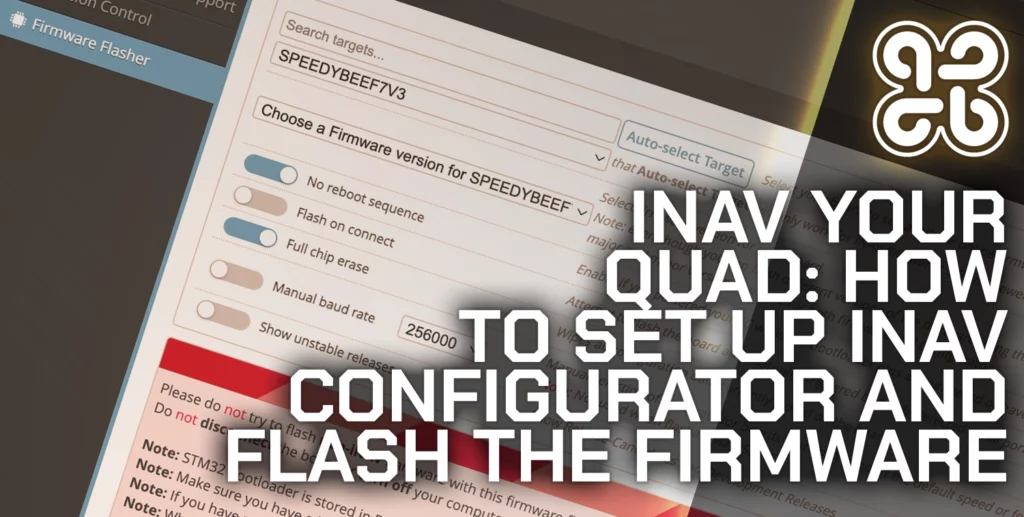
How To Flash The Latest Kiss Firmware with the Kiss GUI
Once you have successfully connected to your Kiss FC, the first thing that you might want to do is flash the latest firmware.
This will mean that the software running on the FC itself will be up to date with the latest version.
To flash new firmware to your FC, select the FC Flasher using the buttons in the top right of the screen.
Next, choose select remote firmware to download the latest firmware from the internet.
Choose your flight controller model and firmware version, I would recommend just using the latest version.
In my example I am using the FETTek Kiss FC and am downloading the current latest version of the firmware for it, 1.3RC47m, which is at the top of the list.
Next, click download firmware to get the latest firmware from the internet. Now we are ready to flash the FC.
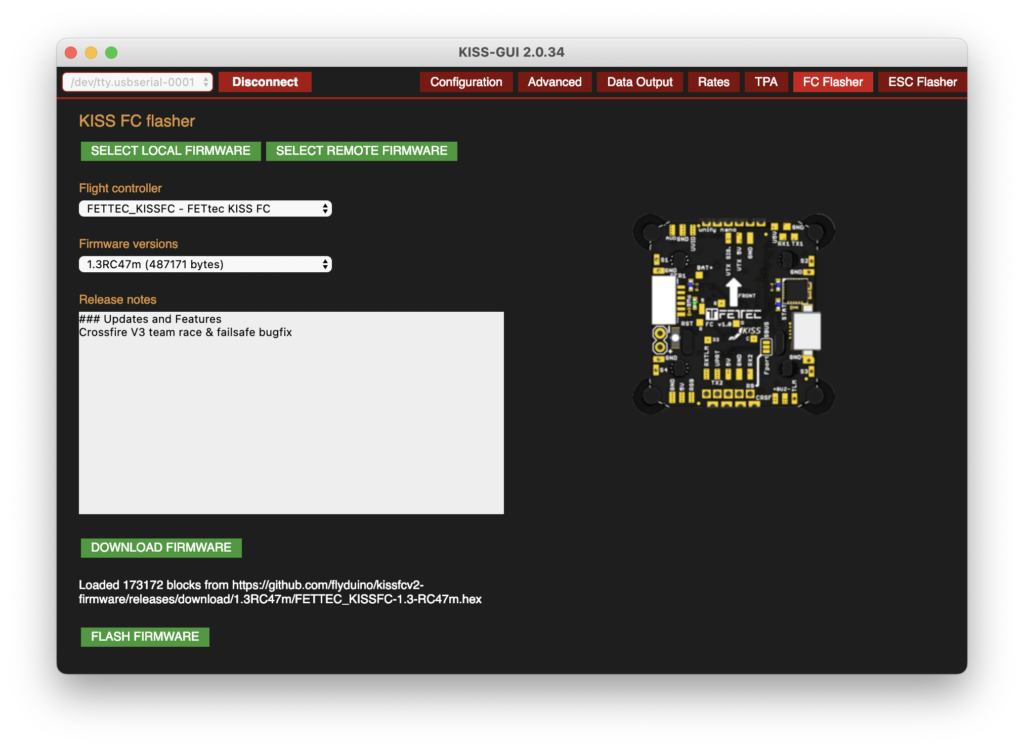
Click flash firmware to flash the firmware to the FC. It is important to be patient, there is no loading bar and it takes a couple of moments to flash.
Once the flashing has completed the quad will beep three times and you will be taken to the main GUI screen.
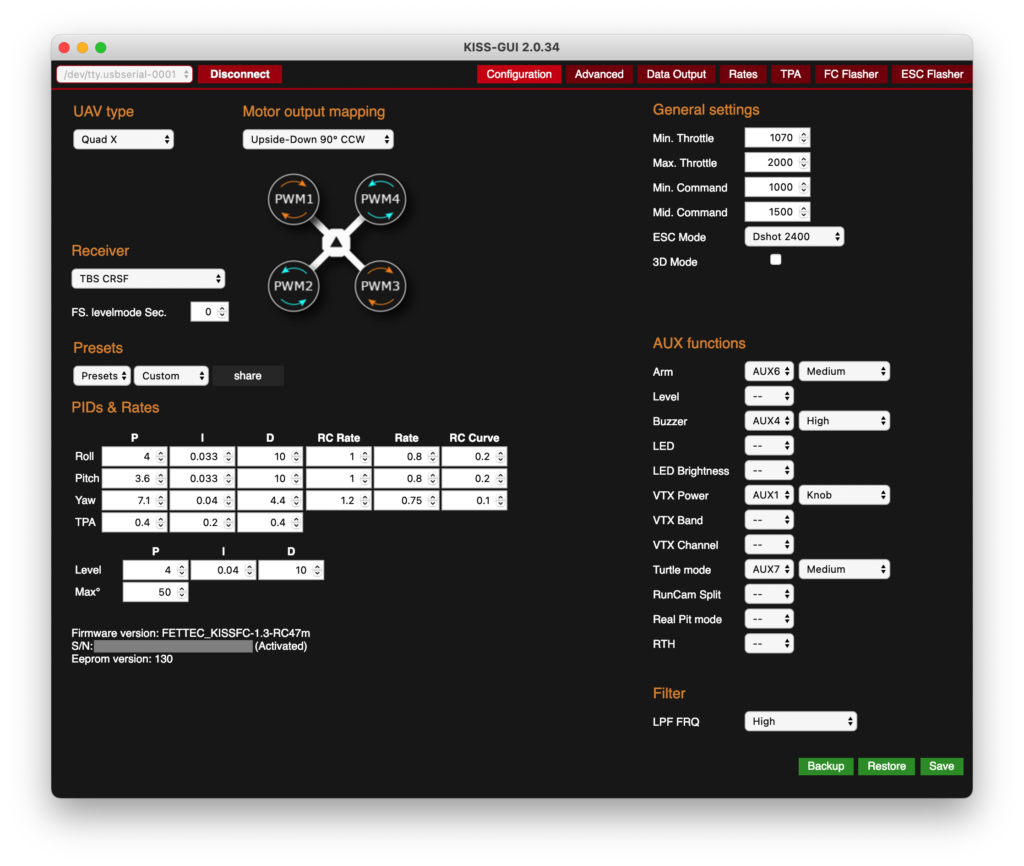
How To Configure Your Quad with the Kiss GUI
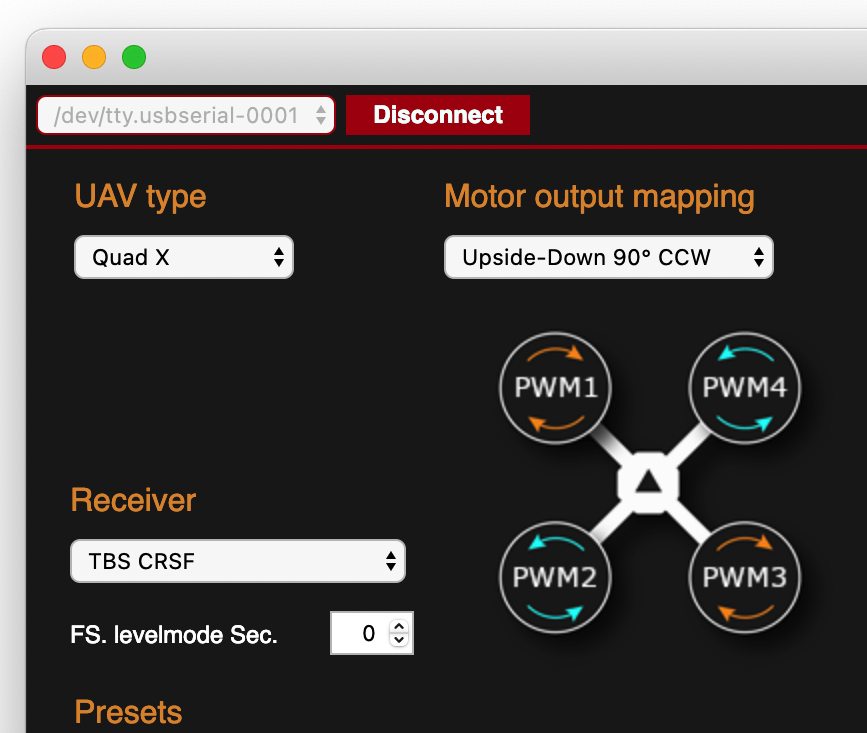
To configure a quad with the Kiss GUI, first click the configuration button in the top right-hand corner of the screen to take you to the configuration page.
Let’s take a closer look at the options we need to configure:
UAV Type
This is where we select the type of frame and motor configuration that we are using.
The most common configuration is Quad X, however there are quite a number to choose from!

A standard 5-inch, 6-inch or 7-inch quad will require the Quad X configuration, which covers mostly all situations.
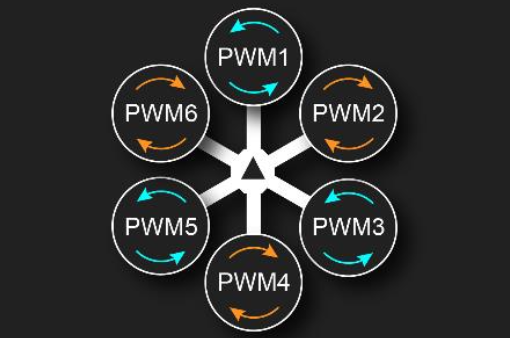
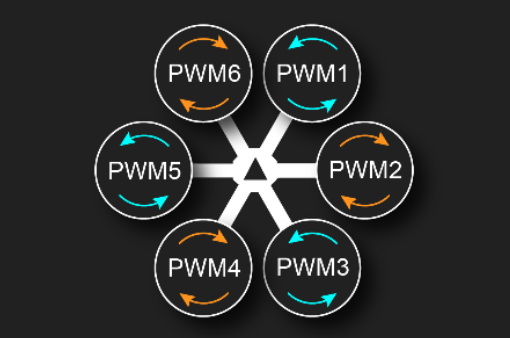
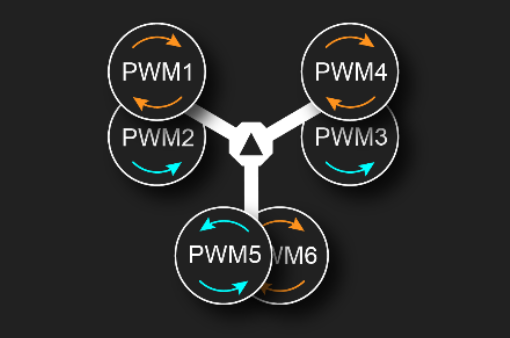
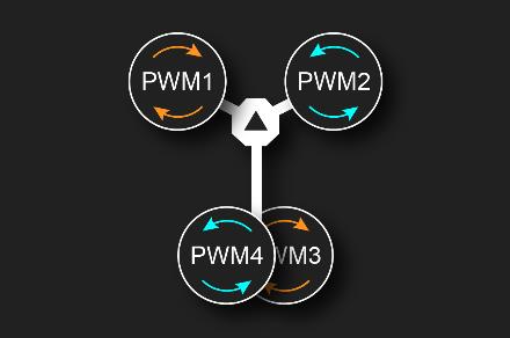
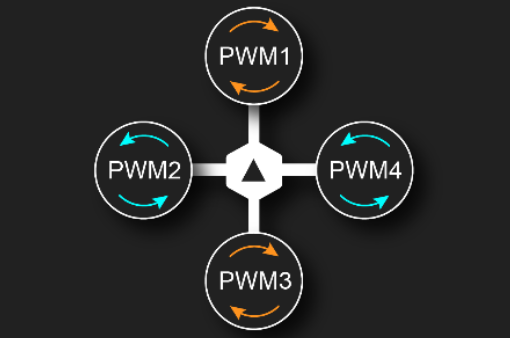
Motor Output Mapping
The next option to configure basically tells the FC where each motor is on the frame relative to its position.
If we take a look at the picture, we can see the arrow in the center pointing upwards, this is the direction of travel.
If we hold our quad in the same orientation, each motor should match the number in the correct corner.
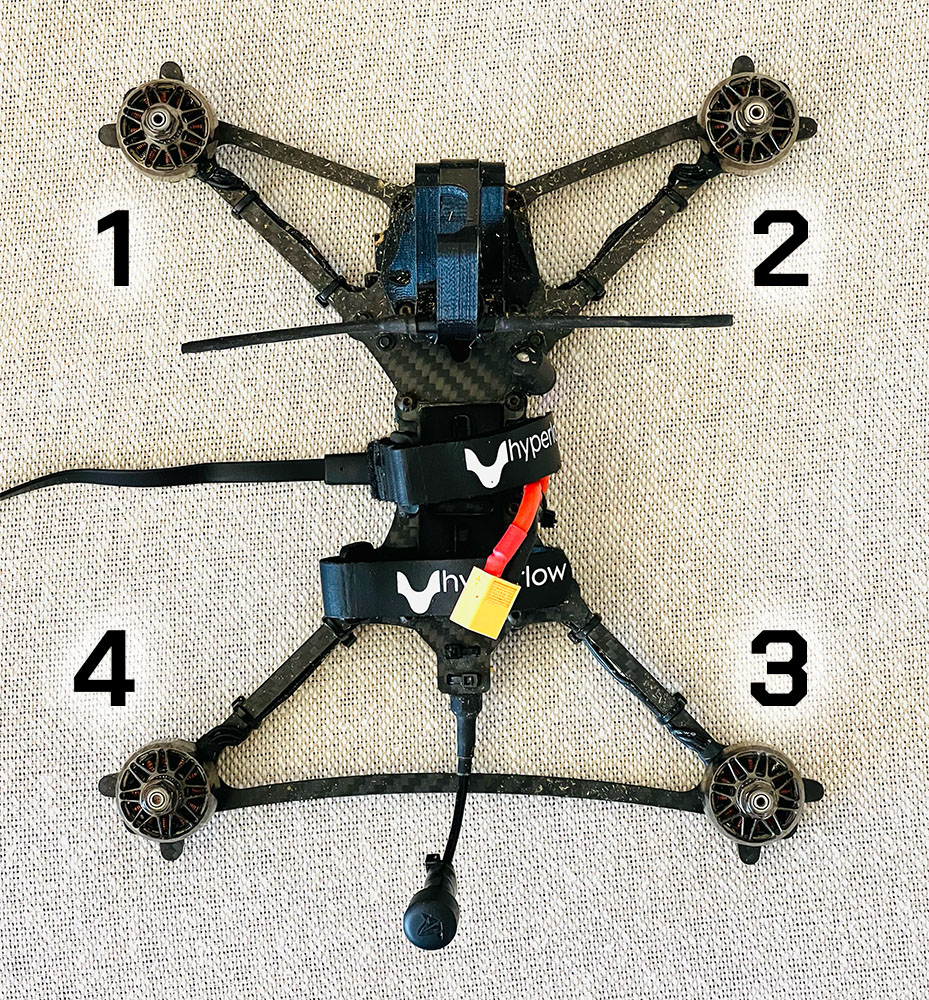
For example the motor mounted on the top left arm of the quad should be soldered to the #1 output on the ESC.
If you are using a 4-in-1 ESC, each motor output should be numbered. If you are using individual ESCs then you can wire them to the FC motor outputs accordingly.
If you needed to mount a 4-in-1 ESC in such a way that the outputs do not match the default configuration, or if you did not solder individual ESCs in the correct order, we can use motor output mapping.
The easiest way to do this is first take a picture or draw a quick sketch of your quad in the forward-facing direction.
Next check the number of each motor by seeing which output it is soldered to, or which FC output the ESC is connected to, and write it by the motor.
Then simply cycle through the different options for motor mapping by selecting them in the drop down menu, until the numbers in the GUI match your diagram.
Note that motor mapping is not related to the position of the flight controller. If you are running your flight controller in an offset direction, you need to compensate this separately.
Receiver
In this drop down menu we need to choose the protocol that our chosen receiver is using.
You will need to consult the manual for your chosen radio gear as to what is the correct option to select.
Here are some of the more common options:
- TBS CRSF is the Team Black Sheep protocol and is the correct choice for all Team Black Sheep radio products, such as TBS Crossfire or TBS Tracer.
- Futaba Fast S-Bus will be a common choice, primarily for everyone using a DJI radio with their DJI HD Goggles.
- Spekt. Sat. options will be compatible with Spektrum receivers.
- FrSky S-BUS and FrSky F-Port options will be compatible with standard FrSky receivers.
Note that you should choose the options only based upon your receiver.
For example if you are using an FrSky transmitter with a TBS Crossfire TX module and receiver, you should choose TBS CRSF as your receiver protocol.
General Settings
Under general settings the only thing that you may need to change is the ESC mode.
Here you should choose a setting that matches your chosen ESC, but also it would be better to use the best setting possible.
At the time of writing Dshot 2400 is the most responsive, so I would recommend to use it if your ESC supports it.
You can also use FETTec OneWire if you are using a compatible FETTec ESC, although I had problems with the so stuck to Dshot 2400 and it works great!
If you want to fly upside down and your ESCs support 3D mode, you can also enable it by checking the 3D Mode box.
AUX Functions
The auxiliary functions offer control over other useful features on the drone not that are not directly related to actually piloting it.
There are 7 channels available to assign to auxiliary functions. Choose a function that you want to include in your setup and assign an AUX channel to it.
The functions available are as follows:
- Arm – Necessary to arm and disarm the quad. The quad will only fly when armed.
- Level – Activate\deactivate auto-levelling (angle/level mode).
- Buzzer – Will sound the buzzer when the switch is pressed.
- LED – LED On/Off/Color
- LED Brightness – Controls the brightness of the LEDs
- VTX Power – Allows the output power of the video transmitter to be turned up or down.
- VTX Band – Changes the band that the video transmitter is transmitting on.
- VTX Channel – Changes the channel that the video transmitter is transmitting on.
- Turtle Mode – Turns on turtle mode, used for flipping the quad when it lands upside down.
- RunCam Split – Used for remote control of the RunCam Split.
- Real Pit Mode – Toggles pit mode on and off. When in pit mode, the video transmitter power is reduced to almost zero.
- RTH – Used to activate Return To Home mode. When set up with a GPS, the quad will automatically fly back to home.
Arm is mandatory and required in order to fly. I would recommend setting up switches for arm and buzzer at the very minimum.
Personally I use a spring loaded switch for buzzer, it allows for a manual beep when required and works like a car horn.
I would also recommend setting up turtle mode, in case you get stuck upside down somewhere that you cannot reach the drone.
With each of these functions there is an option to select between low through to high in the adjacent drop down menu.
This is simply the position that the switch needs to be in to toggle the function on and off.
In most cases when an on-off switch is used, simply setting this to medium will set the toggle point to the middle of the switch.
There is also an option for knob, which can be chosen for a variable value such as VTX power. This can be used with a physical knob on the transmitter.
You will also need to configure the switches and knobs that you want to use on your radio to output on channel 5 through to 11 in order to set auxiliary functions in Kiss.
You will need to consult the manual for your individual transmitter in order to do this. You can start here if you are using an OpenTX based transmitter.
Setting PIDs & Rates
Probably the most confusing part of the main configuration screen is the PIDs & Rates section.
All of the numbers here are used to tune the performance of Kiss with the chosen airframe.
The topic of PIDs and rates is a science and can be fairly complex. I will not discuss it in detail here as it is well beyond the scope of this article.
The Kiss FC manual states that the default PIDs should not cause any oscillations.
Therefore I would leave the PIDs and Rates set to their default values at this stage. Go out and fly first and see how your quad feels on stock PIDs.
You can tweak them at a later stage, when you become comfortable flying Kiss.
Alternatively if you have cloned the setup of a pro pilot, you could copy the PID settings for that build.
How To Save and Backup Settings in the Kiss GUI
The last thing to be aware of on the main configuration page are the three green buttons in the lower right-hand corner for backup, restore and save.
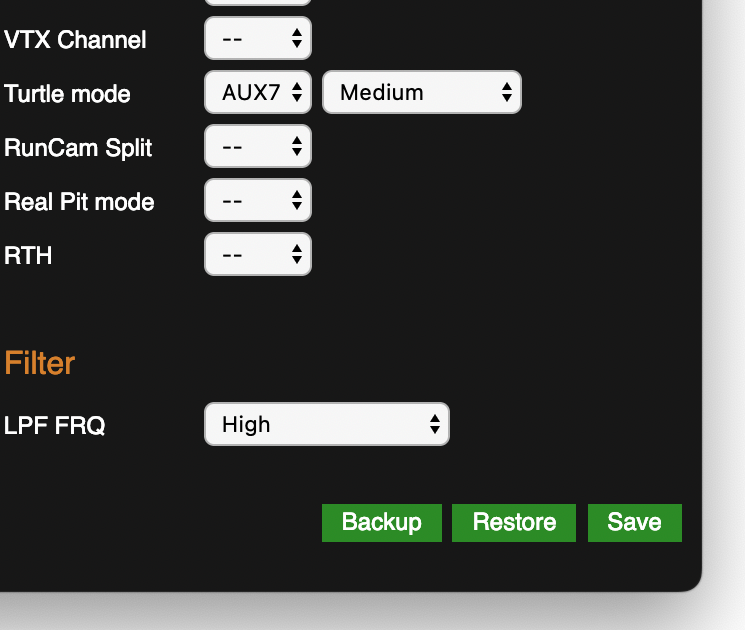
When you make any changes to the configuration, it is necessary to press save in order to upload the changes to the flight controller.
If you click backup, a save dialog box will open and allow you to save the configuration.
Clicking restore will bring up an open dialog, which allows you to choose previously backed up settings and restore them.
I would highly recommend backing up settings prior to a firmware update. I also make a backup each time I make any major changes.
What’s Next?
If you got this far then a big thank you for taking the time to read the article!
You should now have enough knowledge to connect your quad to Kiss GUI and configure it for a maiden flight!
Also, don’t forget to check out some of my other awesome Kiss tutorials!