If you want to fly longer range with Crossfire then the TBS Crossfire Nano Diversity is likely to be the most ideal choice of receiver.
The setup is similar to that of the TBS Nano receiver, however there are a few extra things to consider due to the additional features that come with Team Black Sheep’s diversity offering.
If you are using TBS Nano Receiver, check out this guide instead.
The TBS Nano Diversity is a fully featured TBS Diversity receiver, including the ability to make use of a backup battery in the event of battery ejection. Awesome!
If you are just looking for a quick reference wiring diagram / pinout to aid you with a build, check out the wiring overview.
Prerequisite
This guide aims to help you understand some of the many various configuration options available for the TBS Nano Diversity receiver.
You will need a TBS Nano Diversity receiver and one of the compatible Crossfire transmitter modules.
We will assume that if you are reading this, you are likely already using TBS Crossfire and have a good understand about what it is.
Whether you are new to the TBS Crossfire ecosphere or you already have a good understanding, there is some good information here worth checking out too!
TBS Nano Diversity Receiver Wiring Overview
The following reference diagrams are for the TBS Nano Diversity receiver and aim to provide a clear reference to assist in your build.
You can also consult the TBS Crossfire manual and TBS Nano Diversity quickstart guide for further information.
TBS Nano Diversity Pinout
The following diagram shows the pinout for the TBS Nano Diversity. It shows the available functions for each pin.
This diagram is designed to be used as an easy reference when wiring the receiver. Some functions are duplicated and in these cases you can choose whatever pin you prefer to use.

TBS Nano Diversity Channel Mapping
The following table shows the various functions that are available for each channel on the TBS Nano Diversity receiver.
In order to choose the function that you want to operate on a particular pin, use the channel mapping menu accessible from your TBS Crossfire transmitter module (either Lua script or OLED display on the full sized Crossfire).
You can sort the table by clicking the column headers. For example if you wish to connect CRSF Tx, simply click the header to sort the table and show all suitable pins at the top.
You can also scroll the table left and right to reveal all of the functions. The table shows which functions are compatible with each pin.
| Receiver Pin | PWM | PPM | CRSF Rx | CRSF Tx | Serial Rx | Serial Tx | SBUS inv. | SBUS n.inv. | MAVLink Rx | MAVLink Tx | RSSI | LQ | RSSI/ LQ | Serial RTS | DSMX | Smart Audio |
|---|---|---|---|---|---|---|---|---|---|---|---|---|---|---|---|---|
| Ch. 1 | ✅ | ✅ | ✅ | ✅ | ✅ | ✅ | ||||||||||
| Ch. 2 | ✅ | ✅ | ✅ | ✅ | ✅ | |||||||||||
| Ch. 3 | ✅ | ✅ | ✅ | ✅ | ✅ | ✅ | ✅ | ✅ | ✅ | ✅ | ✅ | |||||
| Ch. 4 | ✅ | ✅ | ✅ | ✅ | ✅ | ✅ | ✅ | |||||||||
| Ch. 5 | ✅ | ✅ | ✅ | ✅ | ✅ | |||||||||||
| Ch. 6 | ✅ | ✅ | ✅ | ✅ | ✅ | |||||||||||
| Ch. 7 | ✅ | ✅ | ✅ | ✅ | ✅ | ✅ | ✅ | |||||||||
| Ch. 8 | ✅ | ✅ | ✅ | ✅ | ✅ | ✅ | ✅ | ✅ | ✅ | ✅ | ✅ |
TBS Nano Diversity Typical Wiring Diagram
The following diagram shows typical wiring between TBS Nano Diversity Rx, a flight controller and TBS Pro Nano video transmitter.
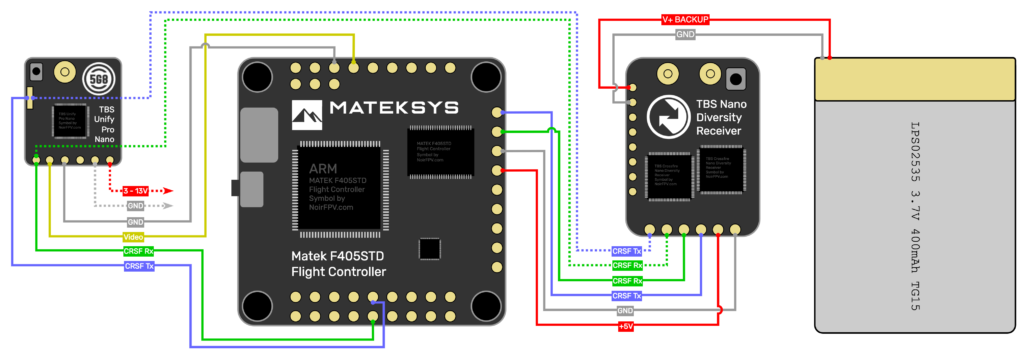
CRSF and Video Transmitters (TBS Fusion)
If you are planning to use a TBS video transmitter (VTx), such as the Unify Pro Nano shown in the diagram, you have two options for wiring:
- CRSF Tx and CRSF Rx from the VTx can be wired to a spare UART (serial port) on the flight controller. This allows data to be passed between the Unify and Crossfire system via the flight controller.
- CRSF Tx and CRSF Rx can be wired directly to an additional UART on the TBS Nano Diversity receiver for direct communication between the receiver and the VTx (shown above with the dotted line).
When your TBS gear onboard the drone is connected using the CRSF, it allows for some awesome additional functionality.
For example, if you are using TBS Fusion as your video receiver (VRx) then it is possible to use CRSF to synchronize the video settings automatically between the VTx and VRx.
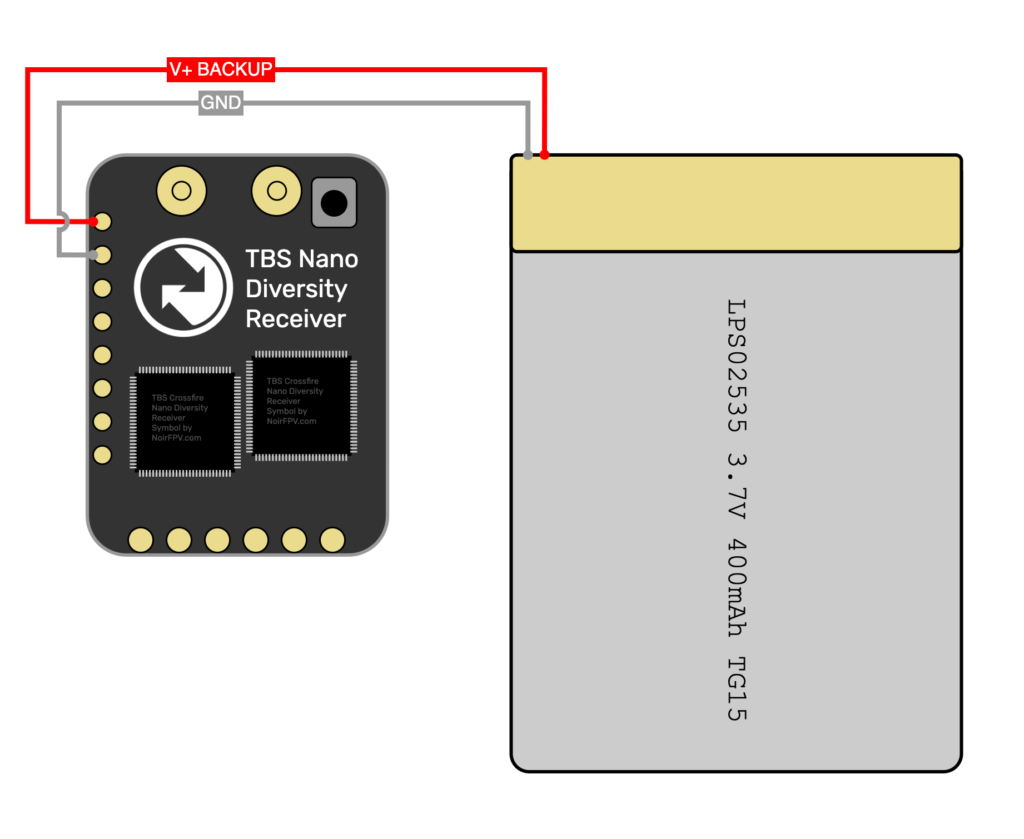
TBS Nano Diversity Backup Battery
Unlike the smaller TBS Nano receiver, the TBS Nano Diversity receiver can be connected to a backup battery.
There is a special pin for connecting the battery and TBS Nano Diversity will automatically charge the backup battery from the main pack when connected.
What does the backup battery in TBS Nano Diversity do?
If the TBS Nano Diversity is connected to a backup battery it will remain switched on in the event of losing power after a crash, such as if the main battery is ejected.
This allows the TBS Nano Diversity receiver to function as a beacon in order to aid recovery of the drone.
TBS Nano Diversity receiver can also reconnect to the TBS Crossfire transmitter and send crash site GPS coordinates.
If the telemetry connection was lost before the crash, for example as you came down behind a mountain, the GPS coordinates that you have may not be accurate.
However if you travel to this position it is a lot more likely that your Crossfire system will be able to establish a connection and provide your transmitter module with an updated set of GPS coordinates of the actual crash site.
Crossfire will perform these crucial functions with or without a backup battery and with any of the available receiver modules.
What Battery should I Use for the TBS Nano Diversity Receiver?
There are some limitation as to what battery can be used for the backup battery. The TBS Nano Diversity does not have the ability to prevent over discharge.
Therefore it is important that the backup battery pin must be connected to a 1S Lipo battery which features a built in battery management system (BMS).
This type of 1S Lipo is readily available and is often used in small rechargeable electronic devices.
TBS Nano Diversity will automatically charge the backup battery when powered from the main battery.
This is a very cool feature to have for those wanting to fly longer range and in general when there is a greater risk of loss.
Diversity Antenna Configuration
Another primary feature of the Nano Diversity receiver when compared with the standard nano receiver is the inclusion of a second radio chip.
Unlike the standard Nano receiver which has a single radio chip connected to its onboard microcontroller, the Nano Diversity actually has two radio transceiver chips.
This allows us to connect two different antenna to the receiver, one to each of the onboard radio chips.
This gives the Diversity Nano receiver the ability to communicate with the Crossfire transmitter on the ground using either of its antenna.
Antenna diversity is not just used in FPV, it can be found in many different areas that utilize radio communications. Check out this Wikipedia article for a little further information if you are interested.
How To Mount TBS Nano Diversity Antenna on an FPV drone
Having the option to use two antenna on our quad allows us to overcome some of the shortcomings of a single antenna solution.
There are two approaches that I see being used for FPV drones, each giving a slightly different benefit.
Polarisation Diversity
Antennas mounted on FPV drones are always omni-directional so that the signal is received as evenly as possible no matter the orientation of the drone.
However in practice an omni-directional antenna does not receive or transmit a signal in a completely even sphere.
It’s pattern of sensitivity is more of a donut around its axis with a dead spot above and below it.
This means that as you bank your drone over, the moment the antenna is pointing directly at your radio it will lose signal if you are a certain distance away.
Polarisation diversity involves taking two antennas and mounting them orthogonally so that the dead spot of one antenna is covered by the coverage of the other and vice versa.
When using TBS Diversity Nano with two orthogonally positioned antenna, if you bank over so that the dead spot of one antenna is pointing at your radio, the other antenna at 90 degrees will have a good connection.
In this case the receiver will automatically switch to the best antenna RSSI and the connection will not be lost.
This type of antenna placement would be well suited to longer range freestyle type builds.
Anyone wishing to perform freestyle maneuvers at distance or with poor line of sight could consider mounting two Immortal-T antenna orthogonally.
Eliminating black spots
Another type of problem that can occur with FPV radio links is the drone itself causing a loss of line of sight. This can be more of a problem for larger drones.
If your drone banks over and the actual chassis of the drone blocks line of sight to the radio, it can cause loss of radio link.
Like with the problem of polarisation, the problem of black spotting can become more pronounced at a greater range.
Mounting a pair of matching antenna on opposing sides of the drone, such as at the very front and back, means that black spots from the chassis itself can be eliminated.
Ultra long range builds using 7-inch frames or larger will benefit from a BardPole in the same polarization mounted to the front and back of the drone.
This will ensure a rock solid link whether travelling towards or away from oneself.
Orthogonal placement maybe not so much a concern in this case as those looking to prioritise range are not likely to fly in a straight line and won’t be performing so many acrobatic maneuvers.
External References
- TBS Crossfire Manual: https://www.team-blacksheep.com/tbs-crossfire-manual.pdf
- TBS Nano Diversity quickstart: https://www.team-blacksheep.com/tbs-crossfire-diversity-nano-quickstart.pdf
- 1S backup battery with BMS on Amazon [affiliate link]: https://amzn.to/3ABYKvV
- TBS Nano Diversity on Amazon [affiliate link]: https://amzn.to/3axJA0b
- Ultimate TBS Crossfire FAQ: https://noirfpv.com/tbs-crossfire-faq/


Great post. I am not sure how to get GPS data since my GPS is only powered by the main battery and not the add-on battery I put onto the backup battery connections on the diversity rxvr. How do I keep gps signals going to the diversity rxvr?
Thanks Curtis! It’s possible that you don’t need to power your GPS after a crash because at this point you are no longer changing position. The Nano Diversity will remember the last known GPS position (at the point of a battery ejection) and continue to broadcast it to the Tx using the backup battery.
In addition, if you lose signal some time before crashing (say you go behind a mountain), the Nano Diversity will still continue to monitor the GPS until the actual crash/impact, thus logging the actual crash site GPS. In this scenario the GPS coordinate on your Tx may differ from the actual crash site GPS, because signal was lost before the crash.
However if you visit the last known GPS coordinate given on the Tx, the theory is that you will then be close enough for the Nano Diversity to reconnect to the Tx, allowing it to update the the Tx with the actual crash site GPS coordinate. All TBS receivers will do this, but the benefit of Diversity with backup battery is that it will still happen if your battery is ejected/destroyed and main power is lost.
With that said, if you do really want to have your whole system running on backup power and keep the GPS going, you might be interested in checking out TBS Core: https://www.team-blacksheep.com/media/files/tbs-core-manual.pdf
Hi thanks for this post. I’m starting with crossfire. I bought a tango 2 as well as a crossfire nano diversity RX. Could you please advise me on two questions? I would like to install a vively cam switcher but apparently I would have to switch the RX to SBUS. How to do with this RX? and is it really useful to switch it to SBUS for this switch to work?
Thank you very much.
Hi Fred, hope you are enjoying your Tango 2! You don’t need to switch your Diversity Rx to SBUS. The Vifly cam switcher, like most cam switchers, can take a PWM input (standard servo type connection). Simply solder the PWM signal of the cam switcher (D/I pad) to a spare channel on the Diversity receiver and configure that channel as a PWM channel (Ch3 or Ch4 etc…) in the Crossfire settings on the Tango 2 (it should be the default setting for most channels anyway). You can then assign a switch on the Tango 2 to that channel in order to switch between the cameras.
Diversity Rx Ch1 CRSF Tx --[CRSF]--> Flight ControllerDiversity Rx Ch2 CRSF Rx <--[CRSF]-- Flight ControllerDiversity Rx Ch3 PMM --[PWM]--> Cam switcherAlternatively you can connect the cam switcher to a PWM output your flight controller, although this depends on what flight controller you are using and is more complex to configure.
Flight Controller --[PWM]--> Cam Switcheri just see your answer. Thanks a lot!!!
Hi,
I hope you are well and I wish you a very happy new year.
I’d like to ask you a question because I can’t find an answer and I’m stuck.
I’ve just fitted a hexa with, for the first time, CRSF (which I’m discovering). I have a Tango 2 and an RX nano diversity. I’ve updated the radio and the RX, rewritten the sd card with the correct files downloaded from the TBS site, created a model in the radio, connected the radio to the RX and everything is recognized in Beta.
But here’s the problem in the “Receiver” tab:
My sticks match well with the RX since the values in the tab move, but they’re very limited. The throttle stick is physically at zero, its range value is at 1350 and doesn’t go any lower. With the stick at full throttle, it rises to 1650 max. And this problem is repeated on all 4 sticks.
However, the middle points are at 1500 and when I look at the radio, the values vary from +/- 1000 sticks at zero to +/- 2000 sticks at full (tango 2 outputs tab).
I’ve also put the Telemetry option in the BF tab.
Do you have any idea how to solve my problem?
Many thanks in advance,
Best regards, Fred