Have you been wanting to fly further away, but you are nervous about losing your quad? Struggling to trust your gear? Or perhaps you were already unlucky enough to lose a quad already?
Betaflight GPS Rescue Mode is not a foolproof savior of quads… however it does give you another line of defence.
Perhaps this extra little safety net could be the difference between losing your quad or not.
- What is Betaflight GPS Rescue Mode?
- Does Betaflight use the Magnetometer for GPS Rescue Mode?
- What is The Best GPS Module for Betaflight Rescue Mode?
- How do I Wire a GPS to Betaflight?
- Where is the Best Place to Mount a GPS for Betaflight?
- How To Set Up GPS Rescue Mode in Betaflight
- How To Add GPS Data to the Betaflight OSD
- How to Test Betaflight GPS Rescue Mode?
- How to Use Betaflight GPS Rescue Mode as a Failsafe
- Conclusion
What is Betaflight GPS Rescue Mode?
Betaflight Rescue Mode is a feature in the Betaflight firmware that allows a drone to be recovered in the event of a loss of radio link or video signal.
When a drone enters Rescue Mode, the firmware attempts to bring it back within range of the signal again.
Rescue Mode can be triggered manually by a switch on the transmitter, or it can be activated automatically when the drone goes into failsafe, more on that later.
It is important to point out that Betaflight GPS rescue mode is not a substitute for fully autonomous flight. It does not give you features such as loiter, or even reliable auto-landing capability (although it will “attempt” to land, mileage may vary).
Betaflight GPS rescue mode is simply meant to guide the drone back towards you in the event of losing control due to a loss of radio link or video signal.
Once the drone comes back into range and a control and/or video link is regained, the pilot should then take over control.
It is still recommended to land manually. Betaflight Rescue mode will attempt to land, but it may or may not be successful.
If you are looking for a fully featured return to home, navigation and auto-landing capability, you would be better checking out either iNav or Ardupilot.
Does Betaflight use the Magnetometer for GPS Rescue Mode?
Betaflight does not currently support using the Magnetometer for GPS Rescue mode.
A magnetometer is a sensor that can detect magnetic fields, and it can be used in drones to determine their orientation or heading relative to the earth’s magnetic field.
This information can be used to help stabilize the drone and to maintain its position in the air. It can also be used to aid autonomous flight.
Betaflight can interface with a magnetometer, which usually comes as part of the GPS module, and it can use the data that it provides to help stabilize the drone’s flight but it does not use it to assist with autonomous navigation.
So why does Betaflight not use the magnetometer for GPS Rescue mode?
Magnetometer sensors can be a little bit temperamental. They are very sensitive to magnetic noise and therefore the placement of the sensor is important.
They should be kept a certain distance from electrical noise, which is usually quite difficult to achieve on your average 5 inch mini quad!
Betaflight have instead come up with a system whereby several GPS coordinates are compared in order to plot a vector, in order to calculate the direction of travel:
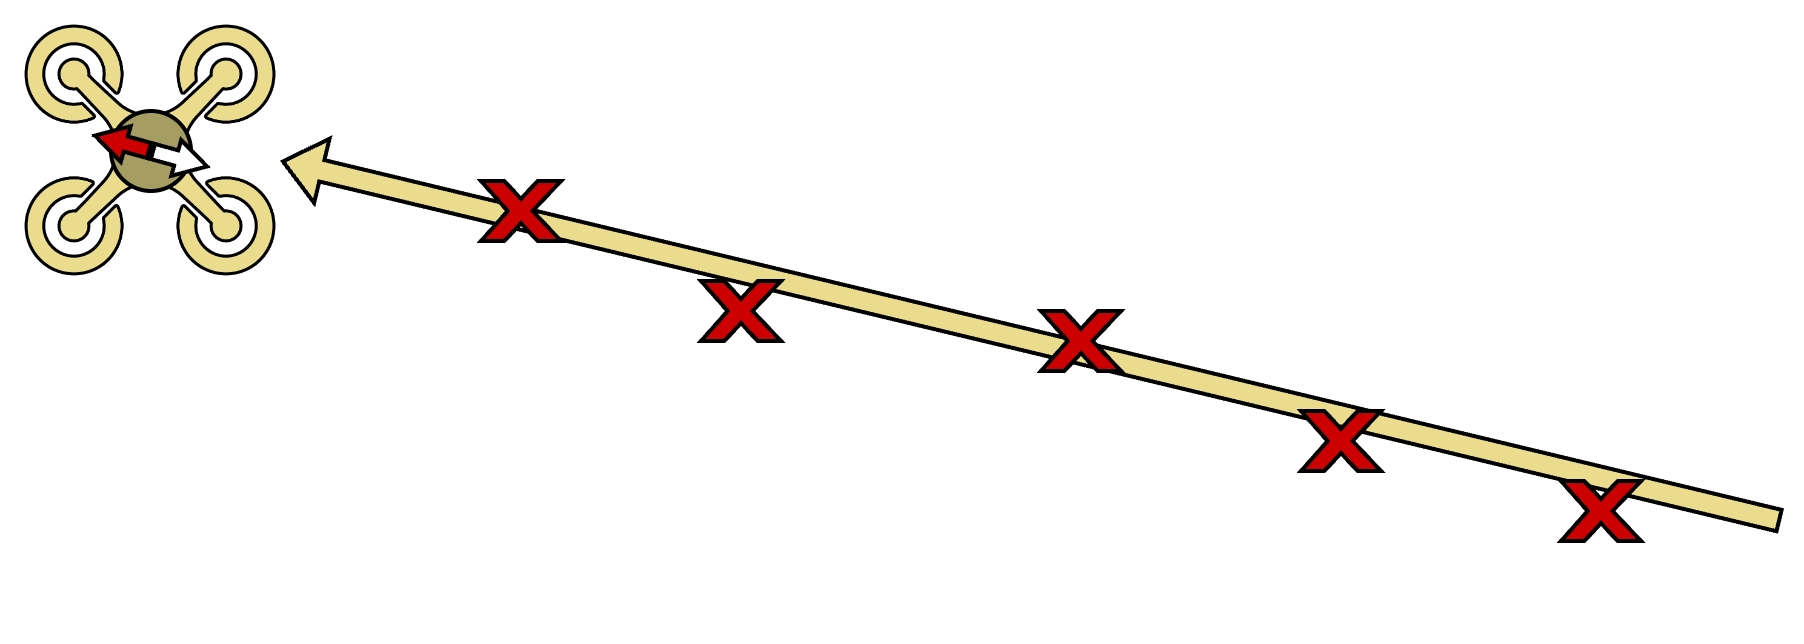
This eliminates the need for a compass and allows a little more freedom with GPS module placement. In short, it better suits 99% of Betaflight users.
So, what are the downsides?
The vectoring method is not perfect. Sometimes the quad has to fly for quite a while before it can get a proper grasp of the true home position.
Not so good if you are flying long range and close to the battery capacity limit!
It is also not completely reliable. There are no guarantees that your quad will come back. This system should be thought as the last line of defence.
It is good to have… just in case. But I would exercice the same caution when flying as you would without it!
What is The Best GPS Module for Betaflight Rescue Mode?
The best GPS module that I have used personally, which is compatible with Betaflight, is the Beitian BN880.
The performance of this module is fantastic.
I have tried it in multiple countries and it always gets a 3D fix with multiple satellites very quickly. It even has no problem getting a 3D fix indoors!
As I am writing this tutorial my quad is sitting on the bench indoors, no where near a window, with 9 satellites fully locked!
It also has a compass, which you can use with Betaflight, just not for Rescue Mode. You can of course also use the compass if you want to switch to the iNav firmware, as the BN880 fully compatible with both Betaflight and iNav.
This is the GPS module recommended by Pawel Spychalski for smaller quads using iNav.
Before the BN880 I tried the TBS M8.2, which also works with Betaflight. Admittedly it was positioned differently on the quad but the results were junk compared to the BN880.
The TBS M8.2 performance varied greatly, but more often than not it left me without enough satellites even when outdoors in the middle of a field. This occured in multiple outdoor locations in different countries.
Others have reported a similar experience with the TBS M8.2, so I think it is just a junk module.
Very surprising considering it is a TBS product. I am a total TBS fanboy and this is probably the only product with the TBS brand name that I can say I had a sub-par experience with.
My advice you to… get yourself a Beitian BN880. You won’t be disappointed!
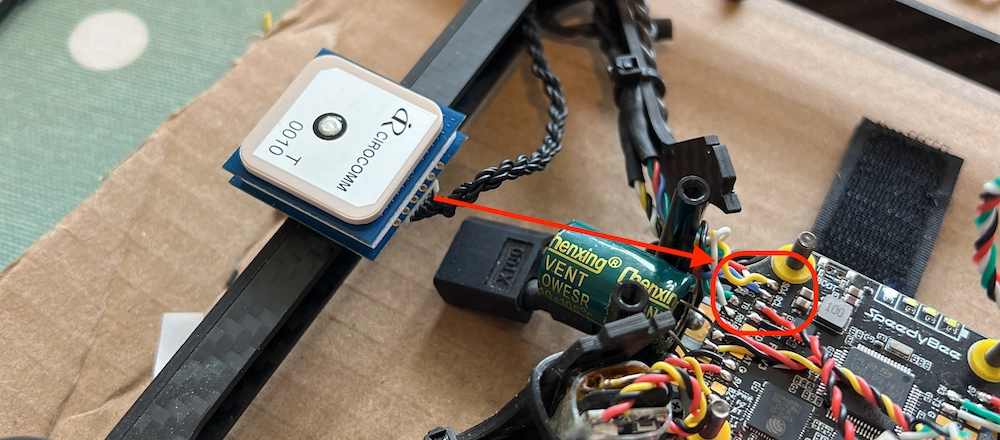
How do I Wire a GPS to Betaflight?
The following table shows the necessary connections that you need to make between the GPS module and your flight controller.
Note that GPS modules with a compass have two additional wires for the compass signal. You can connect these in order to provide compass data to Betaflight, however don’t forget that the compass data will not be used for GPS rescue.
| GPS Module | Description | Flight Controller |
|---|---|---|
| +5V | +5V power | +5V |
| GND | Ground | GND |
| Tx | UART serial | Rx |
| Rx | UART serial | Tx |
| SCL | I2C serial clock | SCL |
| SDA | I2C serial data | SDA |
Power and Ground
The +5V power lead from the GPS module should be connected to any spare +5V pad on your flight controller.
In most cases the +4.5V pad aimed at receivers should also work, with the added benefit that you will be able to power the GPS module via the flight controller USB port.
This is beneficial as it can allow you to run the GPS module and the flight controller without a battery connected. This provides a convenient way to allow the GPS module to download the necessary data during a cold start.
The ground (GND) lead should be connected to any spare GND pad on the flight controller.
It would be advised not to connect it directly to the negative terminal of the battery, as this may introduce noise, which could affect the performance of the GPS module.
It is especially important to provide sanitized power to the GPS module, if you plan to use the compass.
UART serial
The UART serial leads (Tx and Rx) should be connected to a spare UART port on your flight controller.
Note that the Tx lead of the GPS should be connected to the Rx pad on the flight controller. The Rx lead of the GPS should therefore be connected to the Tx pad of the flight controller.
When connecting the UART serial leads from the GPS to the flight controller, make a note of the port number as you will need it during configuration.
The port number is usually written on the flight controller PCB next to the solder pads. For example the solder pads for UART port 2 will be labelled T2 and R2.
Check the documents for your specific flight controller, as the solder pads/connectors will be different on each model.
I2C serial
The I2C bus consists of 2 wires, the serial clock and serial data lines. The compass requires both of these lines to be connected to the flight controller in order to communicate with Betaflight.
Unlike with the UART port, these wires should not be crossed over.
Connect the SDA lead from the GPS module to the SDA solder pad on the flight controller. Connect the SCL lead from the GPS module to the SCL pad on the flight controller.
Where is the Best Place to Mount a GPS for Betaflight?
The best place to mount a GPS module on your Betaflight quad depends on several factors such as the type of GPS module you are using, the size and shape of your quads frame, and your intended use for the GPS module.
In general, the best location for mounting a GPS module on a Betaflight quad is a location that provides a clear line of sight to the GPS satellites, away from sources of interference such as electronic components and metal structures.
As Betaflight does not use the compass, there is a little more flexibility in where you can position your GPS module.
If you have a frame with the battery underneath, you could try mounting your GPS directly on top of the frame, although mileage may vary due to interference from the stack.
I have in the past run GPS on top of the frame. It worked, but I am convinced that getting a satellite lock was more laborious than it should have been due to interference from the Sixty9 VTx that was mounted on top of the stack, just beneath the module.
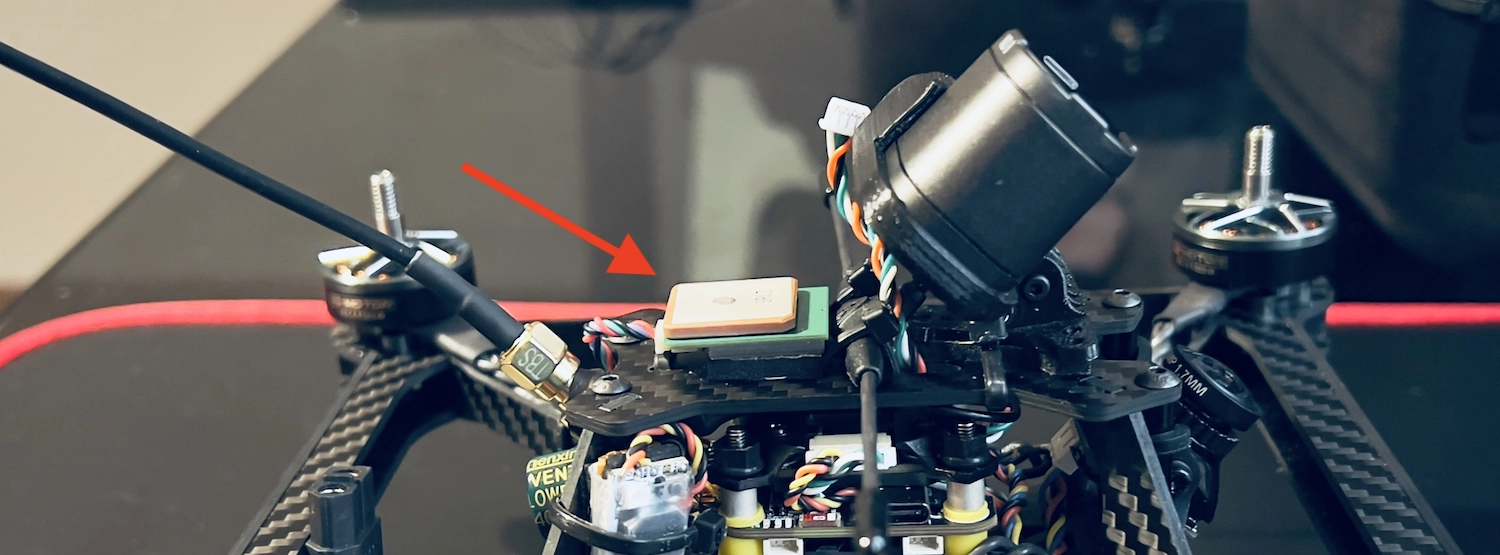
Taking in to account that using a mast for a mini quad is just not feasible, the best place to mount your GPS is either:
- Protruding out of the rear of the quad, usually underneath the VTx antenna mount.
- On top of the GoPro/HD camera. Usually a compatible 3D printed bracket can hold both the camera and GPS module.
I am not so much an advocate of using a GoPro for my own flying.
Personally I find that I can get superb results from the Thumbcam Pro, which is far cheaper (less of a disaster in a crash or lost quad scenario) and far lighter than a GoPro.
Therefore I have opted for option 1 for GPS mounting.
I am also not so much a fan of way too much 3D print in bright colors. I prefer minimalist design.
I am also a big fan of the Source V frame. I could reel of a huge list of reasons why, but here I will mention that the rear strut is great for mounting a Betaflight GPS.
How To Set Up GPS Rescue Mode in Betaflight
The basic setup for GPS Rescue mode in Betaflight consists of the following steps:
- Enable the GPS serial input on the relevant UART port.
- Set the correct baud rate for the GPS UART port.
- Enable the GPS in the main Betaflight configuration.
- Set the correct protocol and turn on auto configuration.
- Configure a GPS Rescue switch.
- Configure GPS Rescue on failsafe.
Let’s take a closer look at each of those steps.
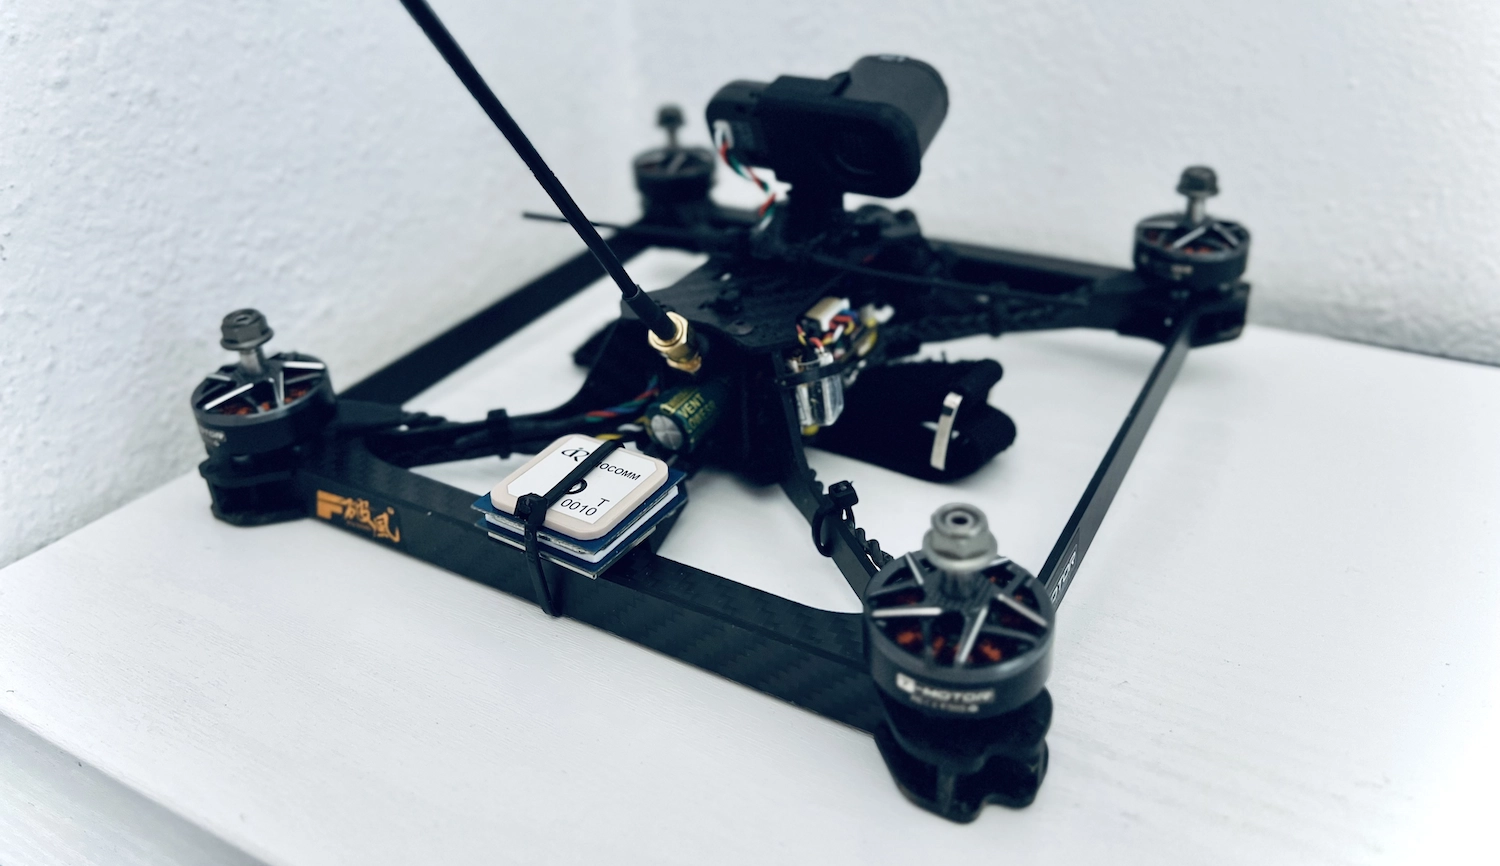
Enable the GPS serial input on the relevant UART port
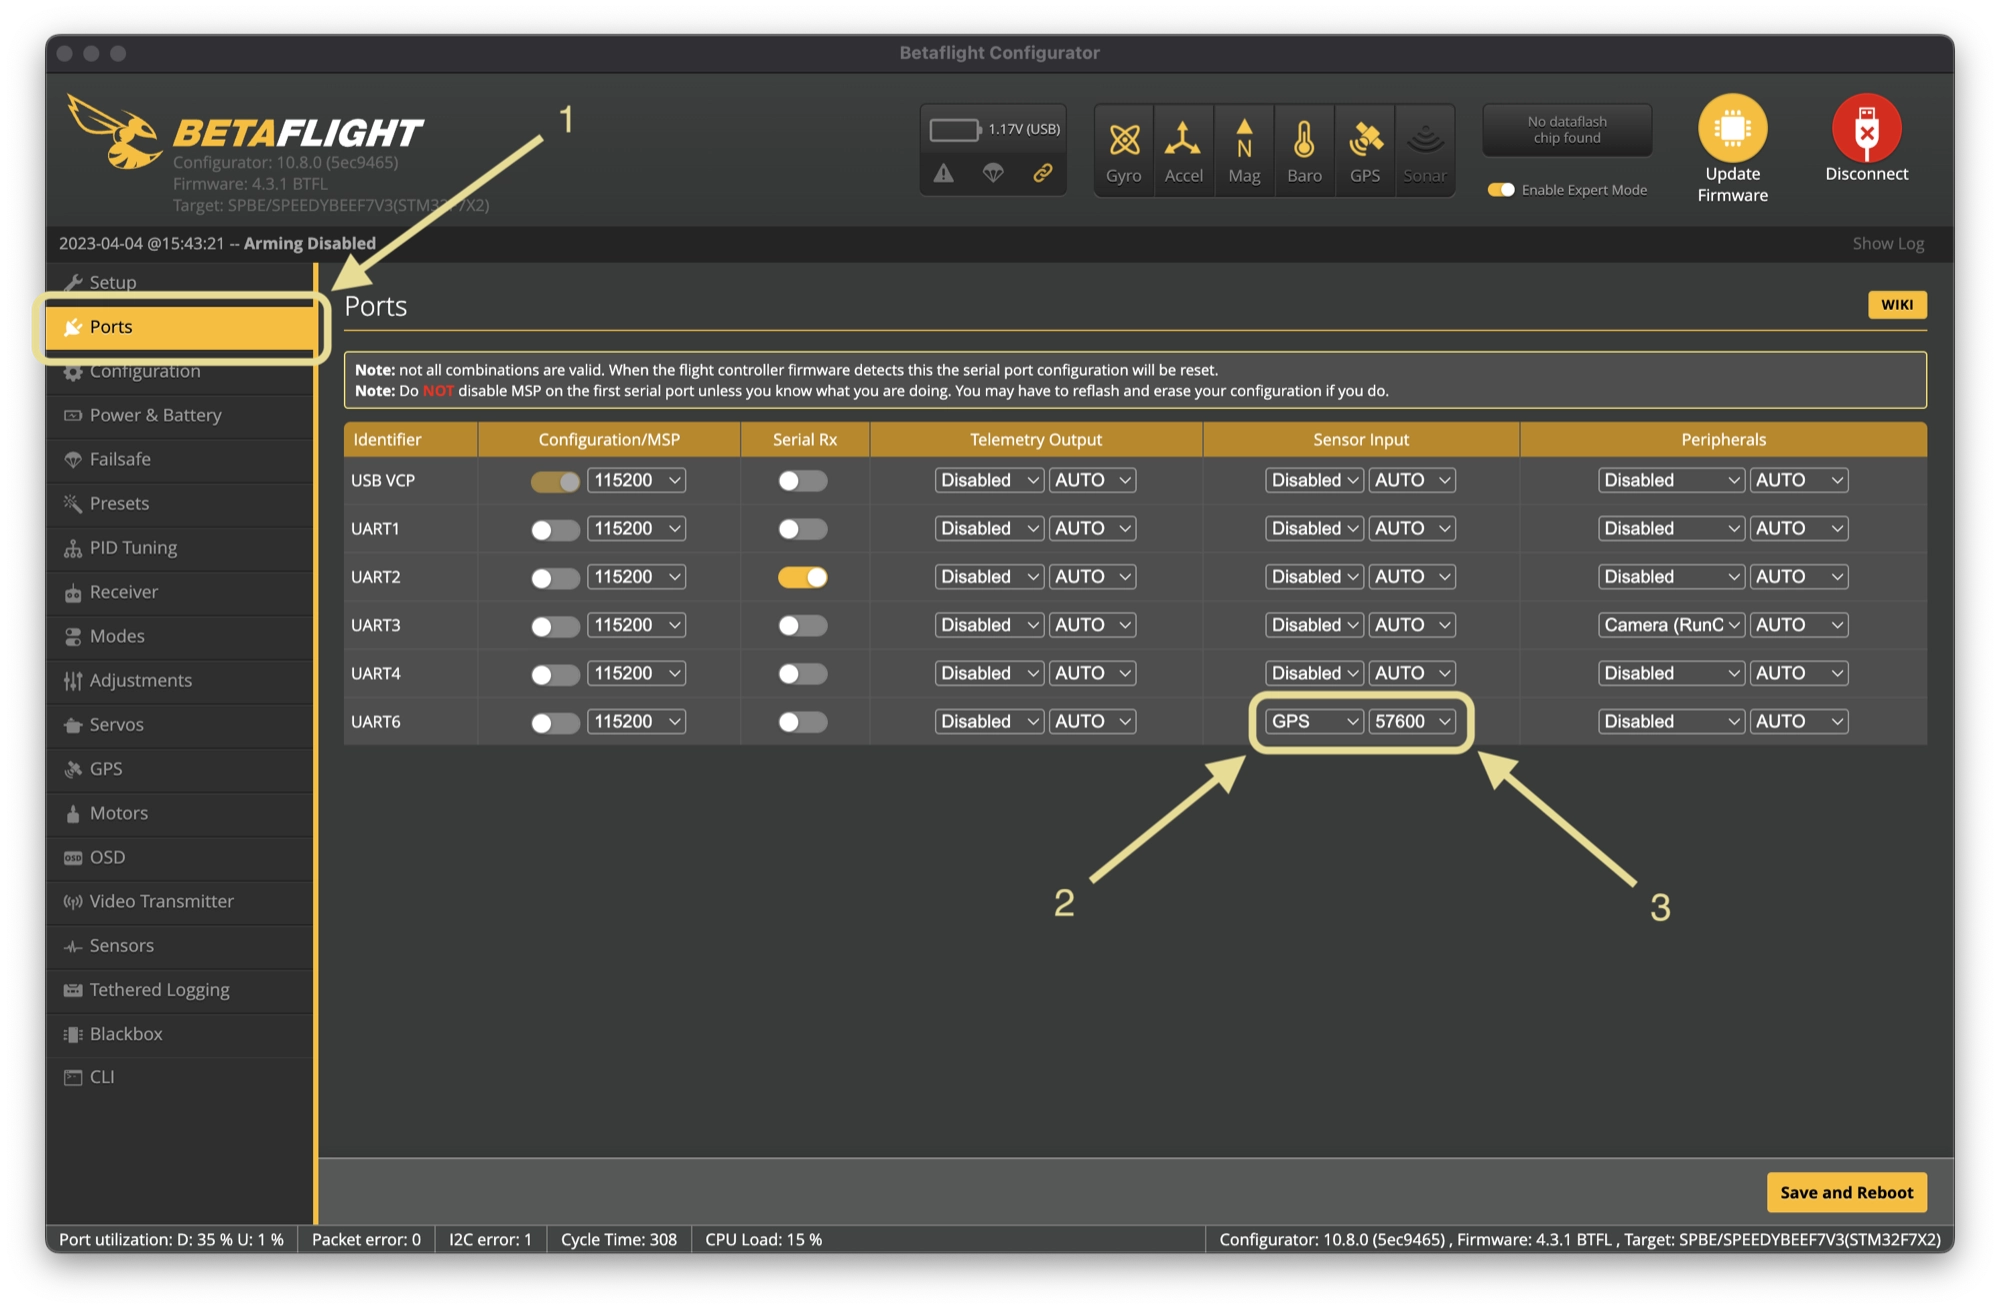
- Click Ports in the left-hand sidebar to open the flight controller port options.
- In the Sensor Input Field, choose GPS in the row that corresponds to the UART port that you have connected your GPS module to.
Set the correct baud rate for the GPS UART port
- In the Sensor Input Field, choose the correct baud rate. In most cases this will be 57600 by default.
Enable the GPS in the main Betaflight configuration
- Click Configuration in the left-hand sidebar to open the general configuration options.
- Scroll to the bottom of the main window and turn the GPS switch to on.
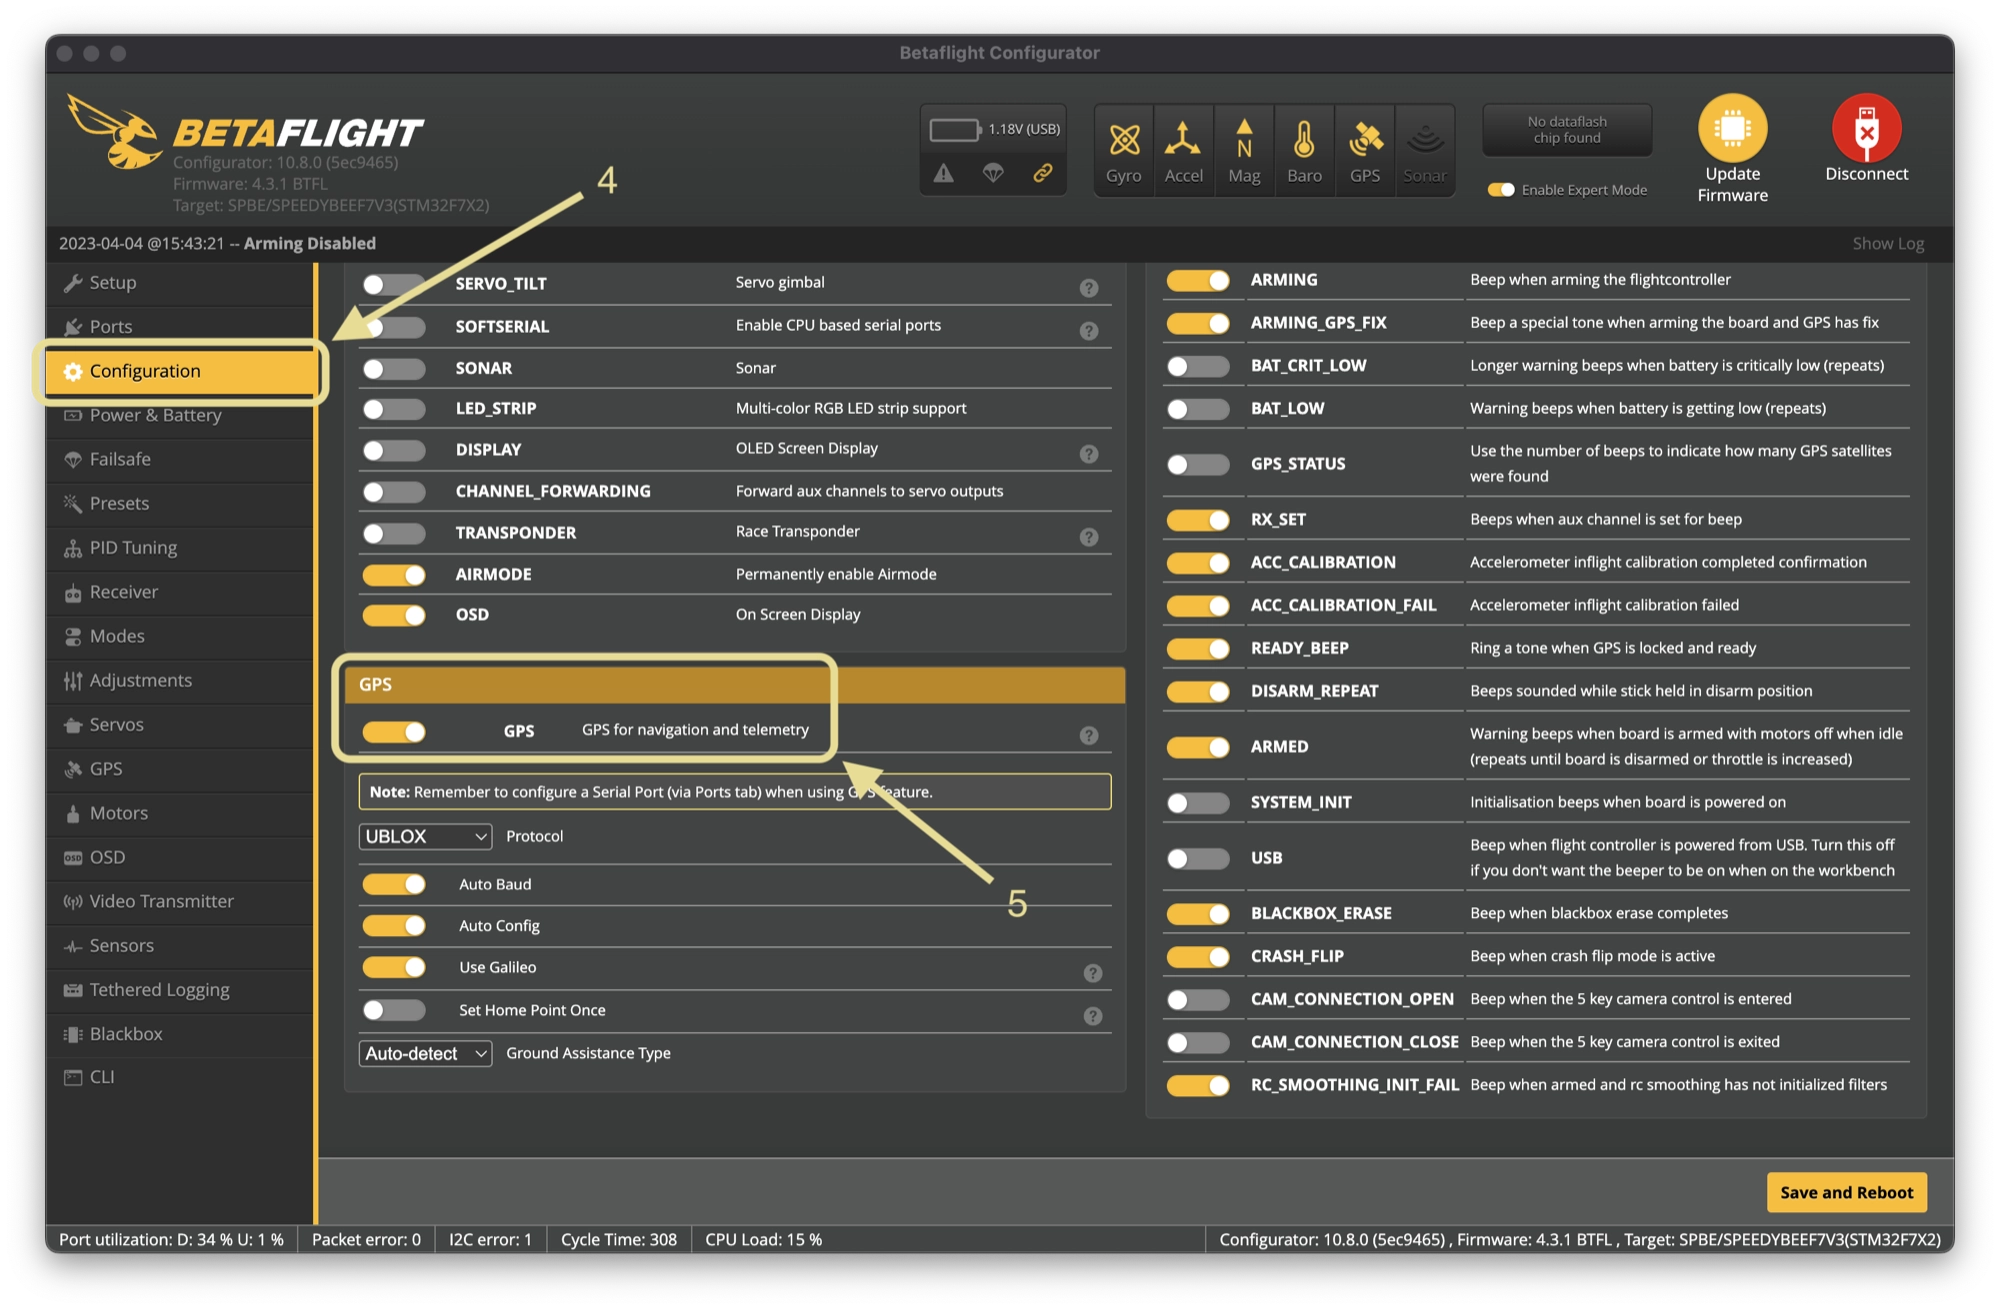
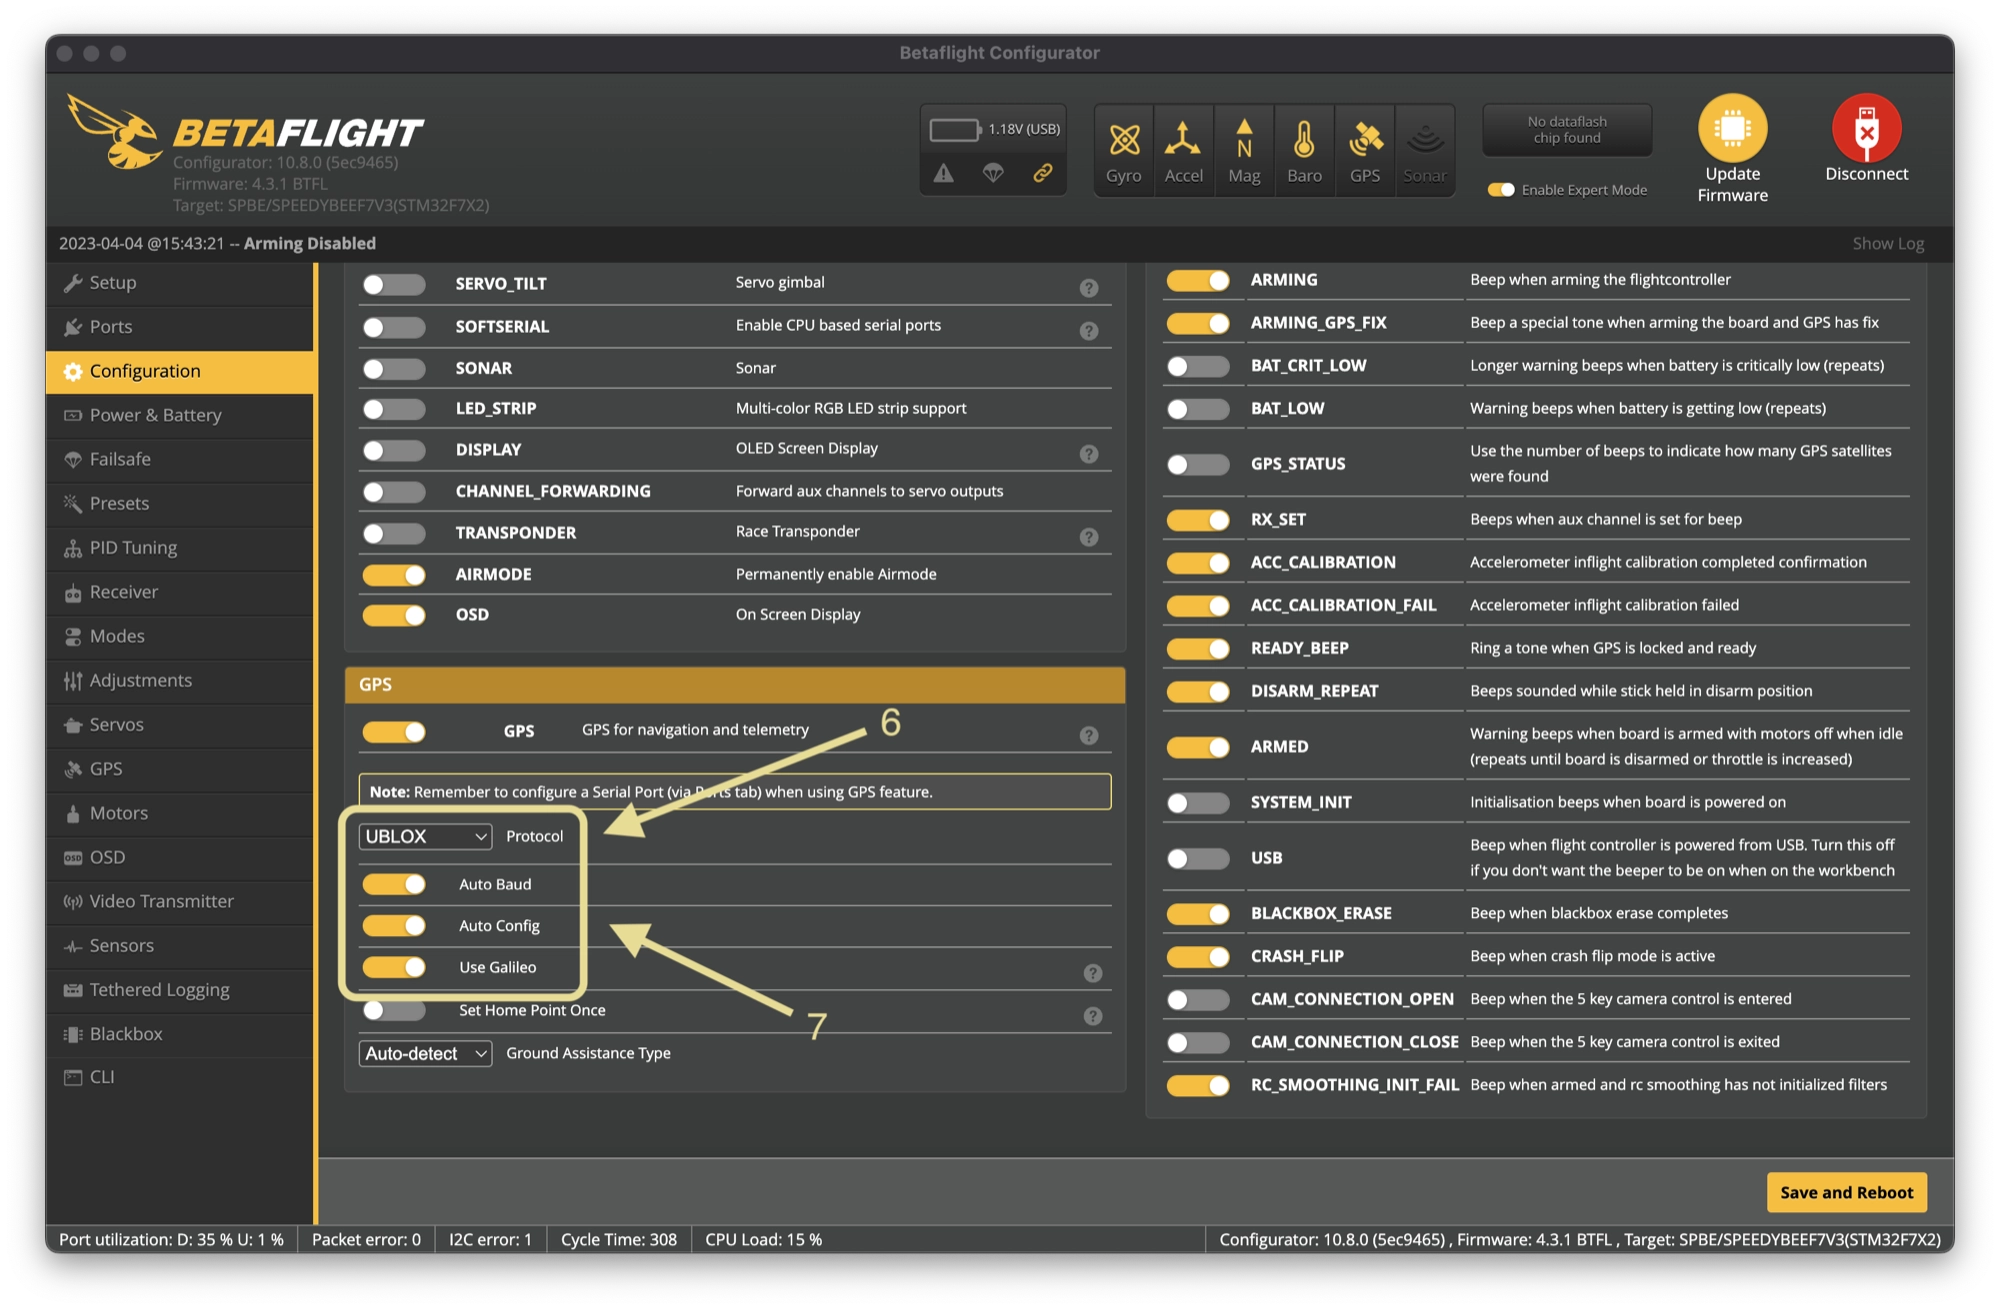
Set the correct protocol and turn on auto configuration
- Click Configuration in the left-hand sidebar to open the general configuration options.
- Scroll to the bottom of the main window and turn the GPS switch to on.
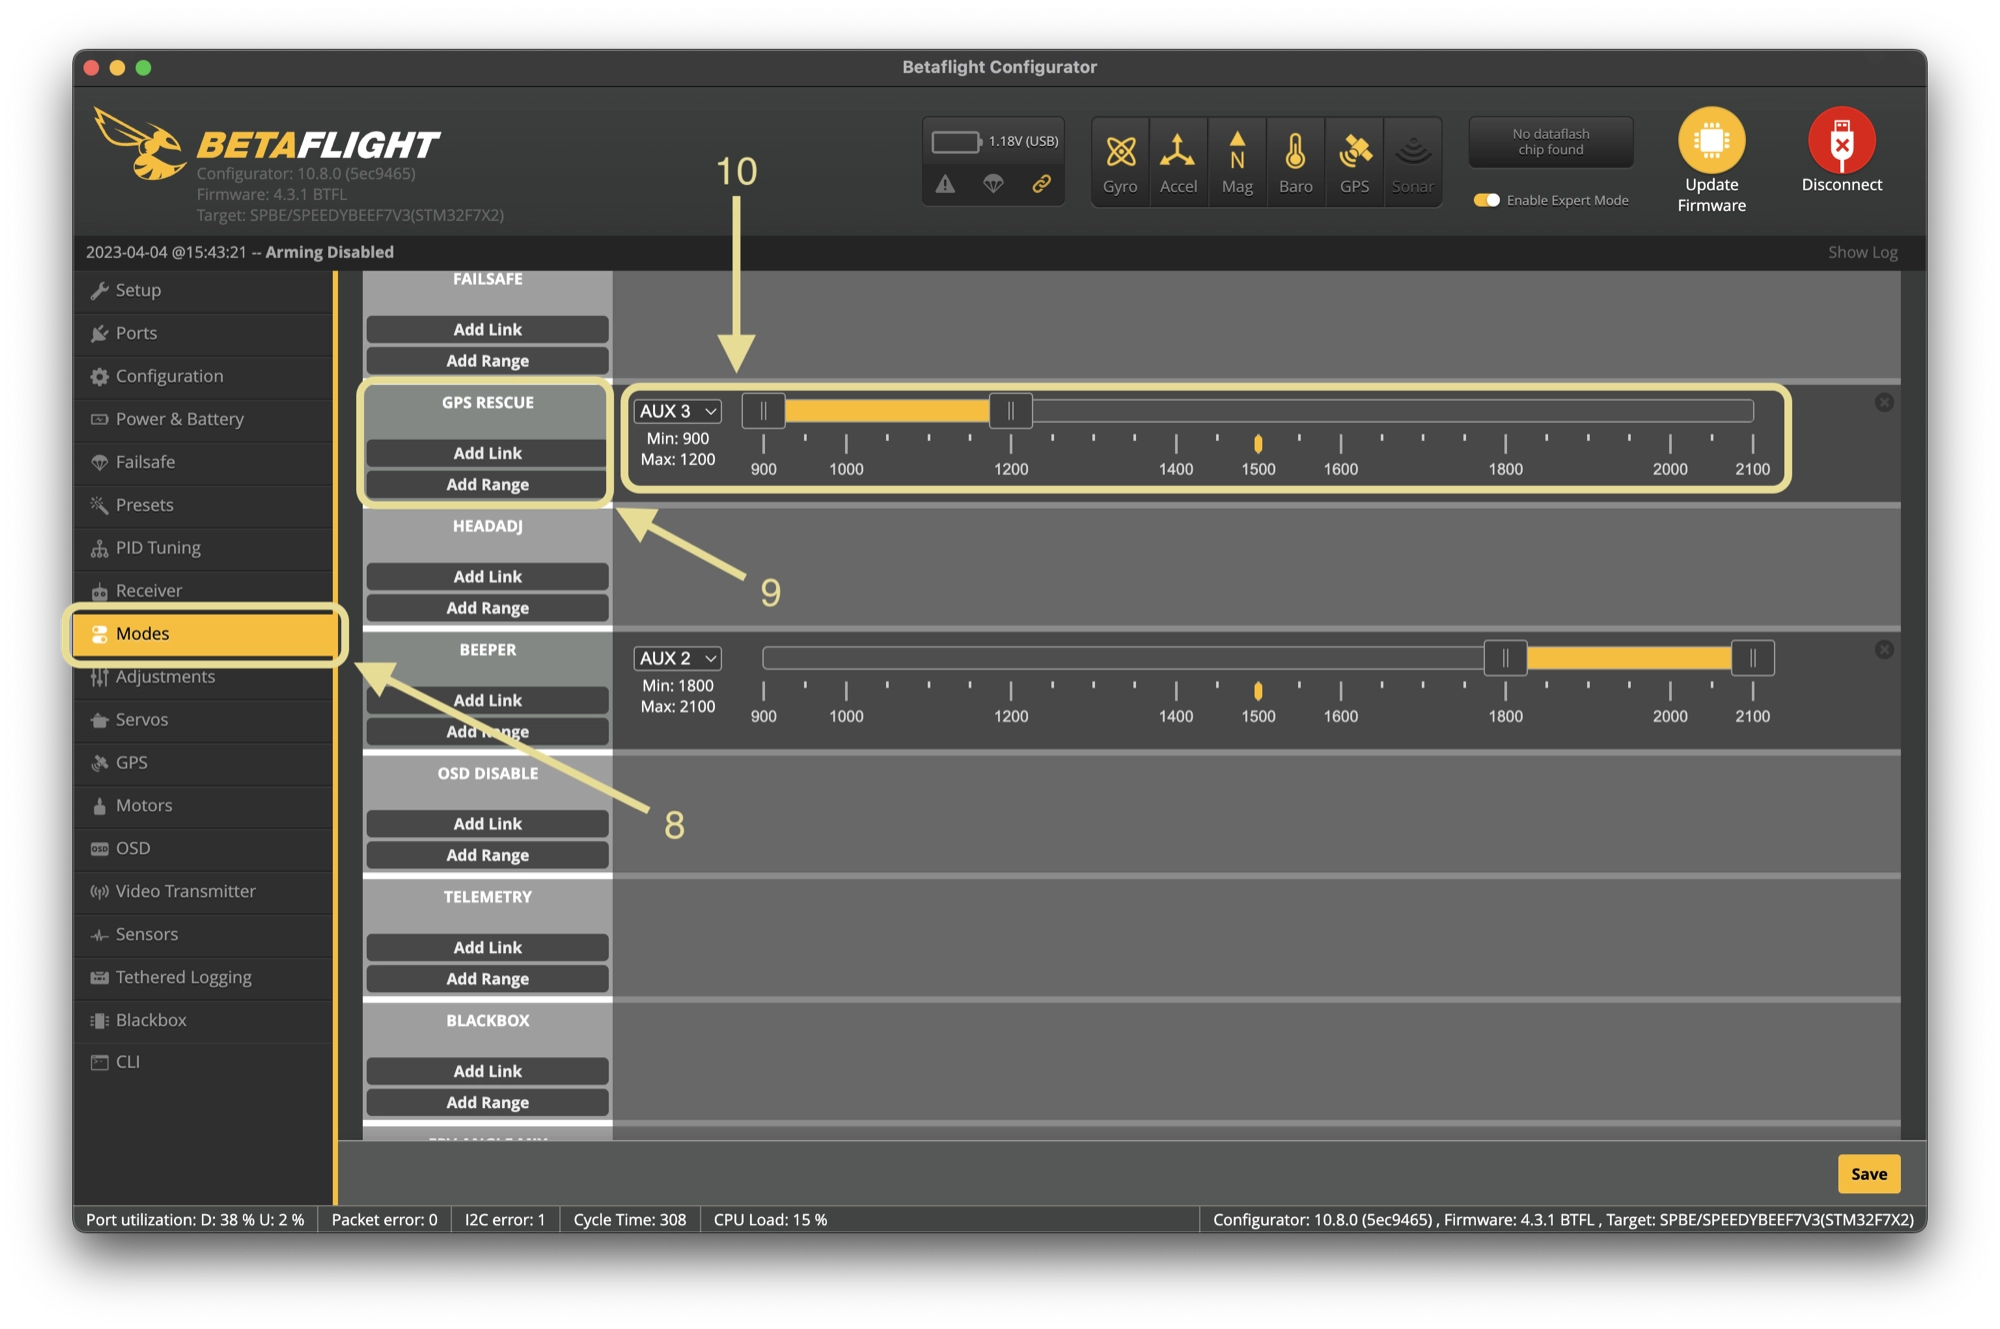
Configure a GPS Rescue switch
- Click Modes in the left-hand sidebar to open the radio switches configuration.
- Scroll down and locate the GPS Rescue function. Click Add Range to link a switch on your radio.
- Move the switch you wish to link to detect it automatically, or select the AUX channel manually. Set the switch range that you wish to use for Rescue mode.
Configure GPS Rescue on failsafe
Once you are happy that GPS Rescue mode is working correctly using a switch, you may opt to configure it to trigger in the event of a failsafe.
For further information on how to do this, see this section of the article.
How To Add GPS Data to the Betaflight OSD
Once you have configured a GPS module in Betaflight, you can use the Betaflight Configurator to add some new information to your OSD, such as your distance from the home point, ground speed and GPS coordinates.
You can add the new information to your OSD with the following steps:
- Click OSD in the left-hand sidebar to open the OSD configuration.
- Choose the elements that you wish to add to the OSD, such as compass bar or home direction.
- Choose the OSD profile that you wish to display the information on. Usually this is just number 1 if you are not using multiple OSD profiles.
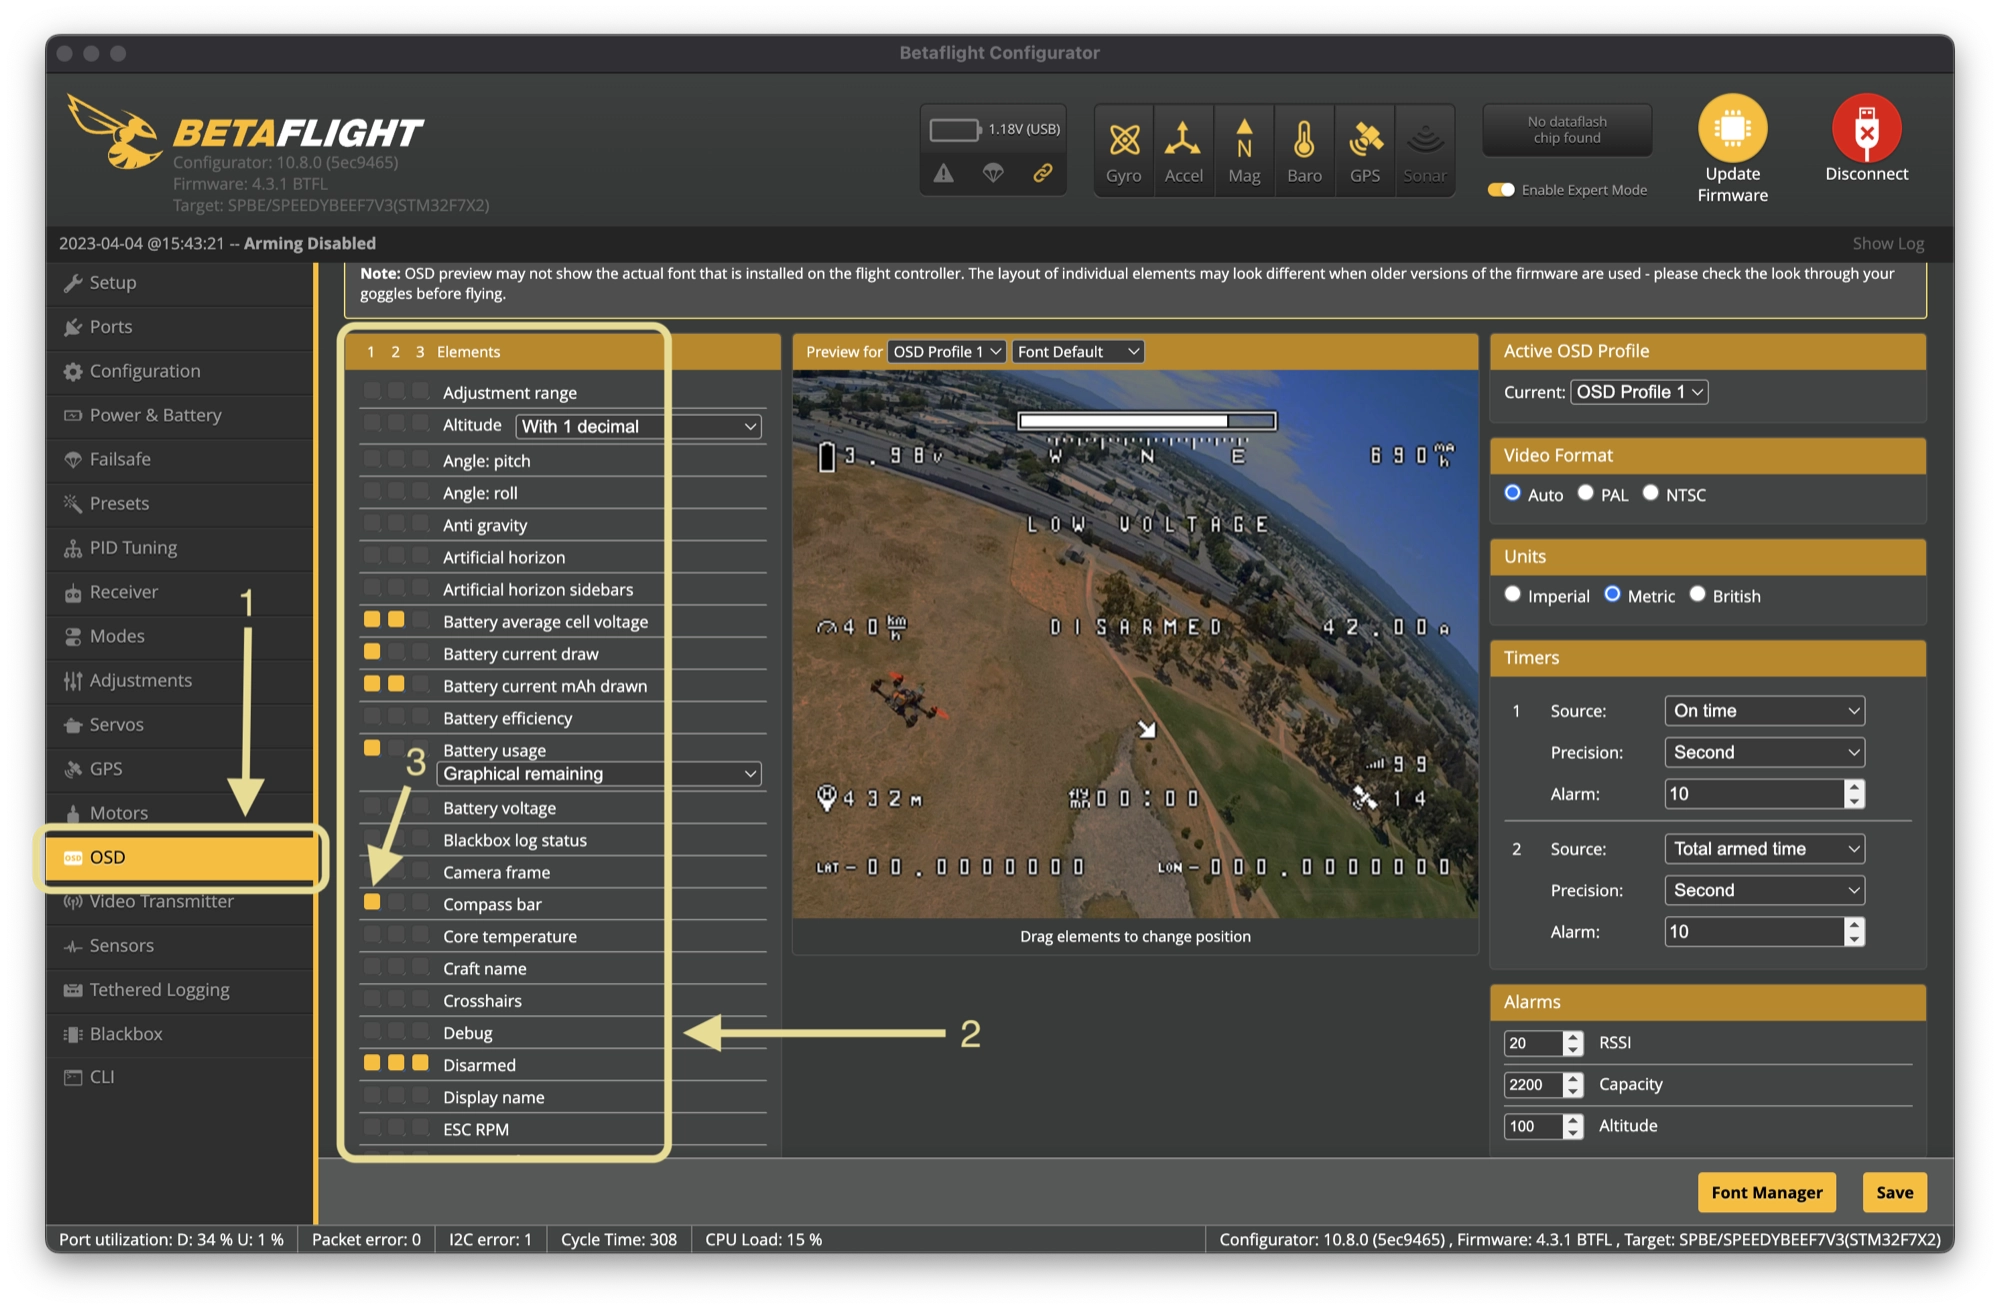
The following OSD elements are related to GPS and can be useful to add:
- Flight distance – the total distance travelled during the current flight.
- GPS latitude and longitude – your GPS coordinates (useful for recovering a lost quad as last known coordinates will be recorded in the goggles DVR).
- GPS sats – the current number of satellites with a full lock.
- GPS speed – ground speed in kph or mph.
- Home direction – an arrow that points towards the home point (where you took off from).
- Home distance – the distance to the home point (how far you have to fly to get home).
I would recommend adding GPS sats, the GPS latitude and longitude and Home Distance elements as a minimum.
I would also highly recommend adding the home direction arrow, as it is very useful! However a word of caution, it is not always accurate.
Due to the lack of a compass and the vectoring methods used by Betaflight, which we covered earlier, you sometimes need to fly some distance before the home arrow starts pointing in the correct direction.
How to Test Betaflight GPS Rescue Mode?
Once you have configured your GPS module, rescue mode switch and OSD, you can begin testing GPS rescue mode:
- Plug a battery into your quad and prepare for a flight as normal.
- Check the number of satellites using the OSD. Wait until you have at least 8 satellites.
- Arm the quad and take off. Fly to a distance of 250 metres from your home point. You need to be further away than the descent distance, which defaults to 200 metres.
- Once you reach a minimum distance of 250 metres, check that the home direction arrow is pointing in the correct direction (back to where you are stood / the location of the home point).
- Flip the switch to activate GPS rescue mode. Your quad will lock the horizon and turn quickly to the home point, before beginning to return towards you.
- Monitor the entire return flight and be ready to switch back into manual mode if something goes wrong.
- When the quad gets closeby, flip the switch to return to manual mode and land the quad manually.
How to Use Betaflight GPS Rescue Mode as a Failsafe
Once you have tested and confirmed that GPS Rescue mode works when manually triggered by a switch, you can configured it to automatically activate in the event of a failsafe.
- Click Failsafe in the left-hand sidebar to open the failsafe configuration.
- Set the failsafe switch to stage 2, which will skip the stage 1 failsafe (channel fallback settings) and go straight to GPS Rescue mode.
- Set the stage 2 failsafe to GPS Rescue mode.
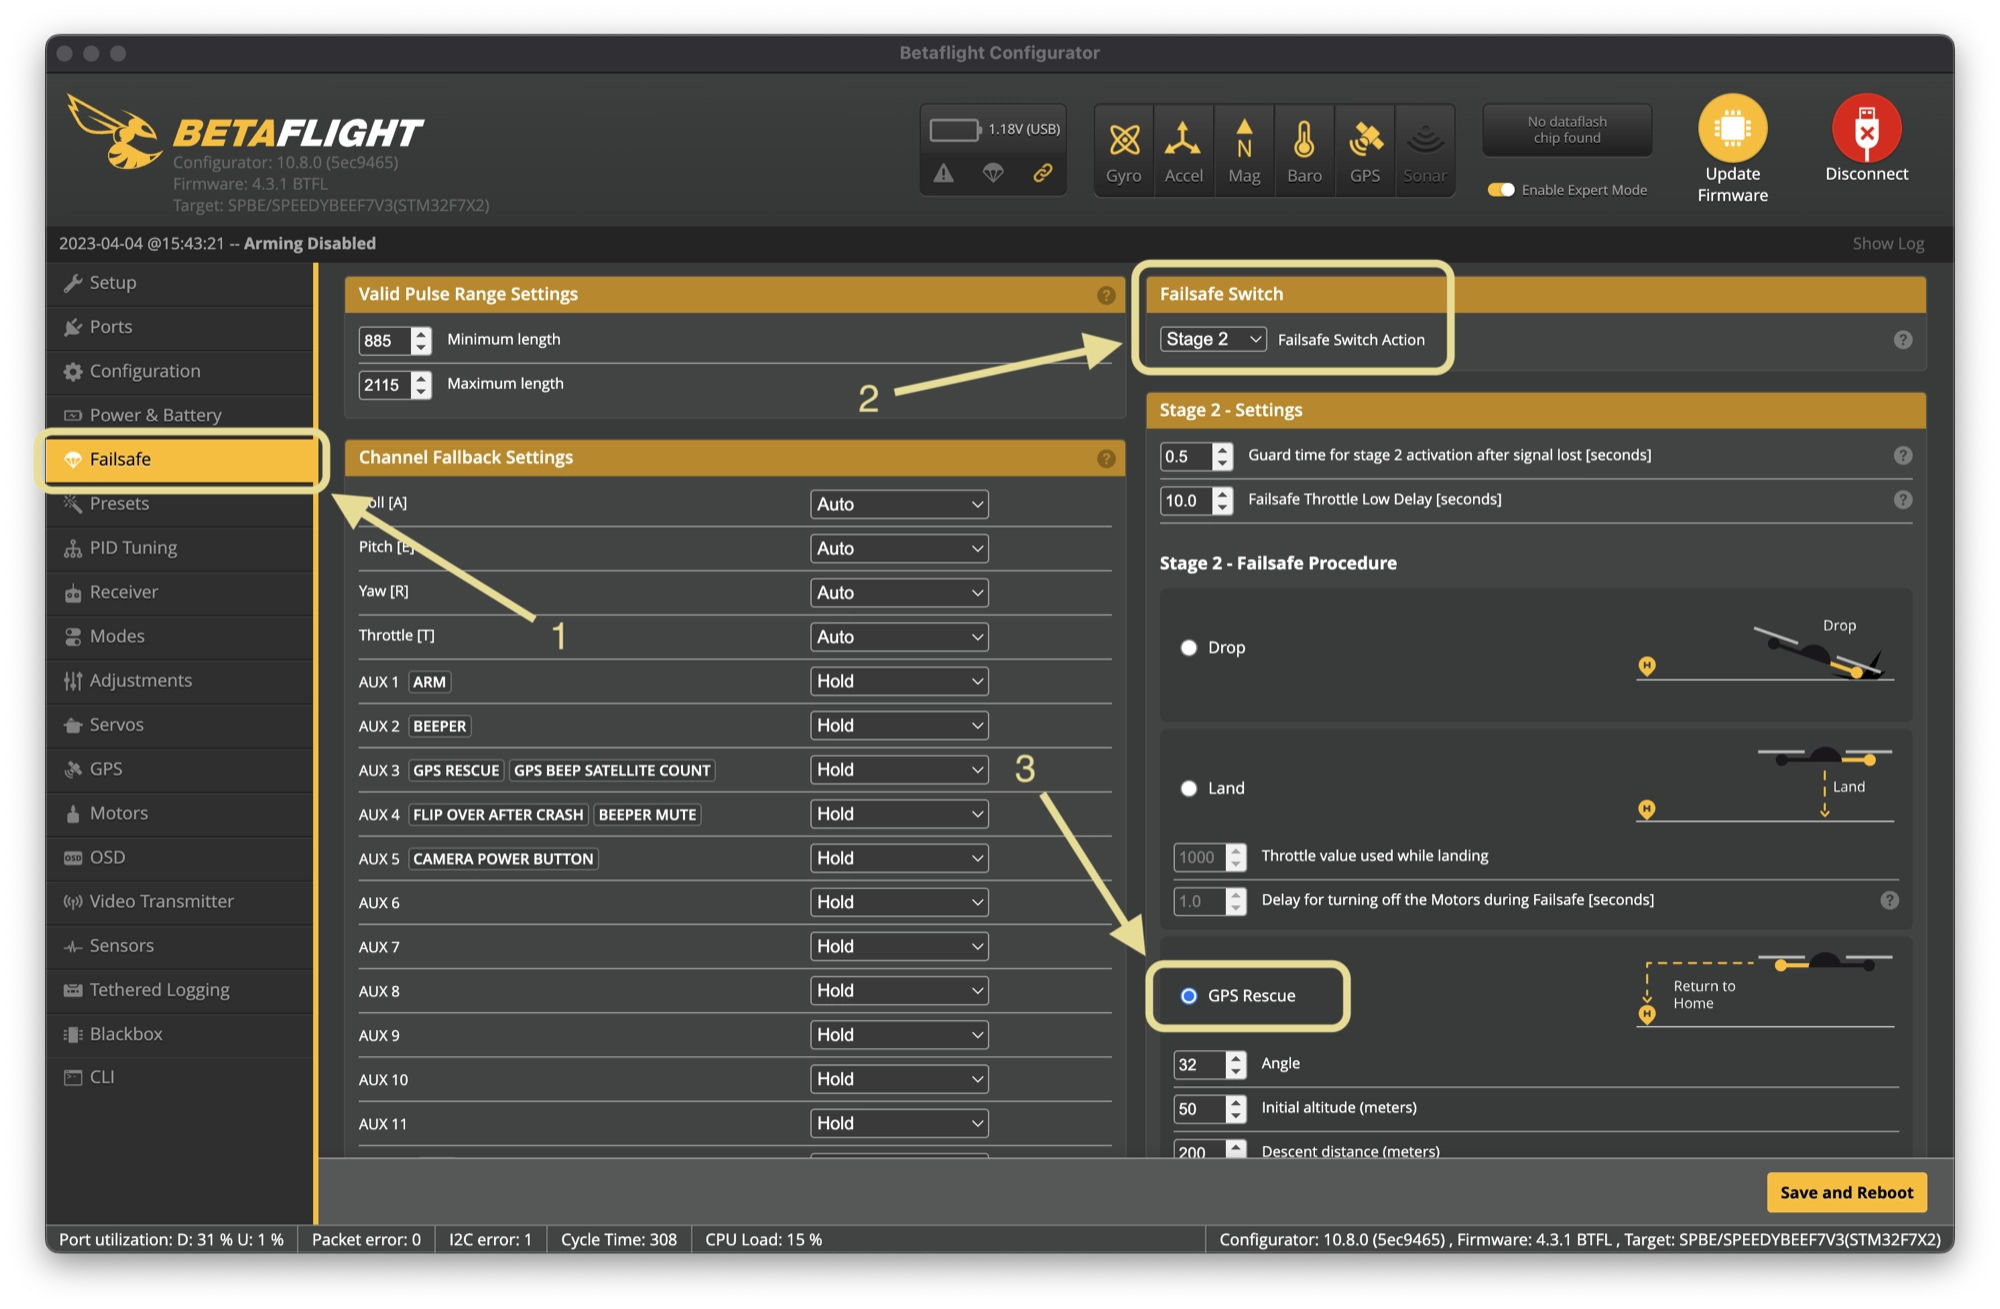
There are a number of options that you can change to customize your rescue mode behaviour:
- Angle – This is the maximum angle that the drone can tilt in degrees. The default setting works ok on 5 inch quads but some adjustment may be required for larger or smaller quads.
- Initial Altitude – The height that the drone will return to home relative to the home point.
- Descent Distance – The distance from home in meters that the drone starts to descend.
- Minimum Distance to Home – The minimum distance required from the home point in order to activate rescue mode.
- Ground Speed – The speed which the quad will travel when returning to the home point.
- Throttle Minimum – The minimum throttle value used during rescue mode.
- Throttle Maximum – The maximum throttle value used during rescue mode.
- Throttle Hover – The throttle value used for hovering during rescue mode. You can use your OSD or log to get the accurate value to enter here. However, I found the default value to work.
- Ascend Rate – The speed in which your quad can climb whilst in rescue mode.
- Descend Rate – The speed in which your quad can descend whilst in rescue mode.
- Minimum Satellites – The minimum number of satellites required to arm. Leave this set to a minimum of 8 in order to avoid any problems.
- Allow Arming Without Fix – Will allow your quad to arm without the required number of satellites. Note that you must have a GPS lock before arming in order to rescue mode to work.
- Altitude Mode –
- Maximum Altitude – Your quad will return at the highest altitude flown since arming plus the initial altitude value.
- Fixed Altitude – Your quad will return at the altitude defined by initial altitude.
- Current Altitude – Your quad will return at the altitude it was at when rescue mode was activated.
- Sanity Checks – Ensures that all required system checks are passed to prevent rescue mode causing the quad to drop from the sky. Leave this turned on.
There is something to be aware of when using GPS Rescue mode as a failsafe. Rescue mode will engage upon losing your radio link, but it will disengage as soon as the link is regained.
Be careful not to let this catch you off-guard. If you want the quad to return to the home point, you need to enable GPS Rescue mode manually by flipping the switch that you have assigned.
Conclusion
GPS Rescue mode is not perfect and requires a little patience when setting up and testing, however it is a valuable addition to any quad and might just save your ass!
My advice would be take the time to test it thoroughly in a local field, with soft grass and nobody around! My first attempt ended with the quad dropping like a stone.
Once you are confident that it works, keep flying with the same caution that you would have if you didn’t have rescue mode at all.
I would also strongly advice reading the important notes on the official Betaflight Wiki.
Good luck and happy flying!

Pingback: toradol pain relief guide