If you are looking to download and install Betaflight configurator (Windows, Linux or Mac) so that you can flash and configure the Betaflight firmware, this guide will get you up and running in under 5 minutes.
If you are completely new to Betaflight, you may first want to read these 5 top Betaflight tips for beginners.
Choose your operating system to get started, or continue reading for an introduction to Betaflight.
- Betaflight Configurator for Windows
- Betaflight Configurator for Mac OS
- Betaflight Configurator for Linux

- What is Betaflight Configurator?
- How to Install Betaflight Configurator on Windows
- How to Install Betaflight Configurator on Mac OS
- How to Install Betaflight Configurator on Ubuntu Linux
- Troubleshooting: My Flight Controller is Not Recognised
- How to Flash the Betaflight Firmware Using Betaflight Configurator
- Troubleshooting Betaflight Firmware flashing
What is Betaflight Configurator?
Betaflight Configurator is a free, open-source software application used to configure and tune the settings of Betaflight, a popular open-source firmware used in racing drones, freestyle drones, and other multirotor aircraft.
With Betaflight Configurator, users can adjust various parameters of their drones, such as PID settings, rates, and filters, as well as set up features such as OSD (On Screen Display) and Blackbox logging.
Betaflight Configurator provides an intuitive graphical user interface (GUI) that allows users to modify and save settings to the drone’s flight controller
Betaflight Configurator provides an intuitive graphical user interface (GUI) that allows users to modify and save settings to the drone’s flight controller. Betaflight Configurator also includes a variety of tools for diagnosing and troubleshooting issues with the drone’s performance.
Overall, Betaflight Configurator is an essential tool for anyone who wants to customize and fine-tune their drone’s flight characteristics to achieve the best possible performance.
How to Install Betaflight Configurator on Windows
- First, you need to download the latest version of Betaflight Configurator for Mac from the Betaflight GitHub releases page.
- Once the download is complete, open the downloaded file to extract the Betaflight Configurator application.
- Next, you need to download and install the drivers for your flight controller. Most flight controllers use either the CP2102 or the FTDI chipset for USB communication.
- After installing the drivers, connect your flight controller to your computer using a USB cable.
- Open the Betaflight Configurator application that you extracted earlier.
- In the Betaflight Configurator window, select the appropriate serial port from the drop-down menu in the top-right corner of the screen. You can usually find the correct port by checking your computer’s device manager.
- Next, click the Connect button to establish a connection with your flight controller.
- Once the connection is established, you can use the Betaflight Configurator to configure and tune your drone’s settings.
That’s it! With Betaflight Configurator installed on your Windows machine and your flight controller connected, you can customize your drone’s flight characteristics and achieve the best possible performance.
Next, learn how to install the Betaflight firmware on your flight controller using the Betaflight configurator.
How to Install Betaflight Configurator on Mac OS
- First, you need to download the latest version of Betaflight Configurator for Mac from the Betaflight GitHub releases page.
- Once the download is complete, open the downloaded file to extract the Betaflight Configurator application and move it to your applications folder.
- Mac OS comes already equipped with the necessary drivers to communicate with your flight controller. However in case you do end up needing a driver, most flight controllers use either the CP2102 or the FTDI chipset for USB communication. Mac OS versions are available from the download pages respectively.
- Connect your flight controller to your computer using a USB cable.
- Open the Betaflight Configurator application that you extracted earlier.
- In the Betaflight Configurator window, select the appropriate serial port from the drop-down menu in the top-right corner of the screen.
- Next, click the Connect button to establish a connection with your flight controller.
- Once the connection is established, you can use the Betaflight Configurator to configure and tune your drone’s settings.
That’s it! With Betaflight Configurator installed on your Mac OS, you can customize your drone’s flight characteristics and achieve the best possible performance.
Next, learn how to install the Betaflight firmware on your flight controller using the Betaflight configurator.
How to Install Betaflight Configurator on Ubuntu Linux
- Download the latest release of Betaflight Configurator for Linux from the official Betaflight Github page: https://github.com/betaflight/betaflight-configurator/releases
- Once the download is complete, open a terminal window and navigate to the directory where you downloaded the file using the terminal.
- Extract the contents of the downloaded file by running the following command. Replace
<version>with the version that you downloaded:
tar -xvzf betaflight-configurator_<version>.tar.gz
- Navigate to the extracted directory by running the following command. Replace
<version>with the version that you downloaded:
cd betaflight-configurator_<version>/betaflight\ Configurator/
- Set the permissions for the Betaflight Configurator executable file by running the following command:
chmod +x Betaflight-Configurator
- Run the Betaflight Configurator by executing the
Betaflight-Configuratorbinary in the current directory:
./Betaflight-Configurator
- In the Betaflight Configurator window, select the appropriate serial port from the drop-down menu in the top-right corner of the screen.
- Next, click the Connect button to establish a connection with your flight controller.
- Once the connection is established, you can use the Betaflight Configurator to flash the Betaflight firmware and configure your drone’s settings.
Next, learn how to install the Betaflight firmware on your flight controller using the Betaflight configurator.
Troubleshooting: My Flight Controller is Not Recognised
If your Betaflight flight controller is not recognized when you plug it in via USB, there are a few things you can try:
- Make sure that the USB cable you are using is not faulty. Try using a different USB cable to see if that solves the problem (some USB cables are for charging only and omit the extra wires necessary for data communication – this has caught me out before!).
- Try plugging the flight controller into a different USB port on your computer. Sometimes, certain USB ports may not be working properly.
- Check if your flight controller has a bootloader mode. You may need to enter the bootloader mode in order for the flight controller to be recognized by the system. The steps to enter the bootloader mode vary depending on the flight controller. Consult the user manual or the manufacturer’s website for instructions on how to enter the bootloader mode.
- You may need to download and install the drivers for your flight controller. Most flight controllers use either the CP2102 or the FTDI chipset for USB communication. See here for further information: https://betaflight.com/docs/getting-started/#install-the-drivers.
- Try connecting the flight controller to a different computer to see if the problem persists. If the flight controller is still not recognized by other computers, it may be faulty and you may need to replace it.
How to Flash the Betaflight Firmware Using Betaflight Configurator
It is recommended to make a backup of your current configuration before flashing new firmware. Also, make sure to read the release notes and instructions carefully before updating the firmware.
To update or install the Betaflight firmware with Betaflight Configurator, you can follow these steps:
- Connect your flight controller board to your computer using a USB cable.
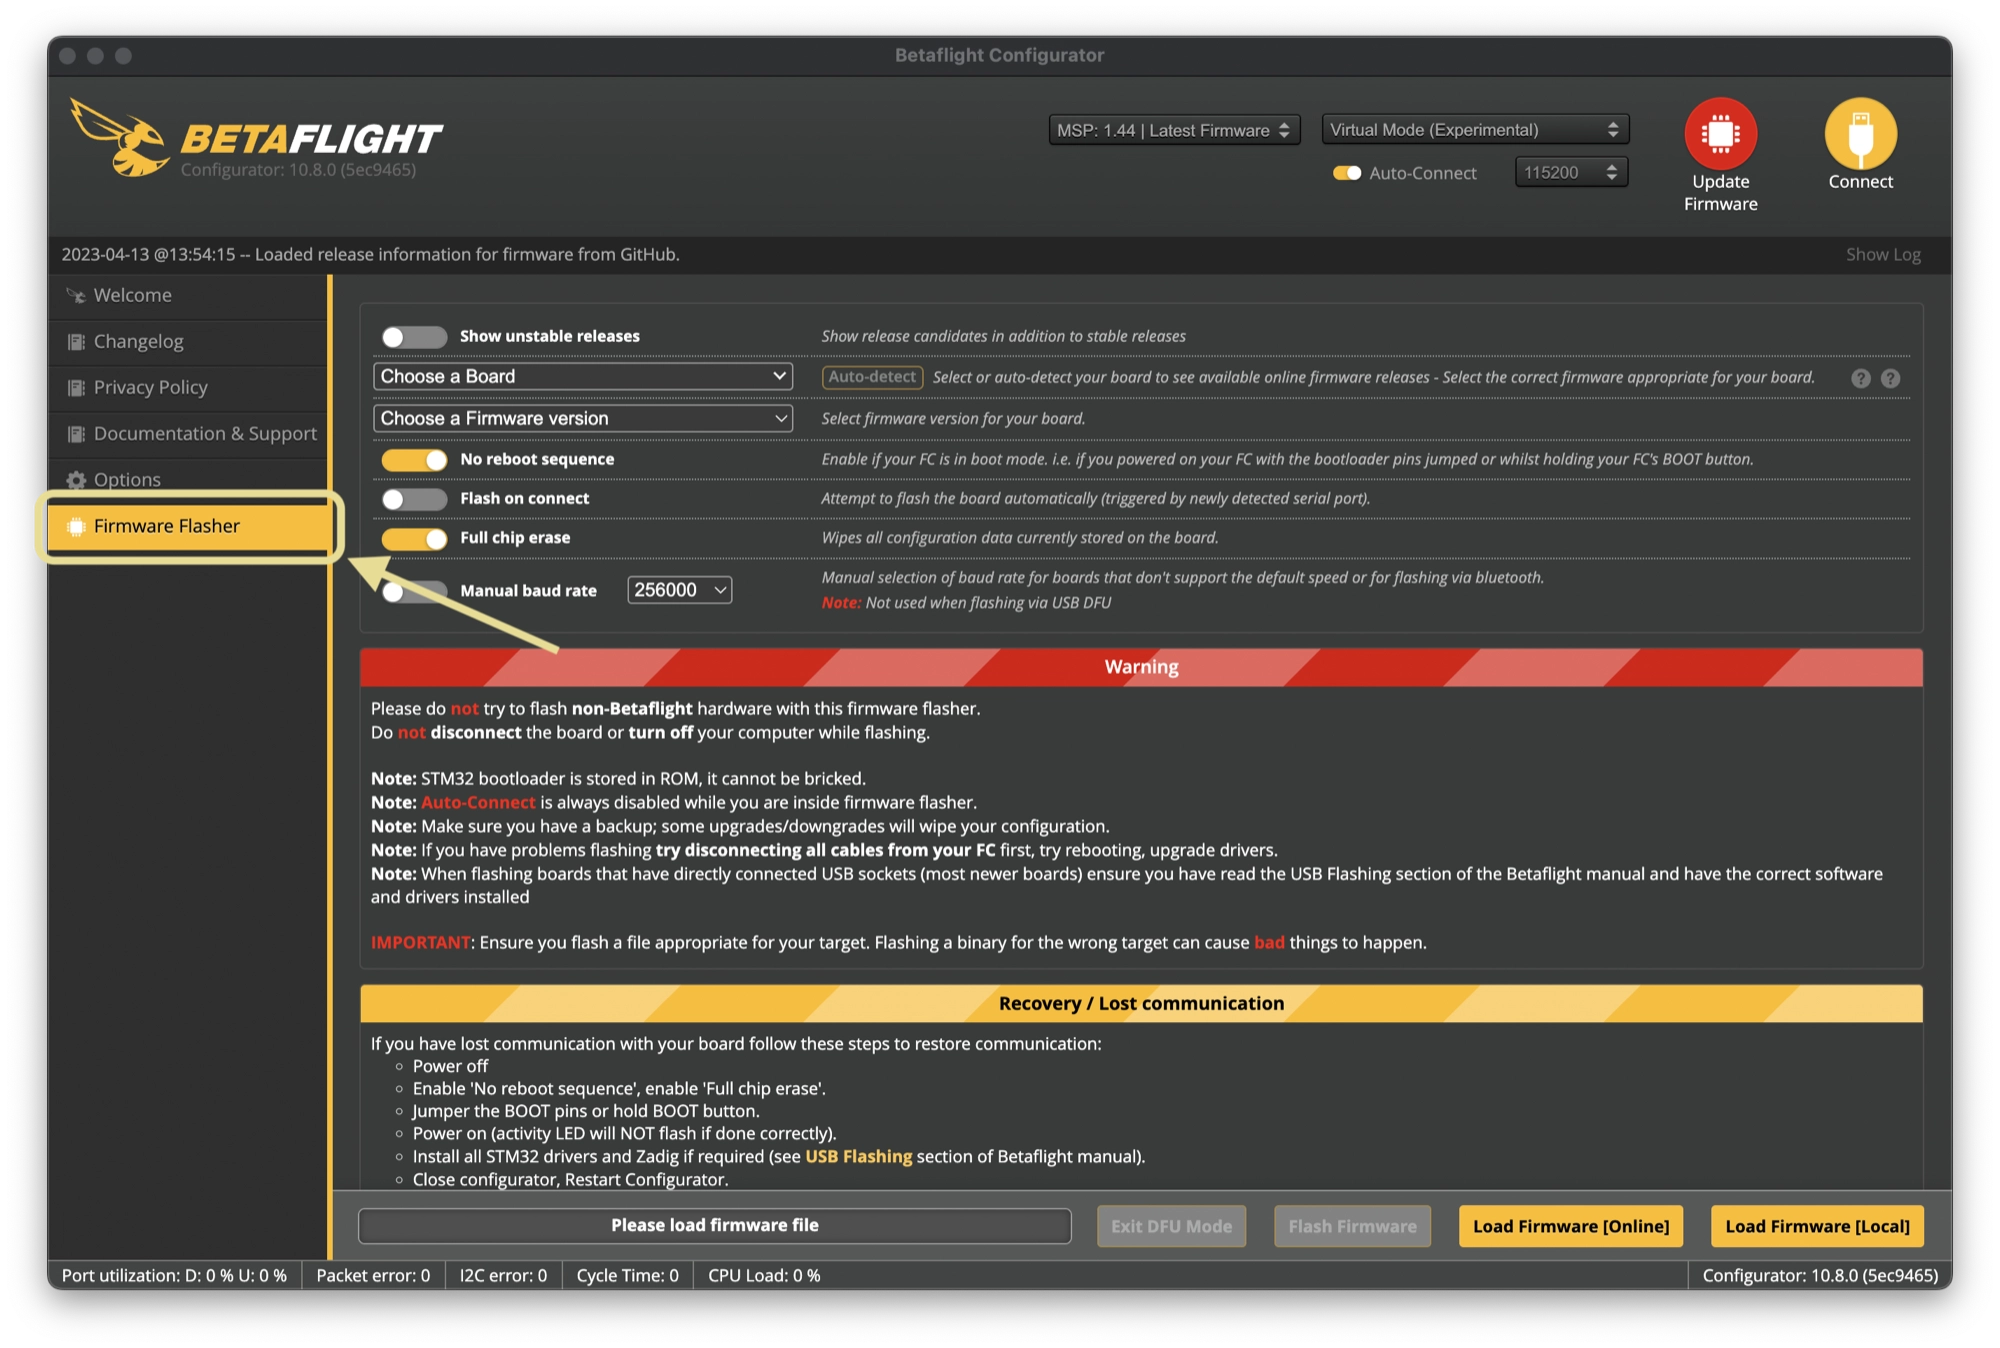
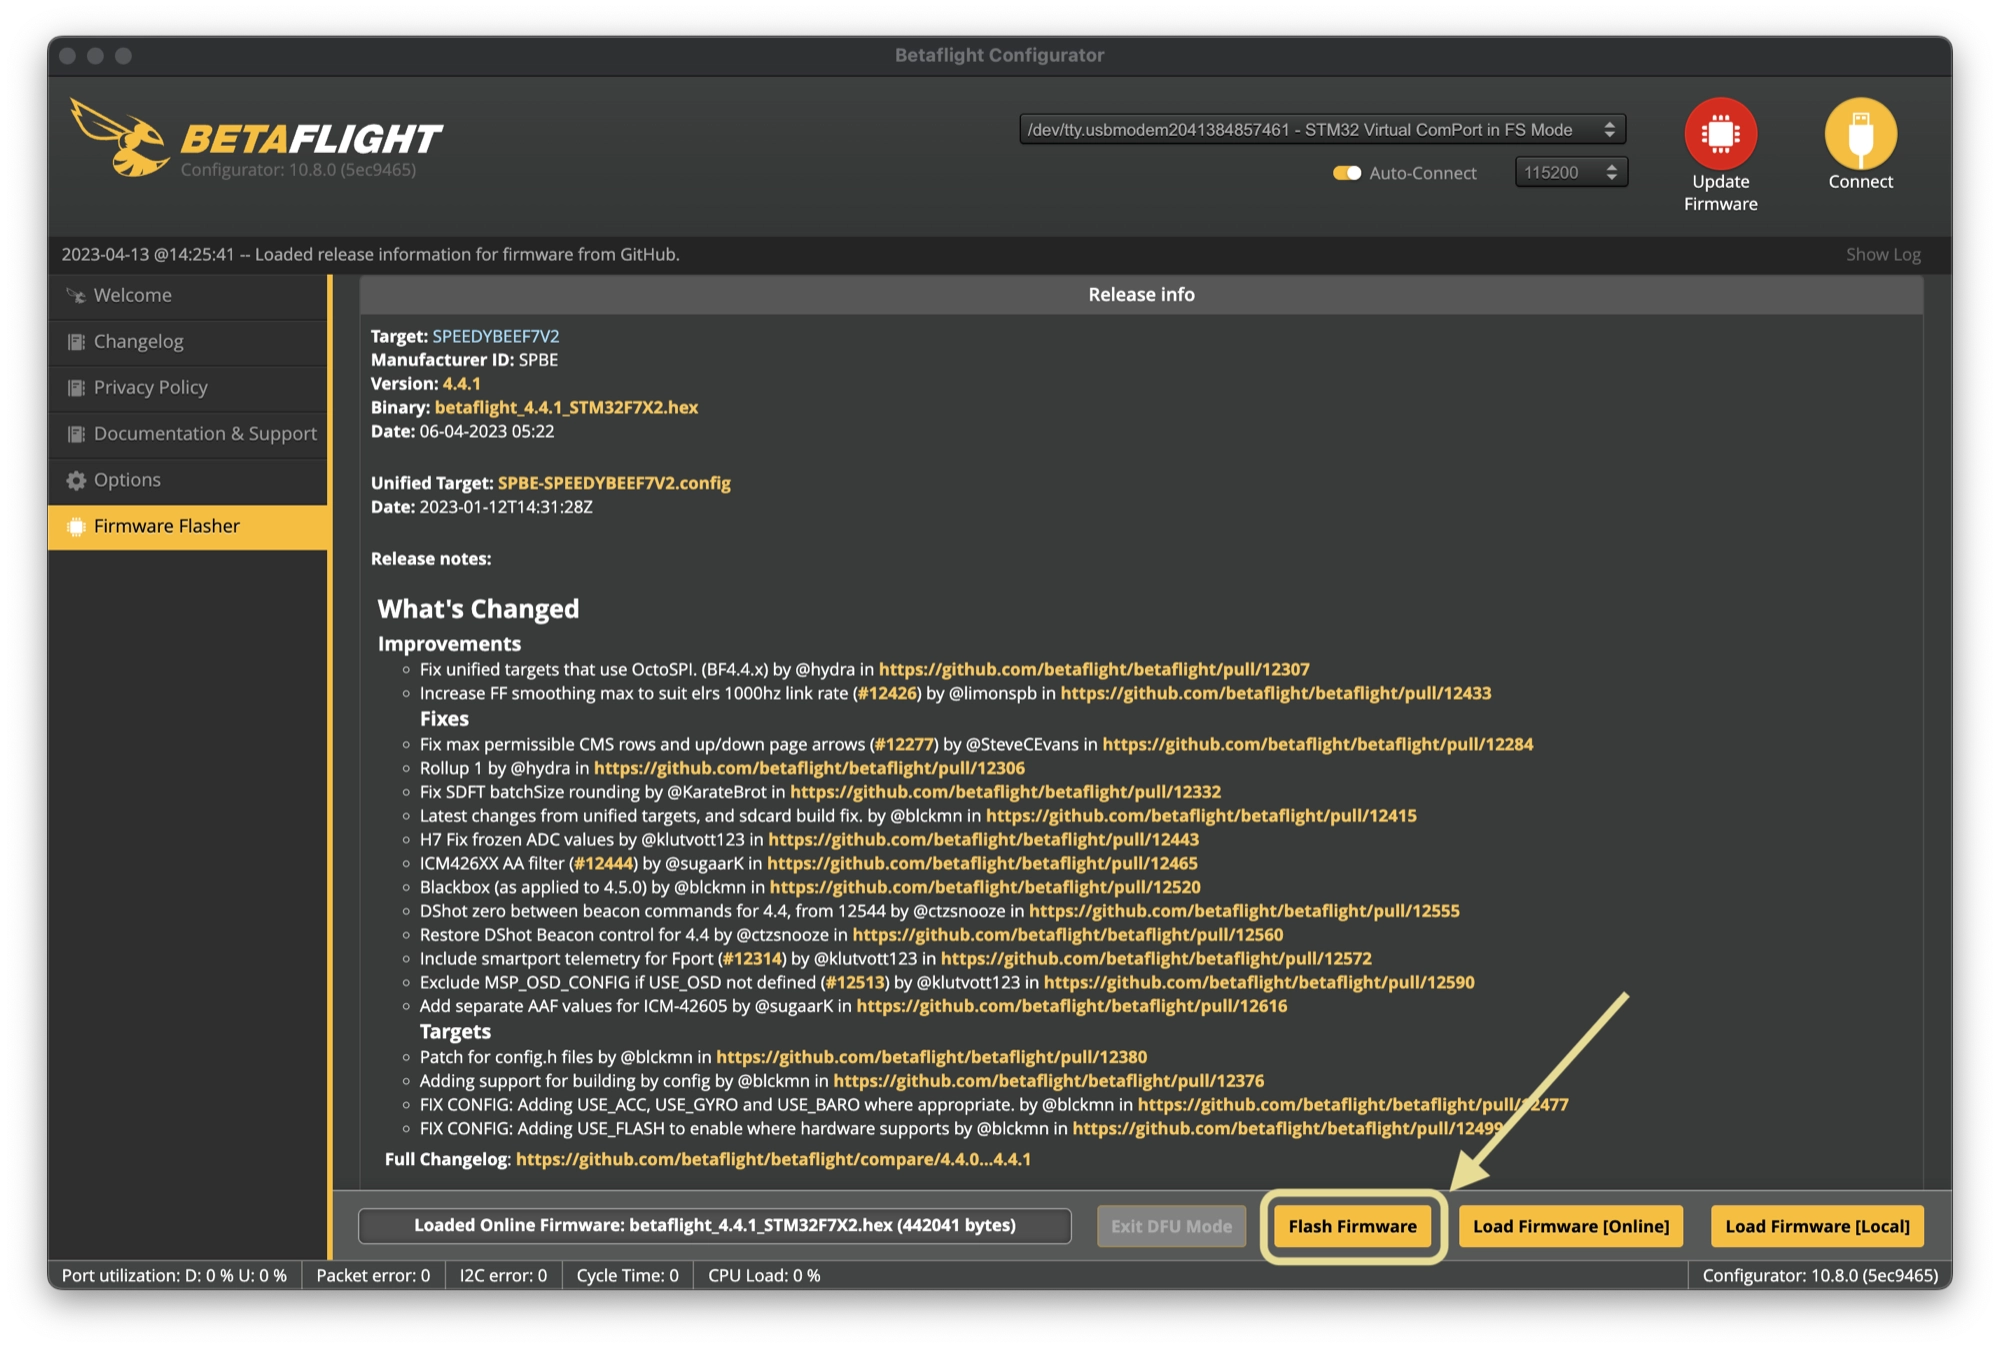
- Open Betaflight Configurator and click Firmware Flasher in the left-hand sidebar.
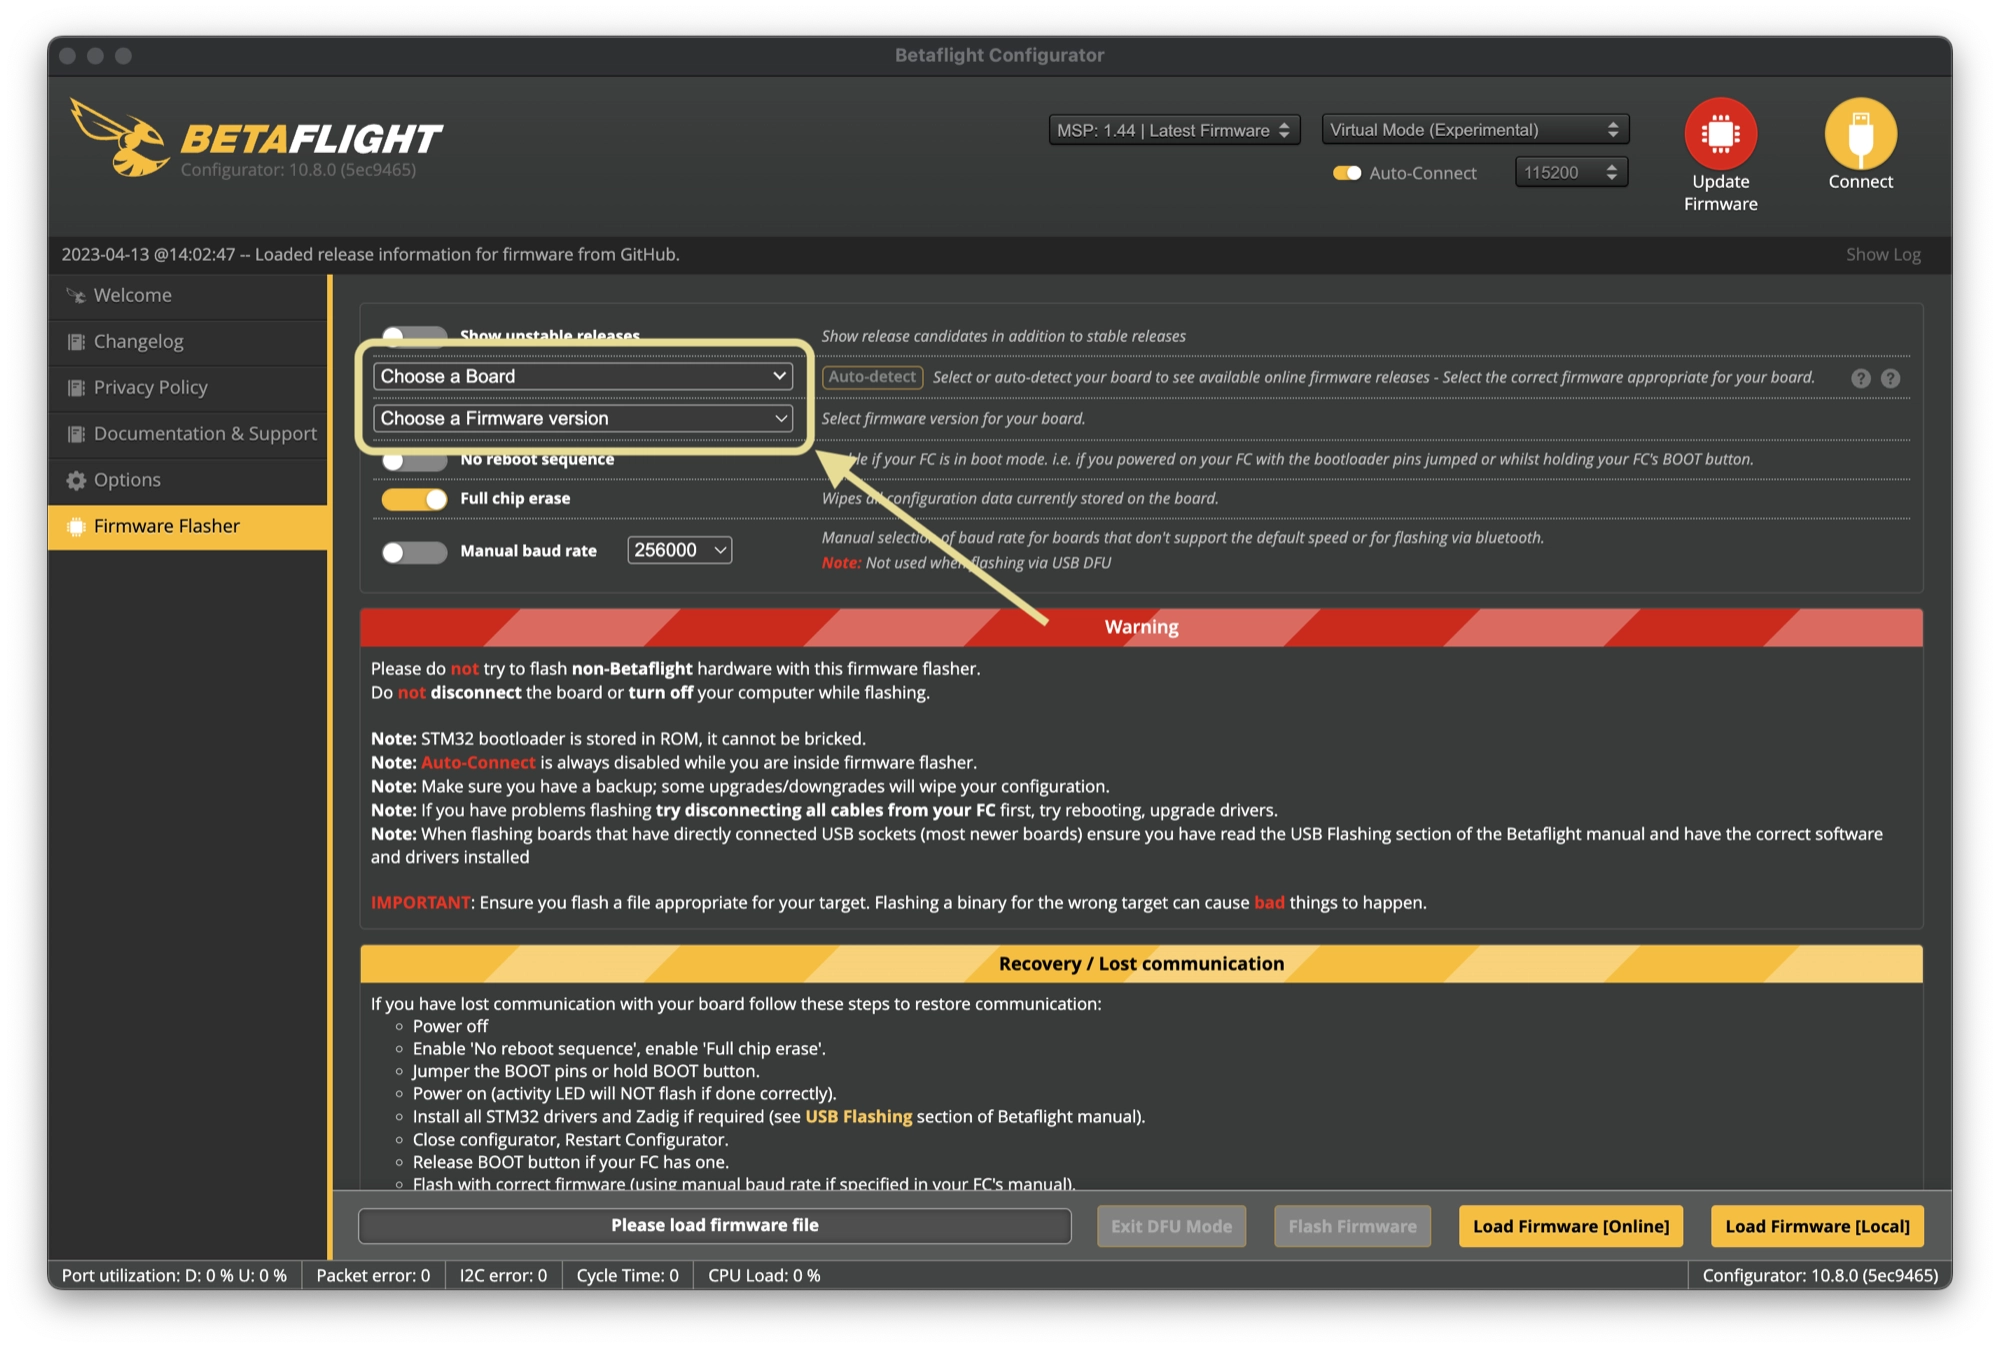
- Select the firmware version you want to install from the dropdown menu. It is recommended to use the latest stable release version.
- Make sure the firmware target matches your flight controller board. You can check this information on the board’s product page or user manual.
- Click on the Load Firmware [Online] button to download the firmware file from the Betaflight server. Alternatively, you can load a locally saved firmware file by clicking on the Load Firmware [Local] button.
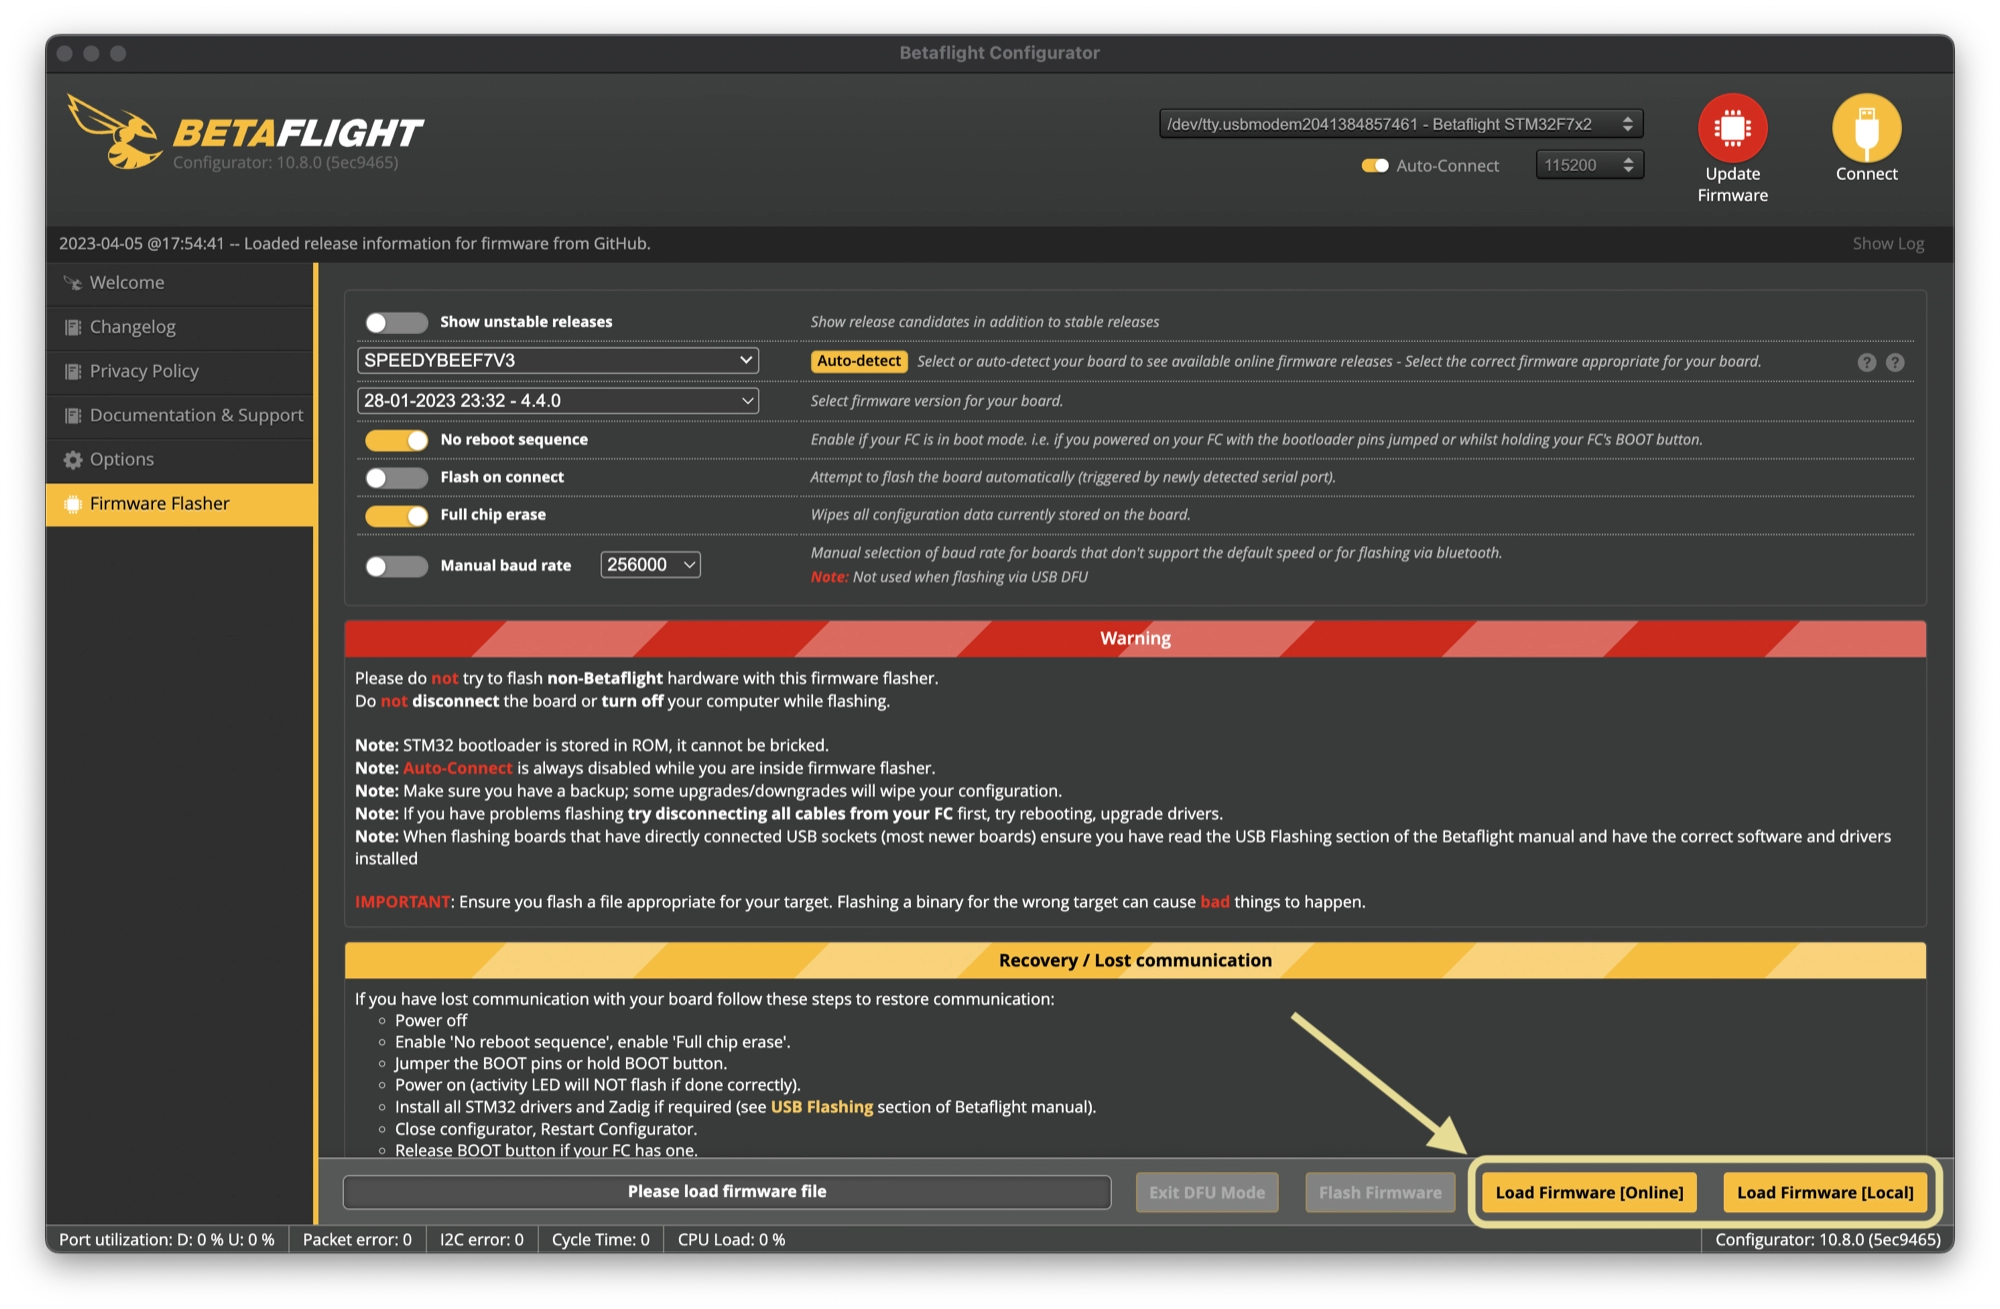
- Once the firmware file is loaded, click on the Flash Firmware button at the bottom of the screen to start the flashing process.
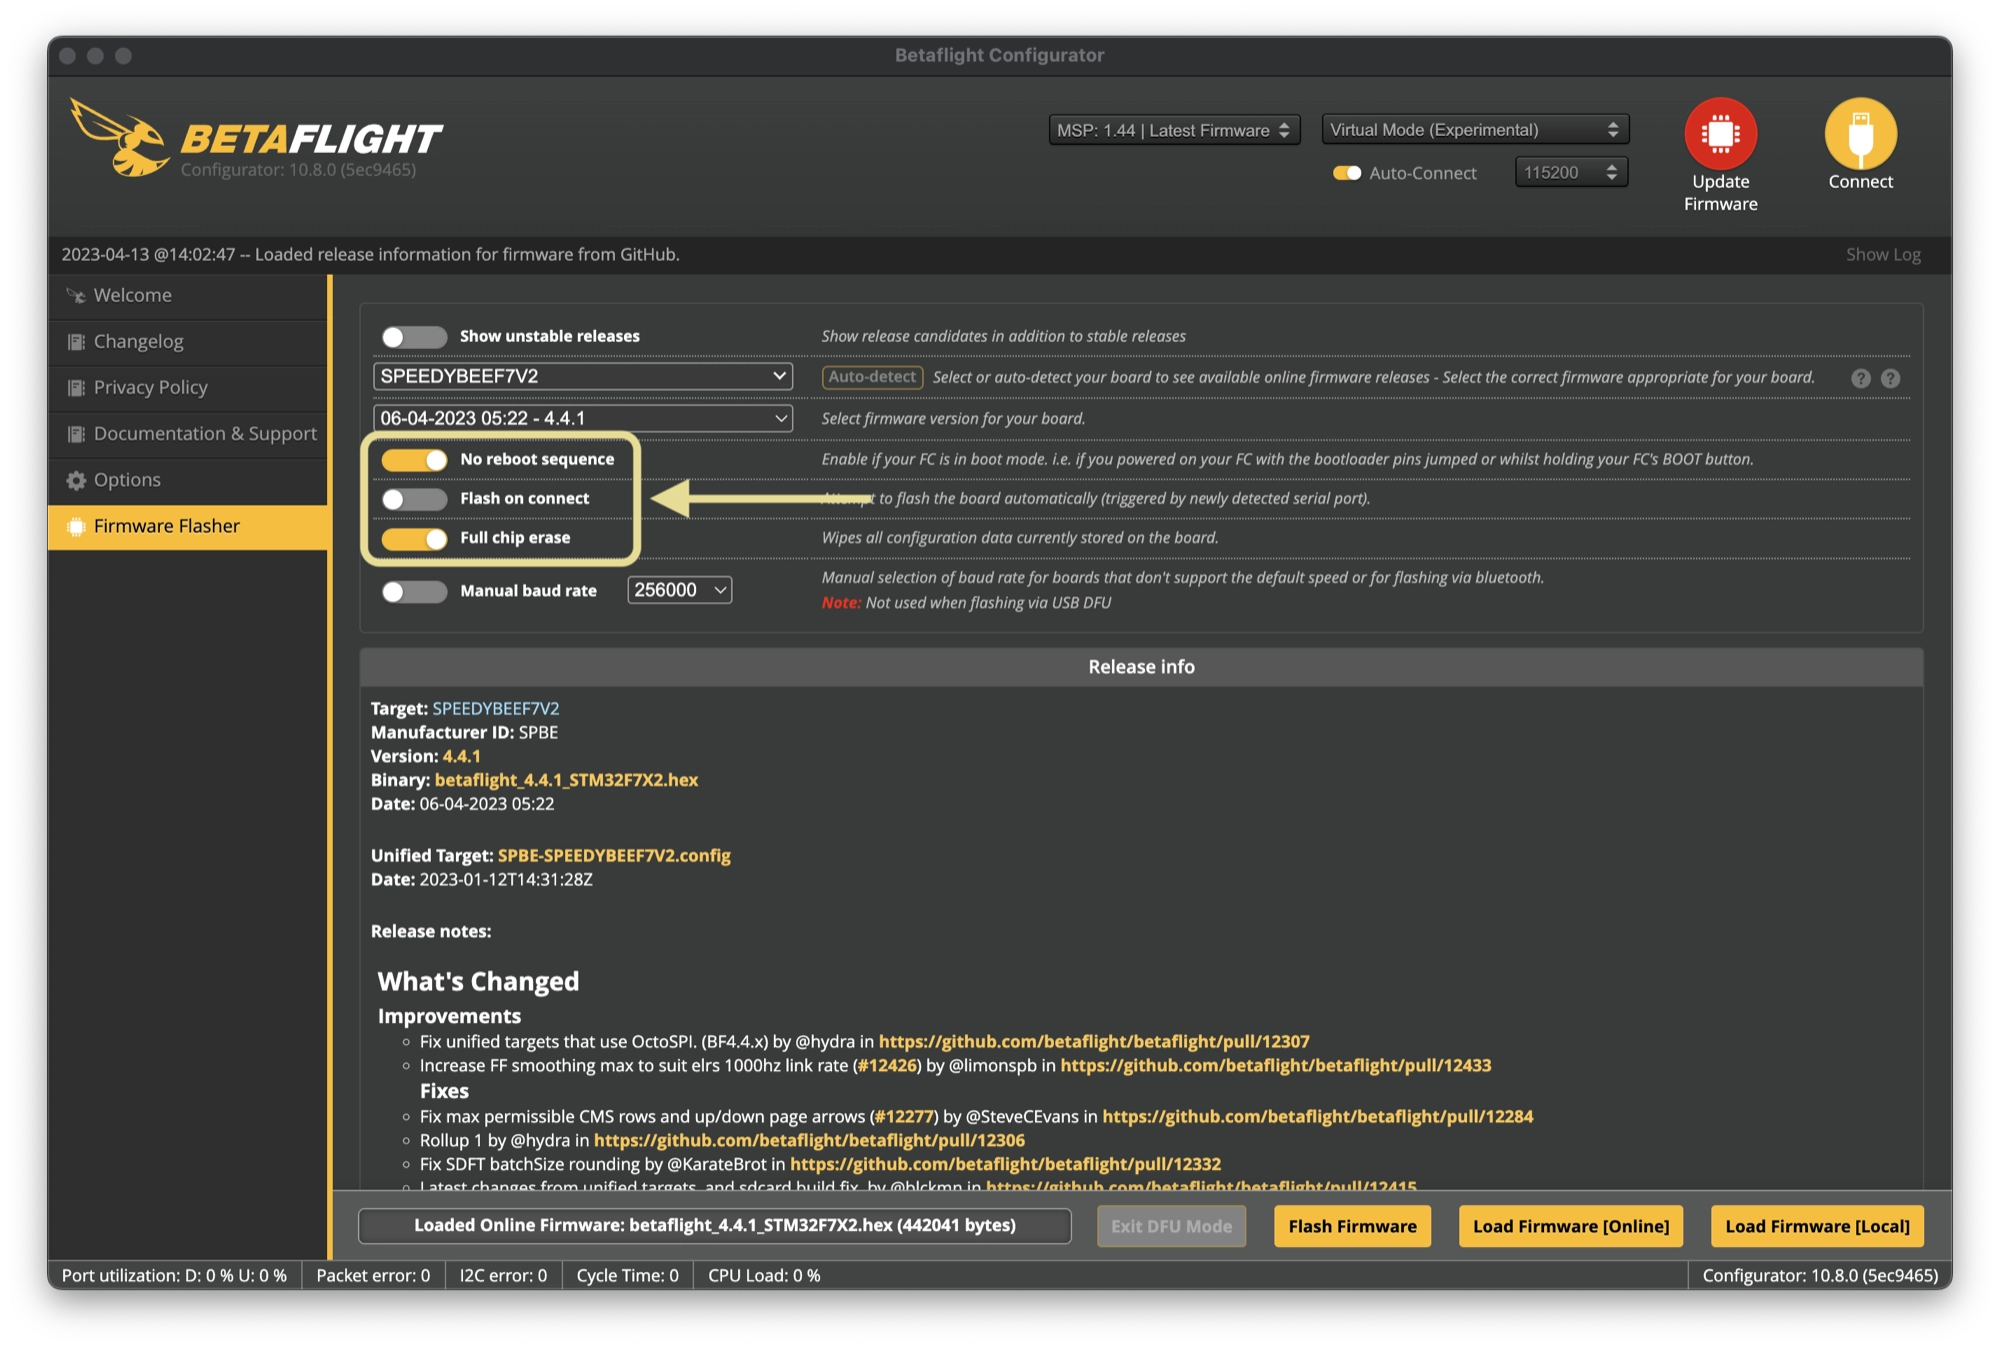
- If you are switching from a different firmware (such as INAV), switch on the Full Chip Erase option.
- Wait for the process to finish. It may take a few minutes. Do not disconnect the USB cable or power off your flight controller board during the flashing process.
- After the firmware is flashed successfully, disconnect and reconnect your flight controller board, then go to the Setup tab to configure your flight controller settings as needed.
Troubleshooting Betaflight Firmware flashing
If you are having difficulties with flashing the firmware, first try the following steps:
- First, turn the flight controller and quad off (disconnect the USB cable).
- Repeat the process above, ensuring that Full Chip Erase and No Reboot Sequence are enabled.
If you are still having problems or you have lost communicate with your flight controller, try the following steps:
- Power off the flight controller
- Enable No Reboot Sequence and enable Full Chip Erase.
- Jumper the BOOT pins or hold BOOT button (see your flight controller manual for how to put it into DFM bootloader mode).
- Power on the flight controller (activity LED will NOT flash if done correctiv).
- Install all STM32 drivers and Zadig if required (see USB Flashing section of the Betaflight manual).
- Close and rester Betaflight Configurator.
- Release BOOT button if your FC has one.
- Flash with correct firmware (using manual baud rate if specified in your FC’s manual).
- Power off the flight controller again.
- Remove BOOT jumper if you installed one.
- Power on the flight controller (activity LED should flash).
- Connect normally.


Pingback: metoprolol tartrate
Pingback: mirtazapine 15 mg tablet for dogs