In this article you will learn everything that you need to know for getting great results with Gyroflow!
At a first glance, Gyroflow can look a little daunting! There are a huge number of different options that you can tweak all from within the main window.
However once you get stuck in, it is actually pretty easy to get good results quickly!
Gyroflow works with all of the popular cameras. If you are looking for a great FPV camera without the pricetag of a GoPro, I would absolutely recommend the RunCam Thumb Pro.
- What is Gyroflow?
- How Does Gyroflow Work?
- How To Download Gyroflow
- How To Import Video Into Gyroflow
- How To Set Up a Camera in Gyroflow
- How To Configure Gyroflow
- Conclusion
What is Gyroflow?
Gyroflow is an open source software that enables video stabilization by utilizing motion data collected from a gyroscope, and optionally an accelerometer.
This free application can be used to stabilize footage captured by modern cameras that record such data internally, such as GoPro, Sony, Insta360, and others.
Additionally, Gyroflow can utilize motion data from an external source, such as Betaflight blackbox, to achieve stabilization.
Gyroflow has become hugely popular with FPV enthusiasts as a free alternative to ReelSteady, a paid stabilization software that is only suitable for using with a GoPro camera.
Gyroflow allows you to stabilize the footage from any camera.
Even if your camera does not have a built-in gyro, you can take the gyro data from another source, such as your Betaflight blackbox log, and use it to stabilize your video footage.
How Does Gyroflow Work?
Gyroflow creates a fresh, stabilized image of the environment by using motion data captured by either the camera gyro, or another external gyro, in order to compensate the camera movement.
Gyro data is filtered so that slow and steady motion remains, but the unwanted jerky motion is removed from the footage.
Unlike mechanical stabilization, which uses a physical device to hold the camera steady, Gyroflow can produce stabilized footage without any additional mechanical devices (such as a camera gimbal).
This is of course a huge advantage to FPV pilots, as not having to have a mechanical stabilizer is a huge weight saver.
The primary disadvantage is that in order to stabilize the image, cropping must be used in order to hide the movement of the image necessary to stabilize the footage.
This leads to a loss of data from the video footage and the footage must either be scaled back up or rendered at a lower resolution.
You should therefore always record at a higher resolution than your required end result, in order to avoid a reduction in final video quality.
How To Download Gyroflow
The latest version of Gyroflow can be downloaded for Windows, Mac or Linux, from the official Gyroflow website.
You can also download Gyroflow from GitHub. Here you will also find the source code, should you wish to build Gyroflow yourself.
How To Import Video Into Gyroflow
Once you have installed Gyroflow, the first thing that you are going to want to do is important some video.
It is very easy to import video data into Gyroflow. Simply drag and drop the video, or click the open video file.
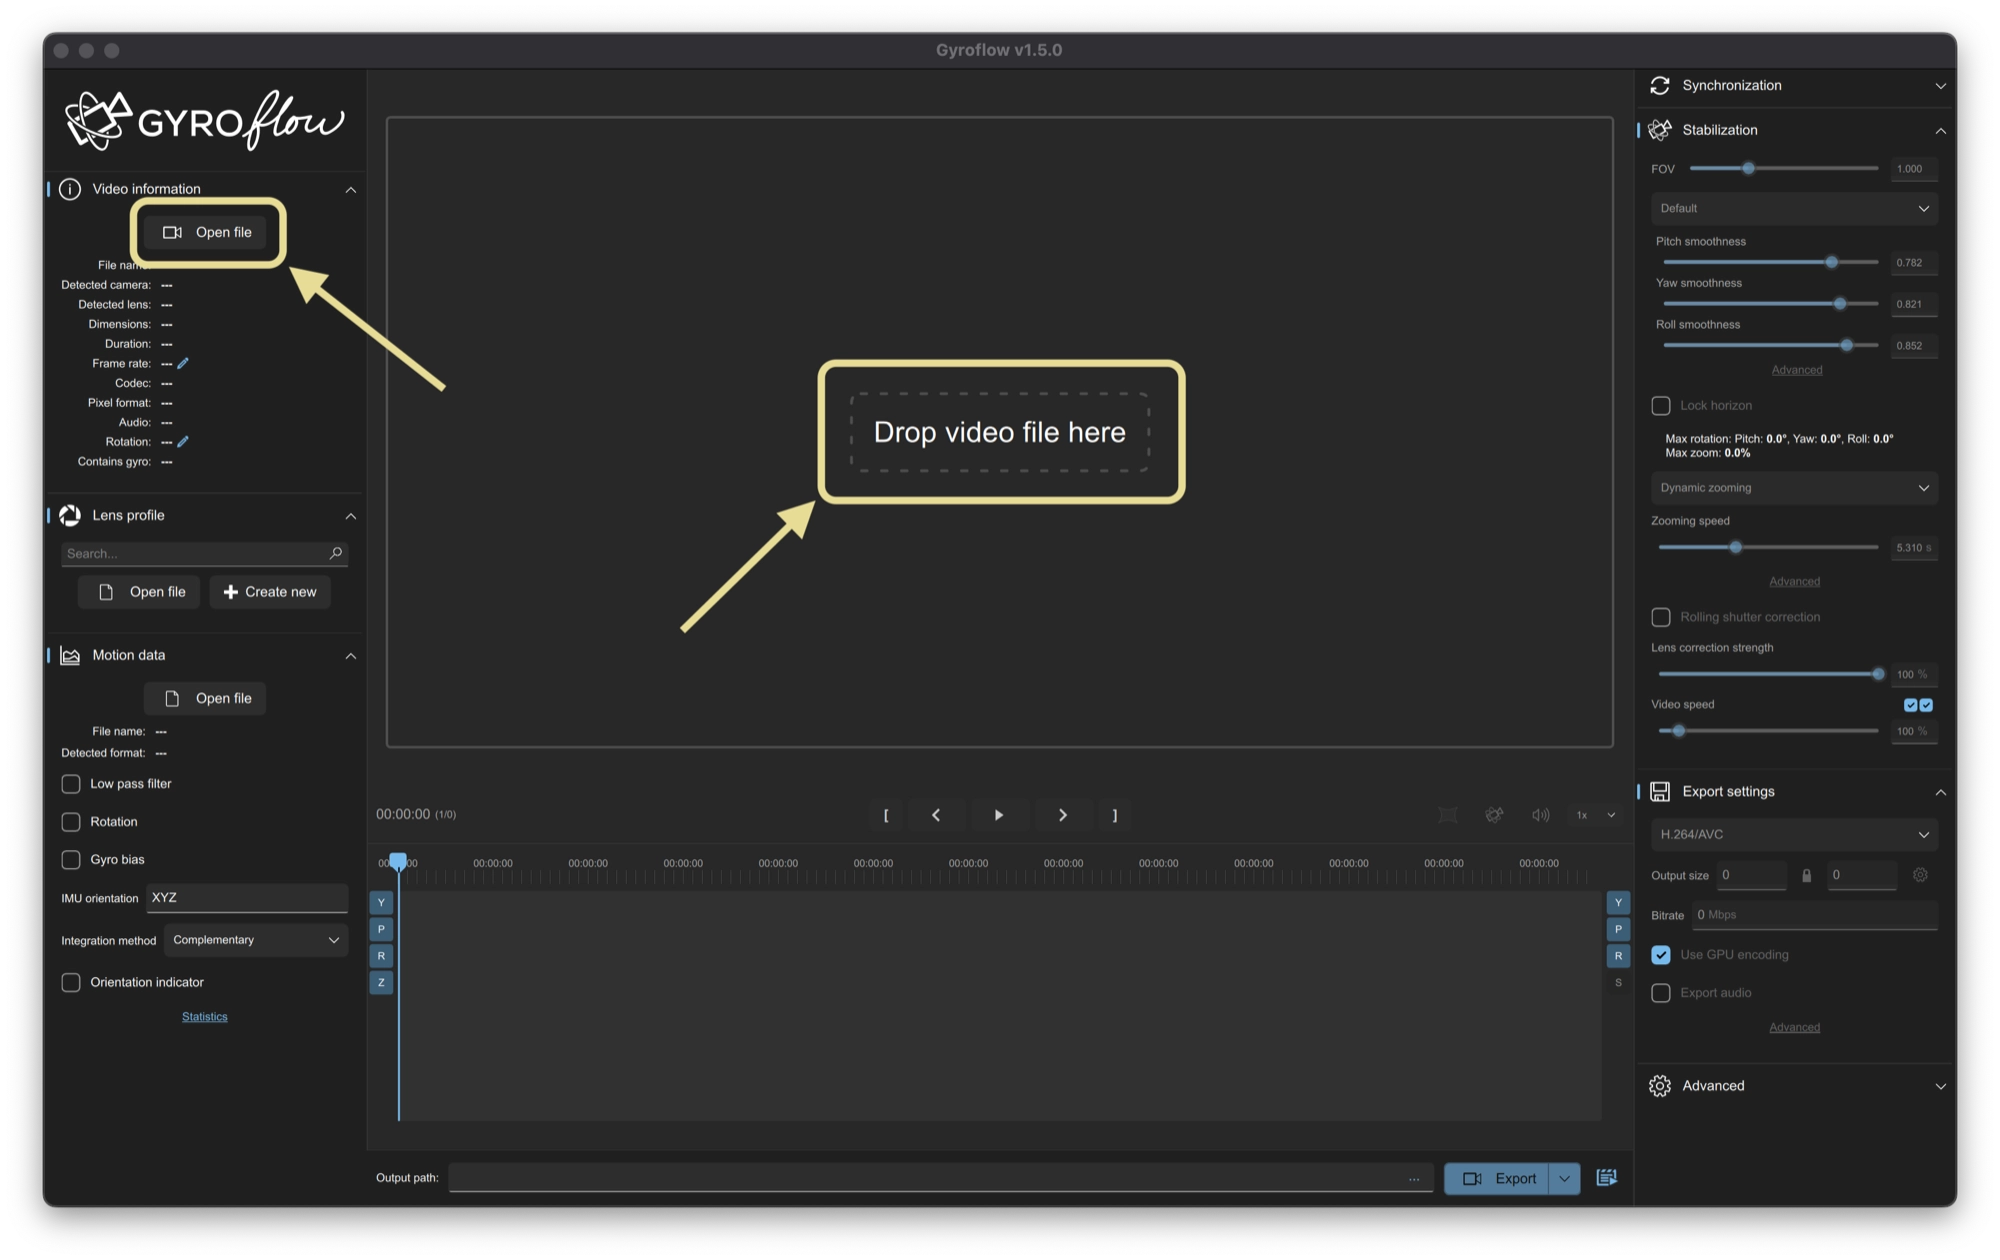
In the left-hand sidebar we have options to set up the video, including compensation for lens distortion and importing the actual gyro data to use for the compensation.
However it is not always necessary to have to fill out the information in the left-hand sidebar.
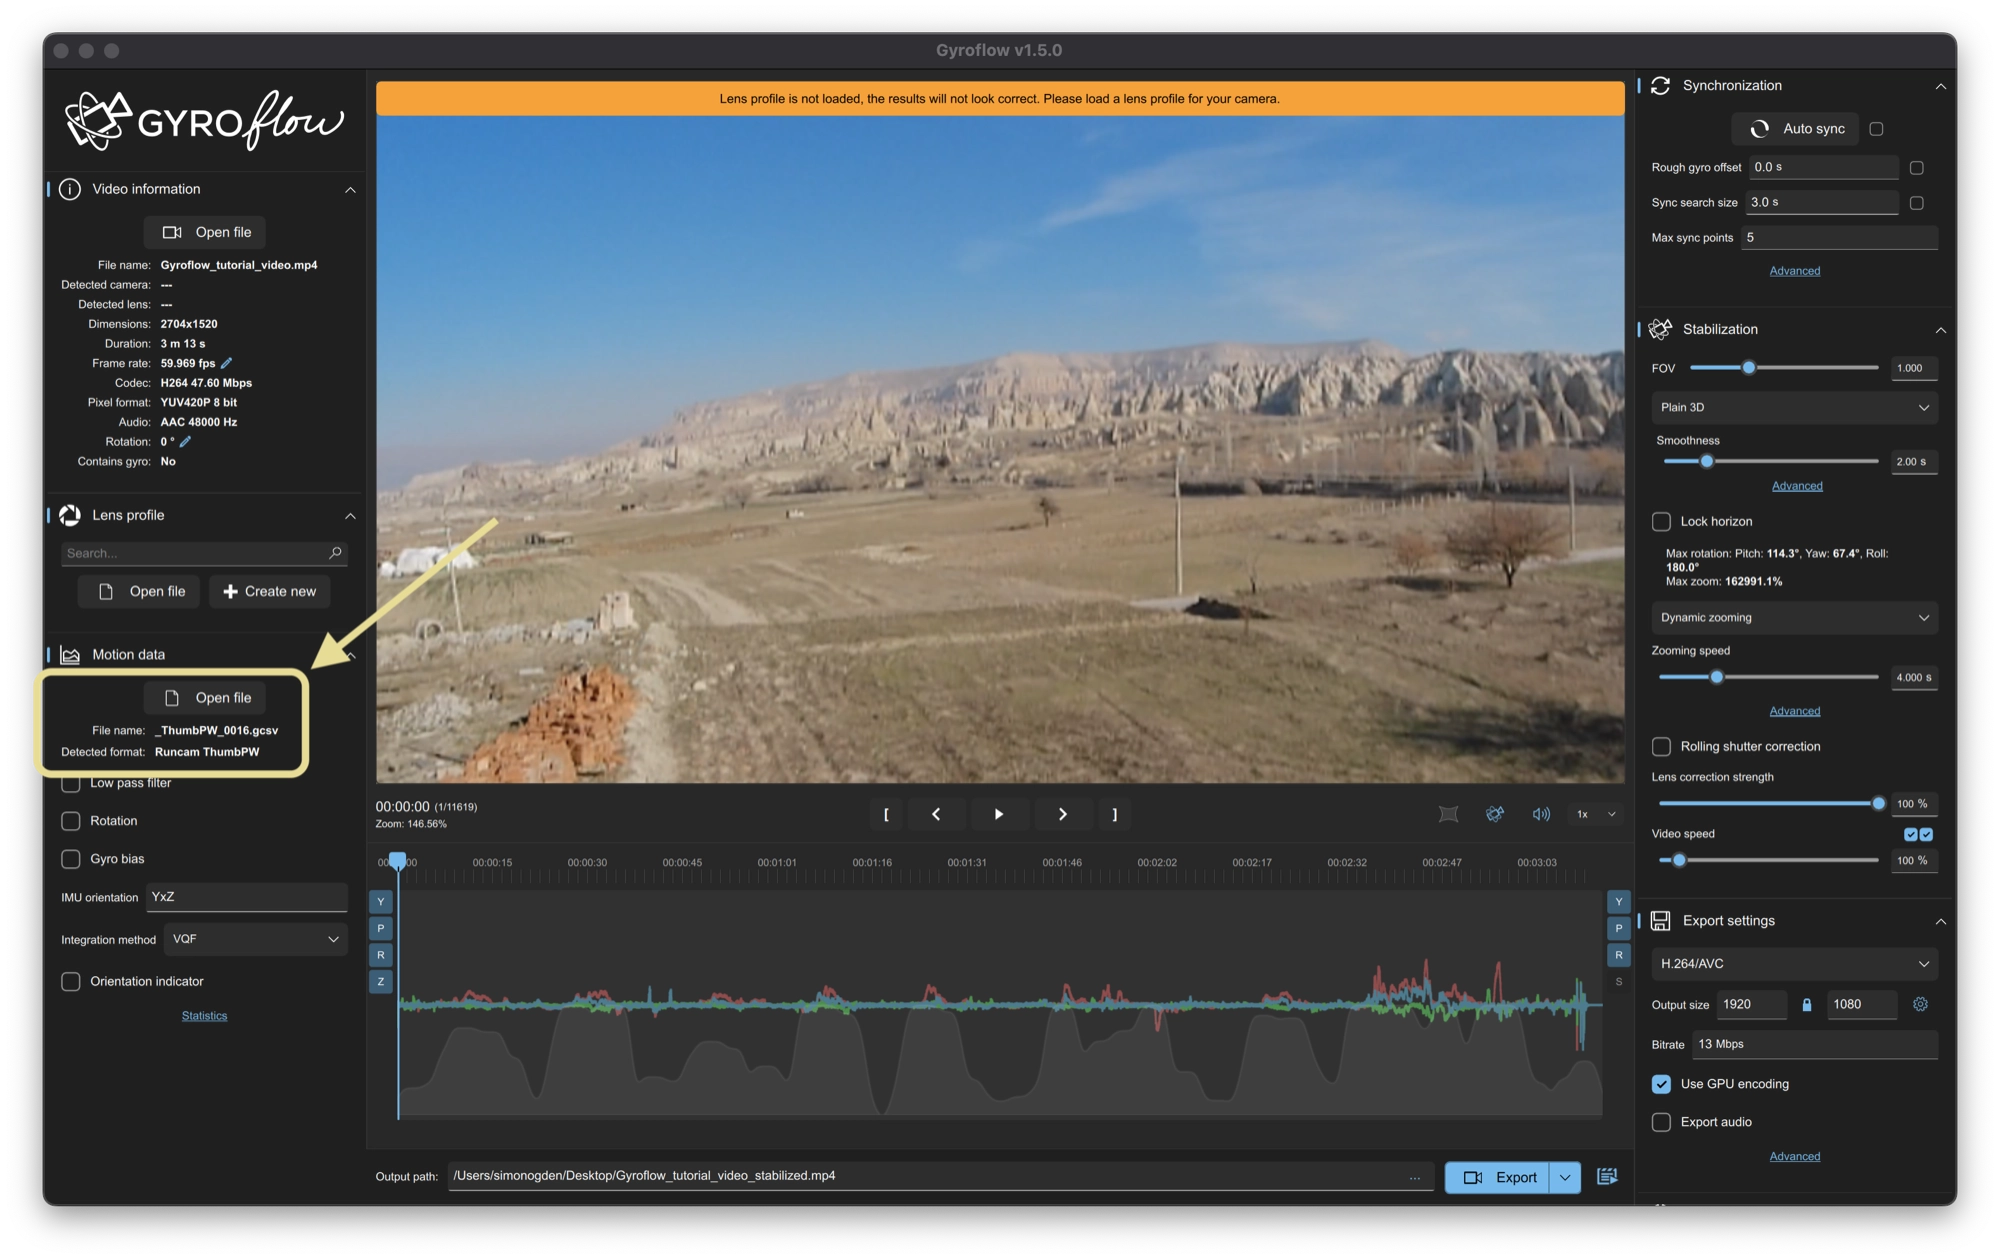
If your camera has a built-in gyro then your video file may also have an accompanying file containing the gyro and camera data.
For example the RunCam Thumb Pro makes this super-easy.
Each video recorded on the memory card file has a .gcsv file of the same name, which contains the recorded gyro data and camera information data.
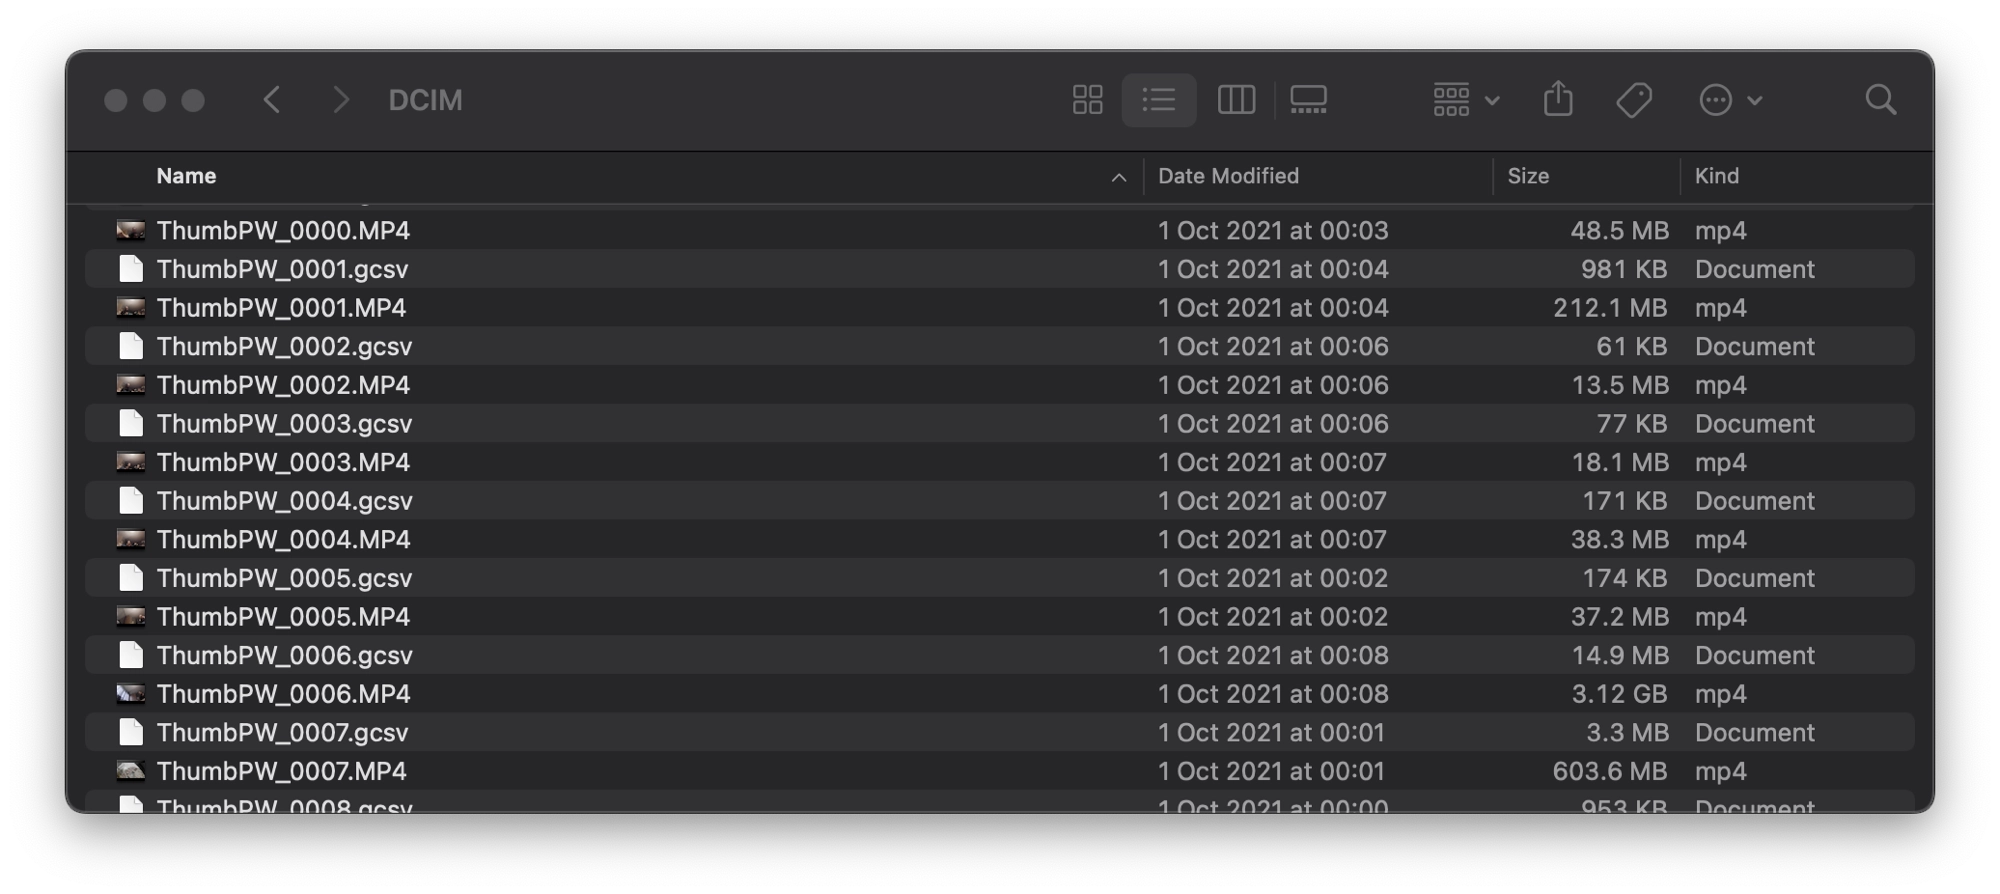
So long as this file is placed within the same directory as the video, Gyroflow can detect all of the necessary settings for lens correction as well as import all of the gyro data.
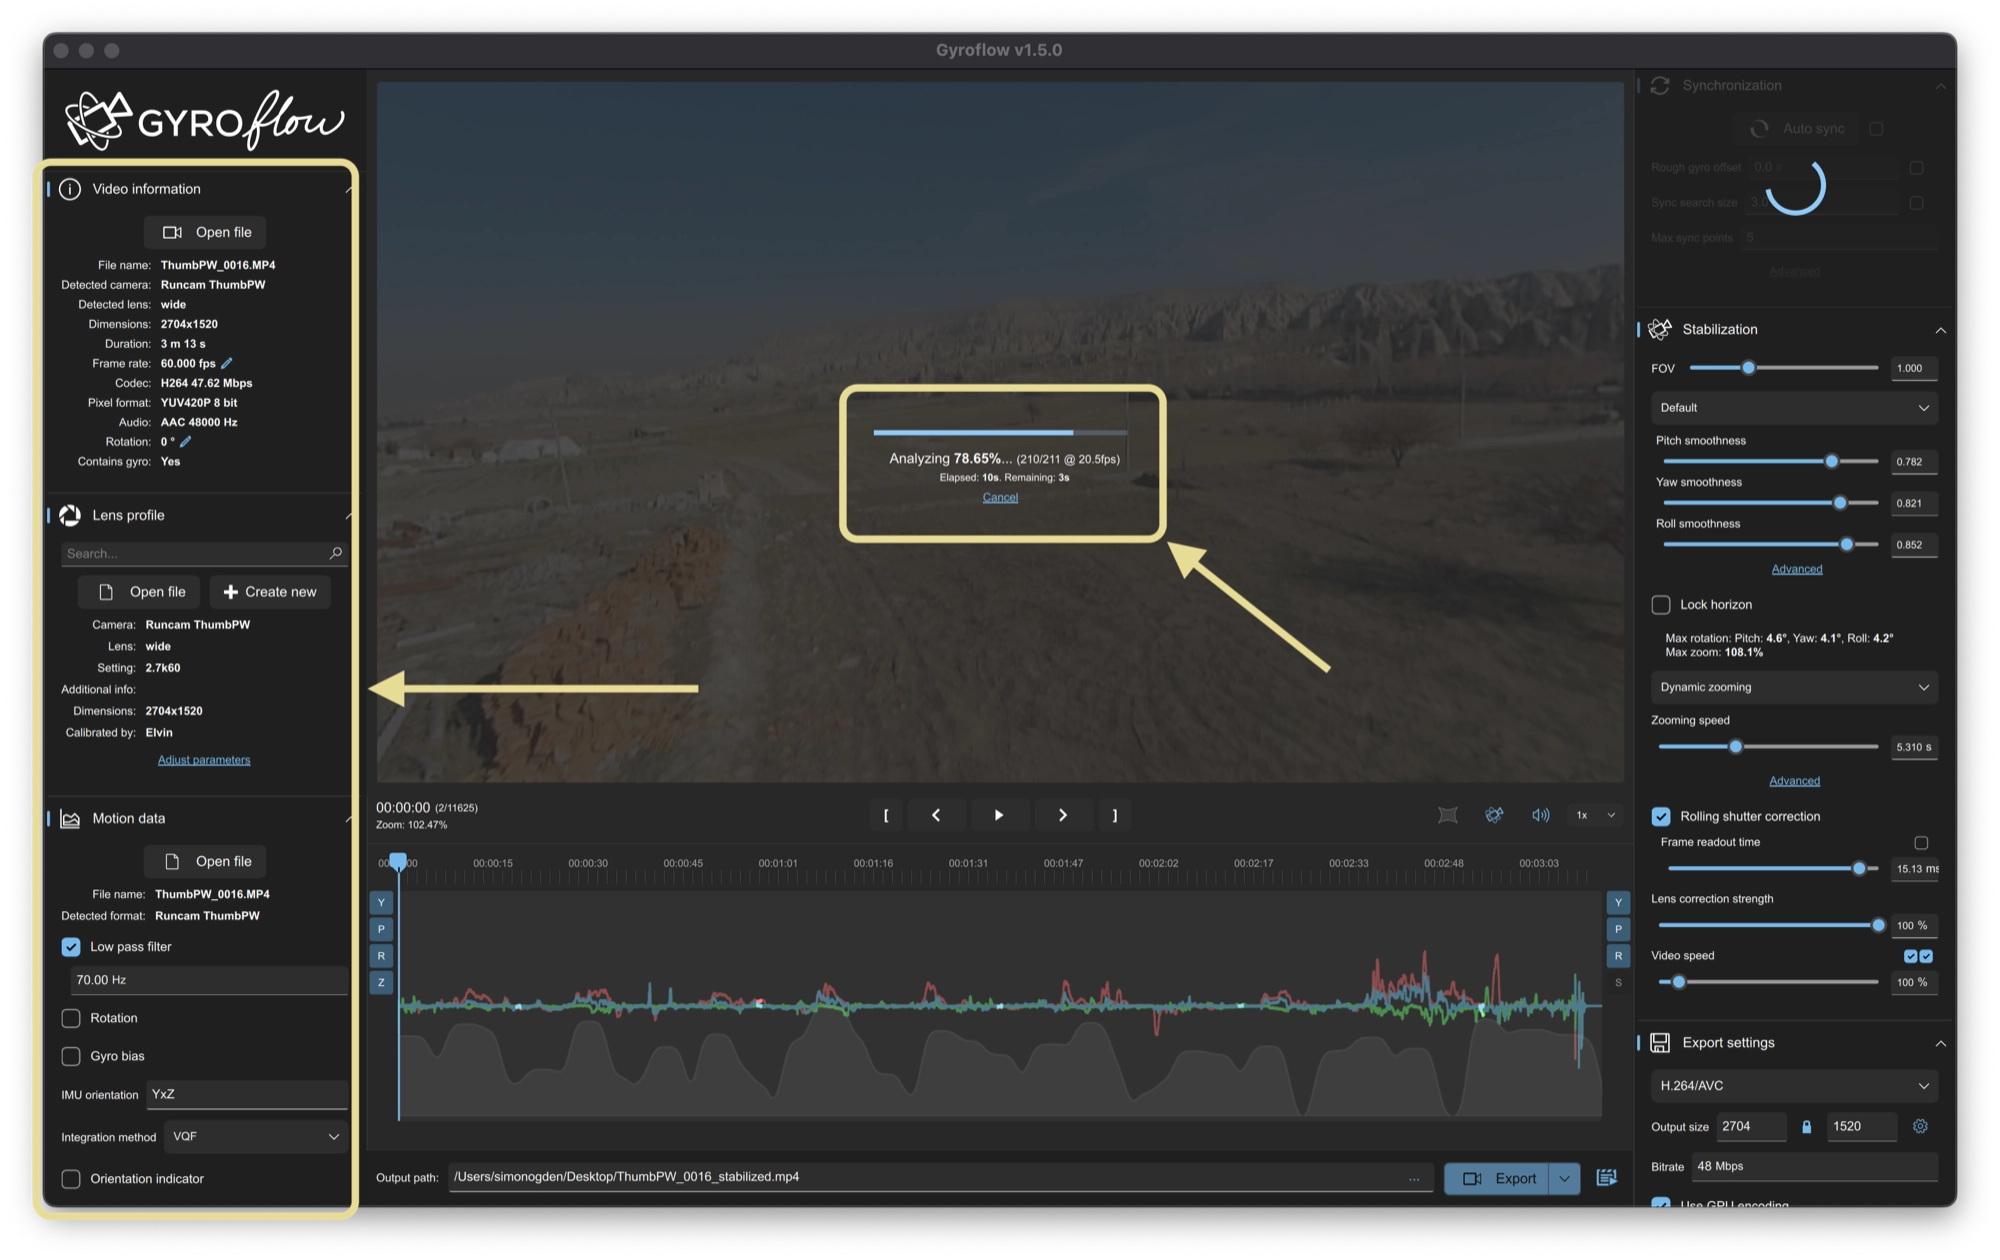
If Gyroflow automatically starts analysing the video and completes the information in the left-hand sidebar, as shown in the following screenshot, you can skip creating a lens profile and synchronizing the gyro data.
How To Set Up a Camera in Gyroflow
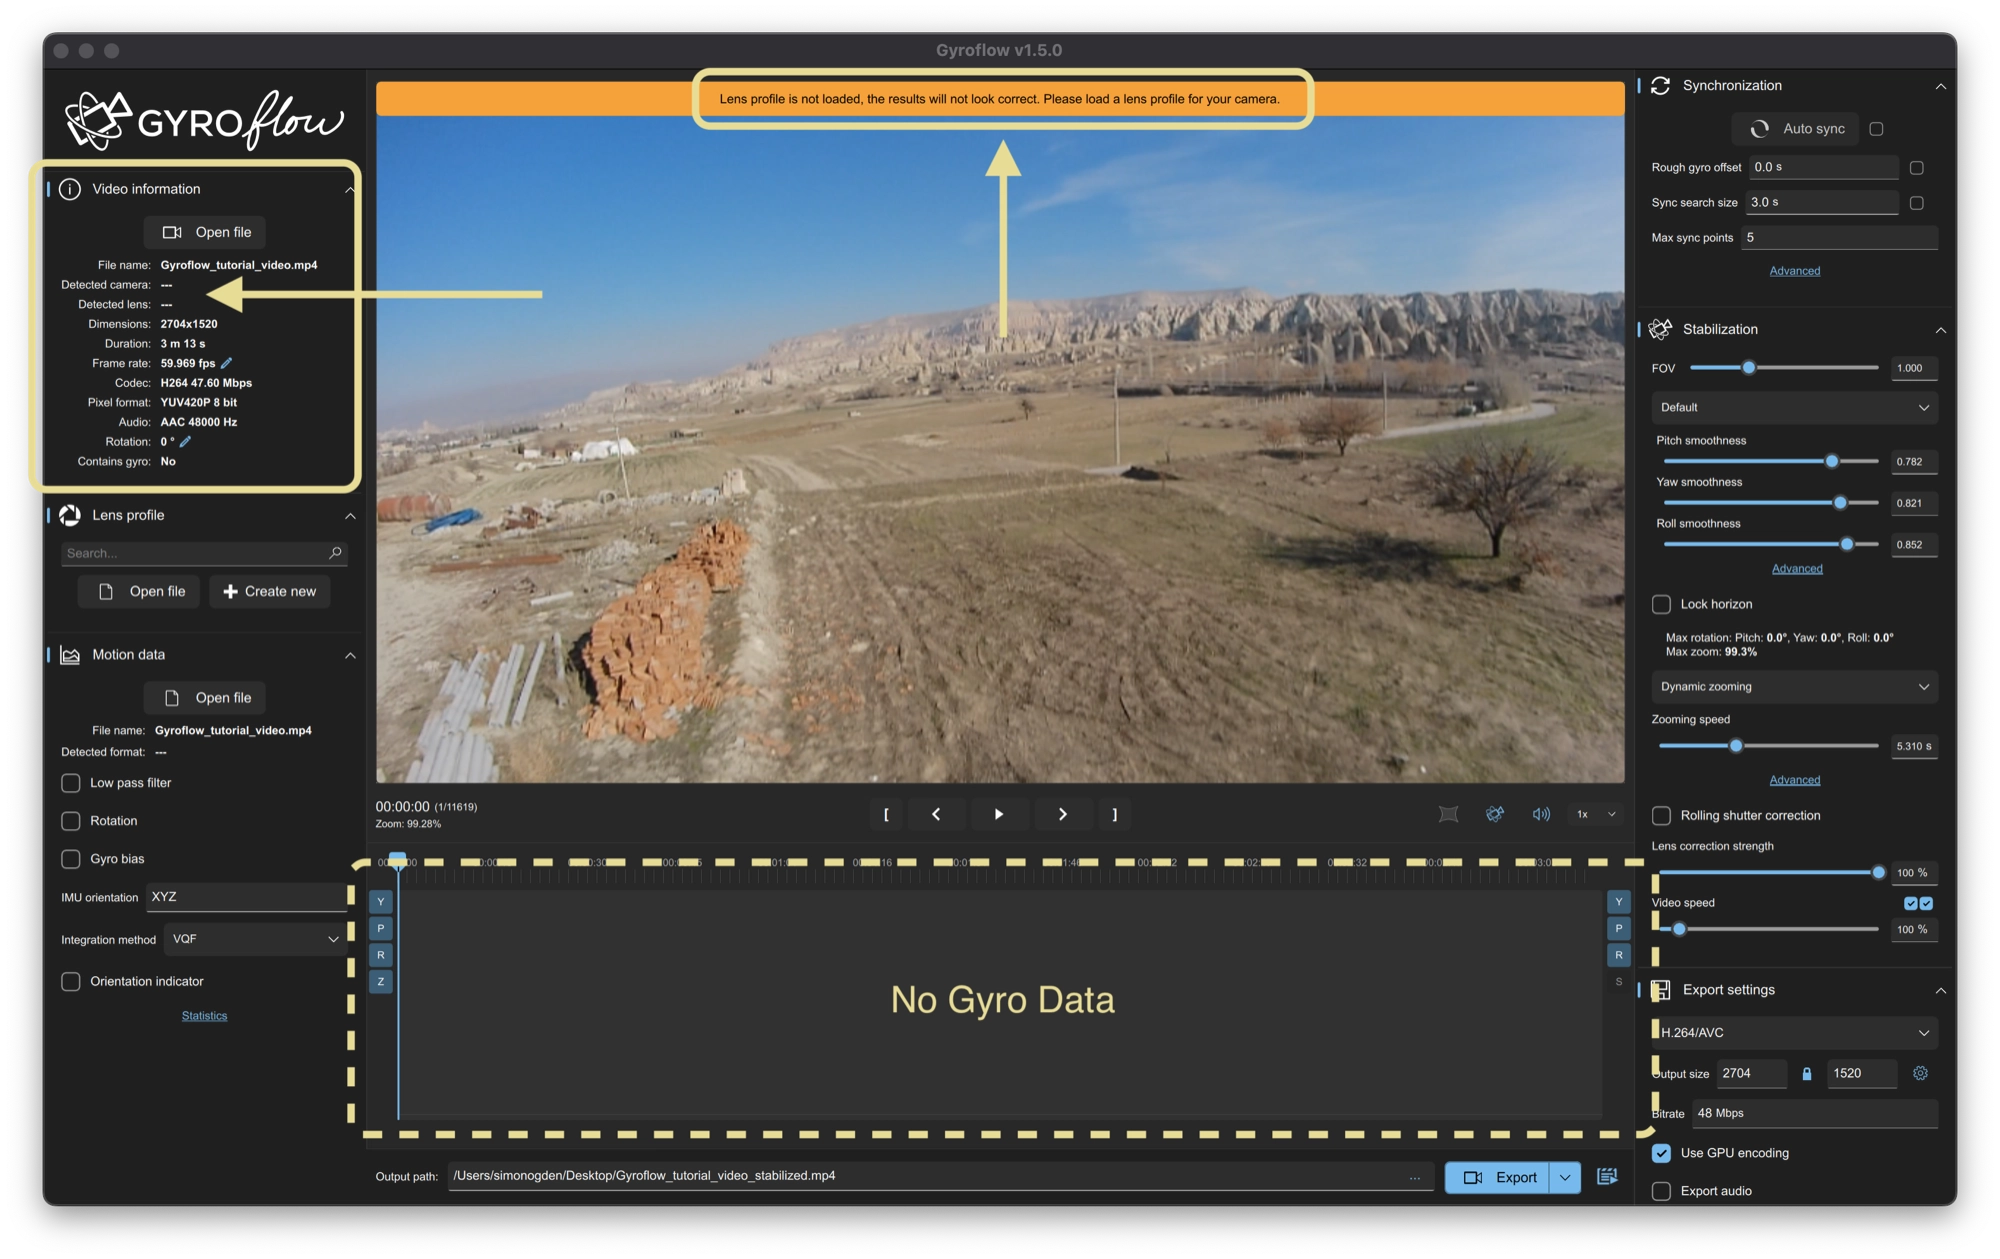
When you load your video into Gyroflow without the lens and gyro data, you will not see any gyro information in the gyro data panel at the bottom.
There will be no detected camera and lens information, and Gyroflow will prompt you to create a lens profile.
If this information is already populated on your screen, you can skip this step.
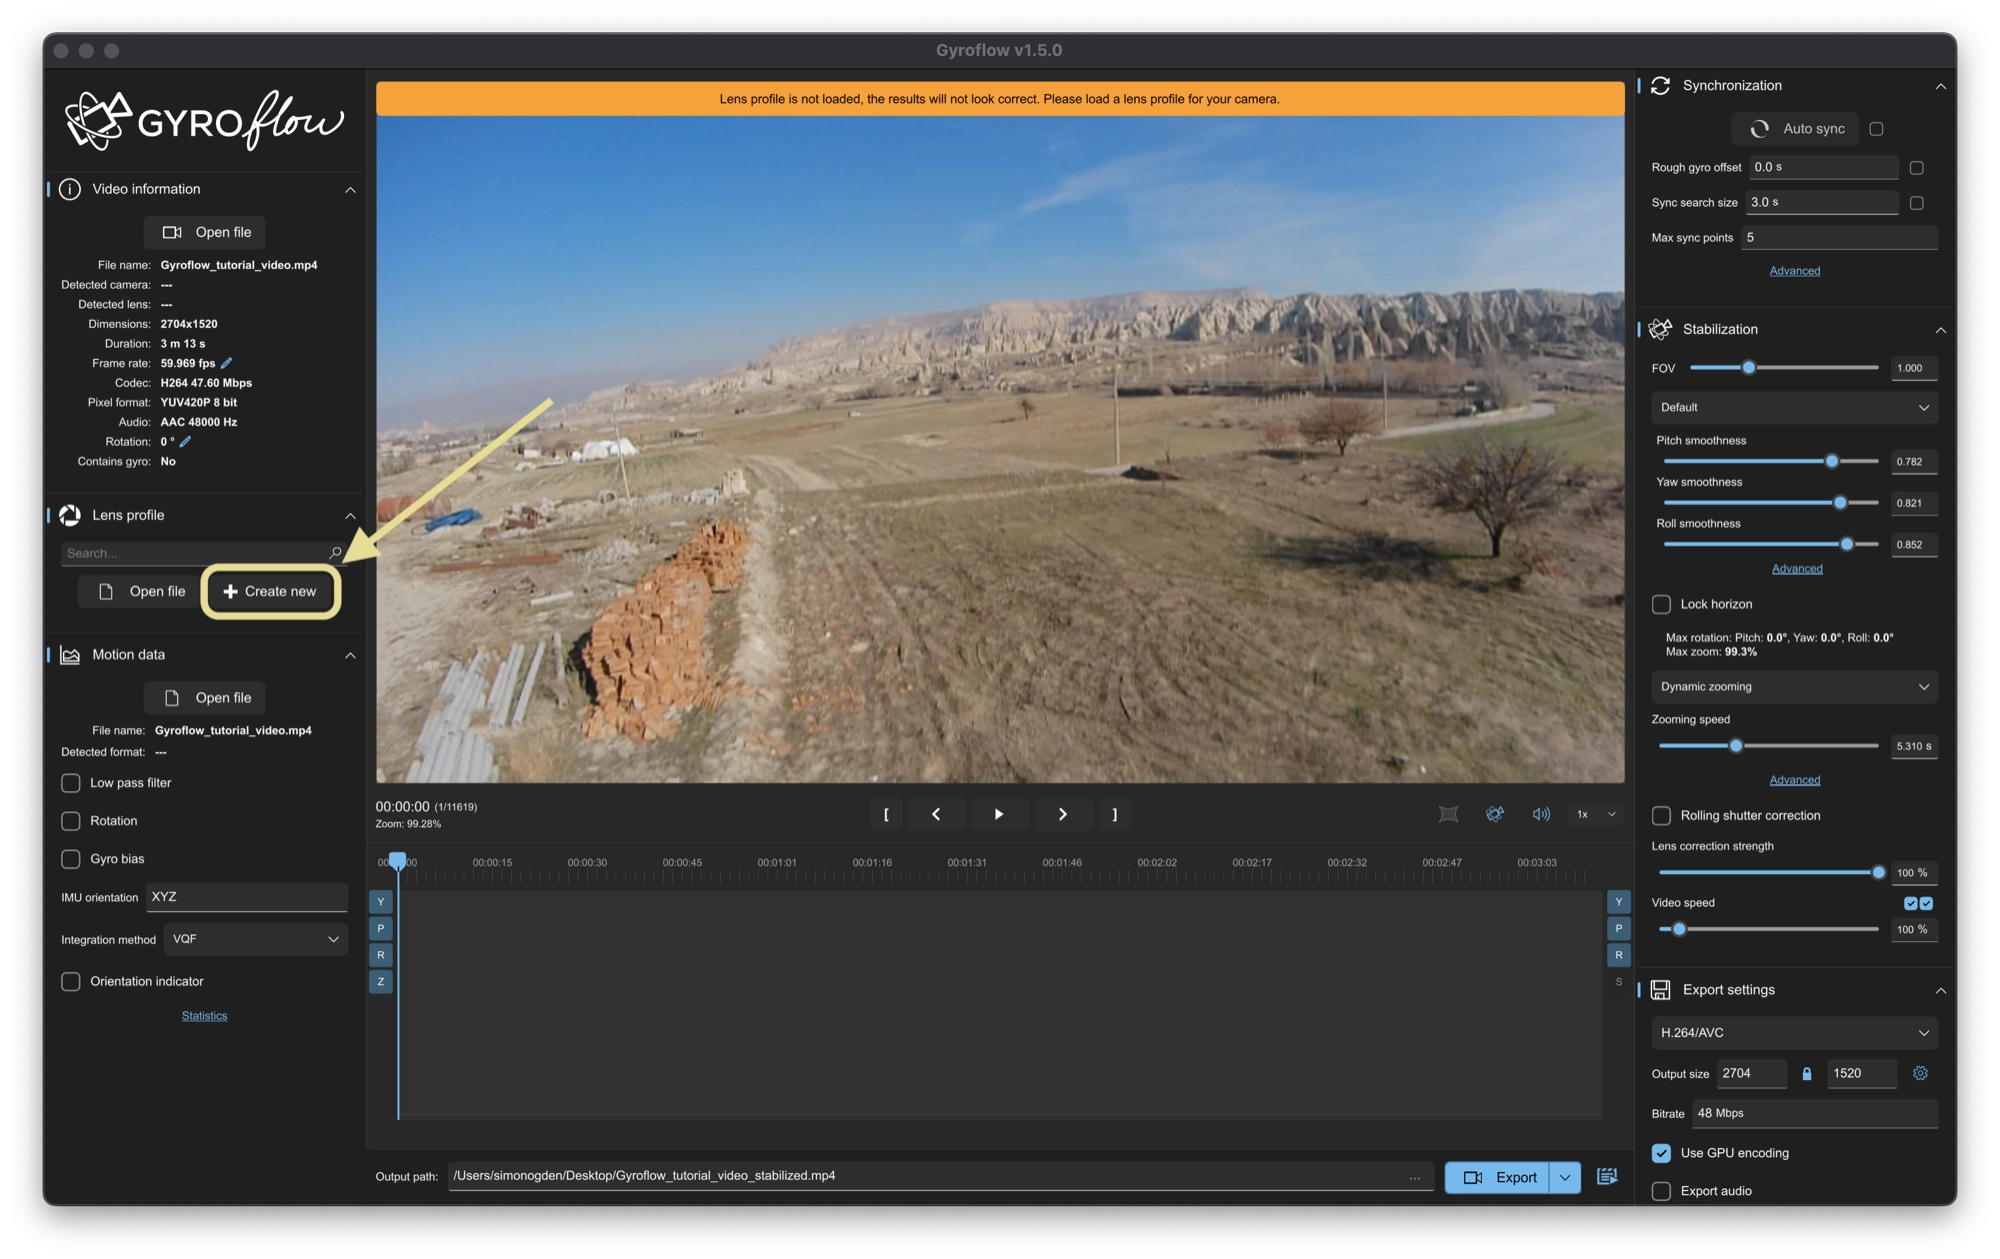
How To Create a Lens Profile in Gyroflow
If you are using a camera that does not come with a lens profile, you can create your own.
To begin the calibration process in Open Gyroflow, navigate to the Lens profile tab and click on Create New.
Opening the Gyroflow Calibration Target
Next, open the calibration target and display it on a large, flat computer monitor in full screen mode.
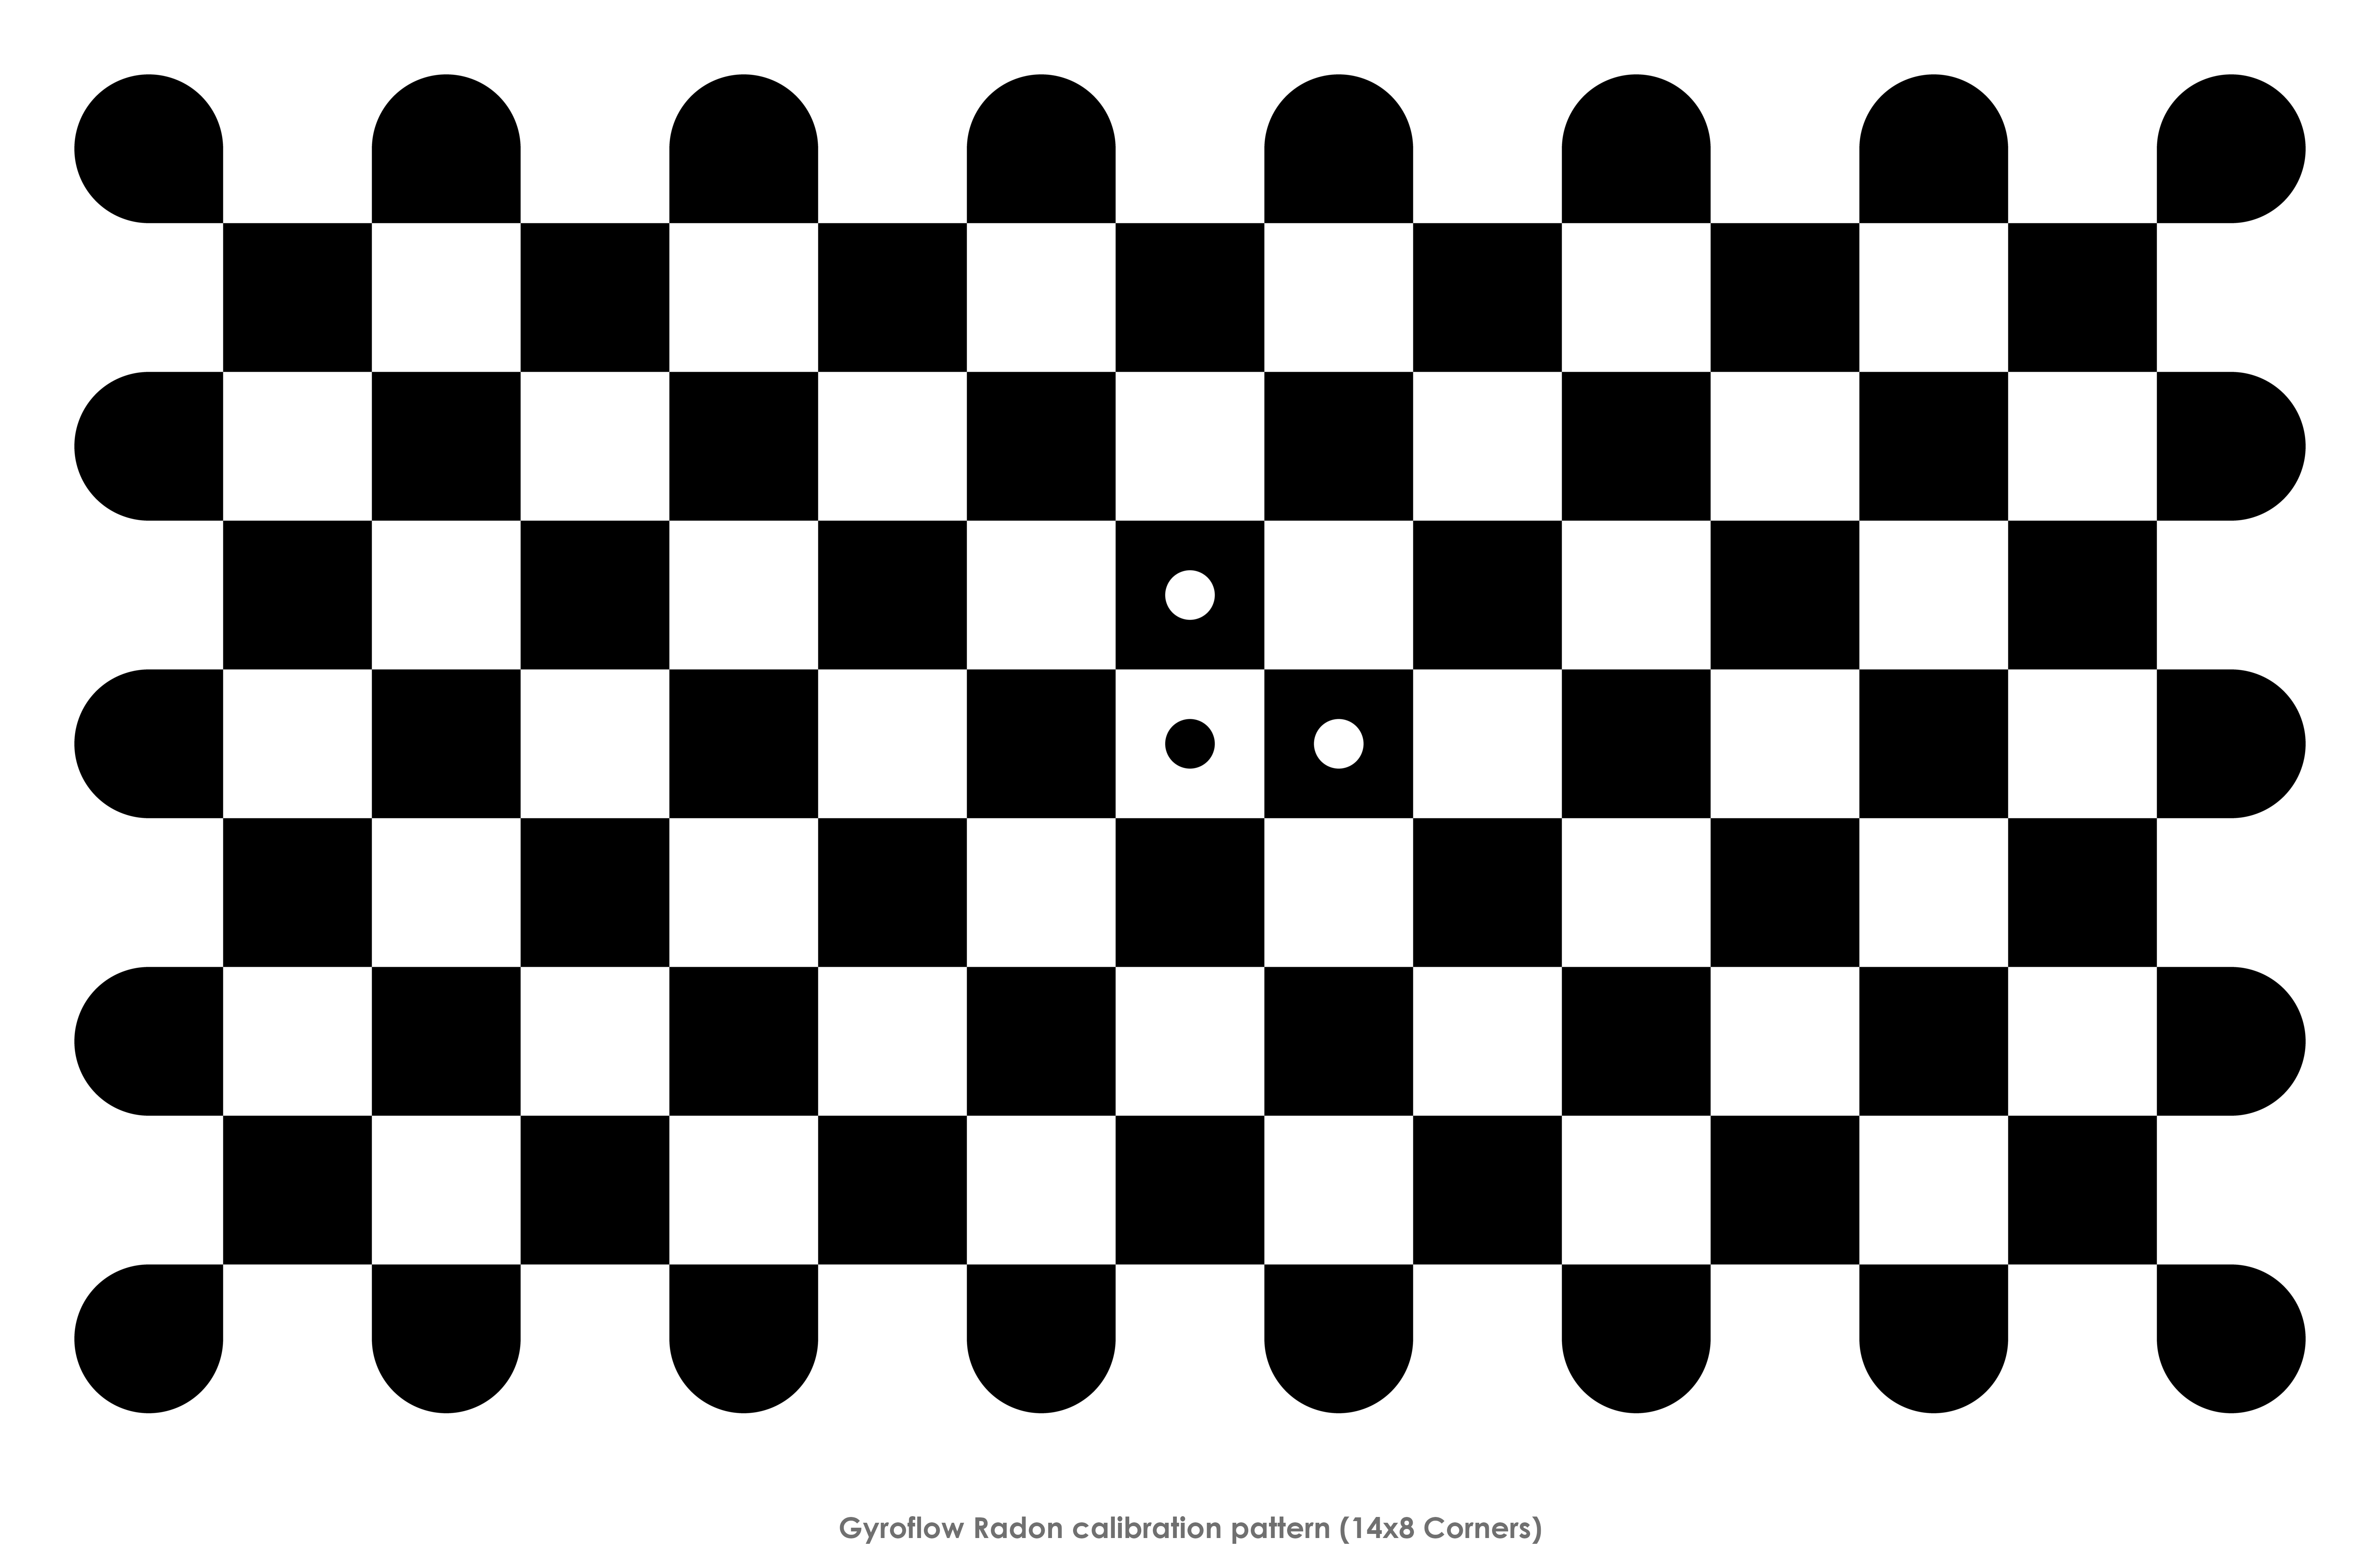
It is recommended to use the largest available screen to ensure that the focus is closer to what will be experienced during actual use.
If a large flat screen TV is available, it is preferable to use it by connecting through HDMI or using the TV browser to open the page. A bright screen in a slightly dimmed room is recommended.
Set Up Your Camera
Next, input the camera settings into your camera that you wish to calibrate for, including the field of view/focal length and aspect ratio, if applicable.
Frame rate and resolution do not matter except if the resolution affects the field of view. It is important to use a high shutter speed to avoid motion blur and keep the calibration target in focus.
Capture a Calibration Video
To capture the calibration data, record a video of the pattern while moving the camera around to different angles and distances in a single clip.
One minute is typically enough, and slow and steady movements are recommended to avoid motion blur and rolling shutter distortion.
The entire chessboard should be visible in the frame for each angle. It is recommended to capture the following angles to obtain distortion information from the full frame:
- The chessboard filling the whole frame
- The chessboard seen from a distance
- The chessboard seen at an angle
- Each edge of the video frame aligned with an edge of the chessboard
- A corner of the chessboard aligned with a corner of the video frame
Finally, to estimate the rolling shutter effect, perform a fast side-to-side yaw motion with the camera to produce bent lines instead of straight ones.
Here is a video from the official Gyroflow Wiki showing the required angles:
Determining the Rolling Shutter Value
Estimating the rolling shutter frame readout time is an important aspect of lens calibration, particularly for DSLRs and consumer-grade video cameras that use rolling shutter sensors.
These sensors can introduce warps and distortions in moving footage. It is advisable to obtain an accurate estimate of the rolling shutter before lens calibration and enter the value into the calibration utility. However, this can also be done afterwards.
For an accurate method of measuring the rolling shutter, take a look at this tool.
Analysing the Calibration Video
Lastly, we need to analyse the test video that we have created. Transfer the video from your camera on to your computer running Gyroflow.
Open the previously recorded calibration video file and click the Auto Calibrate button.
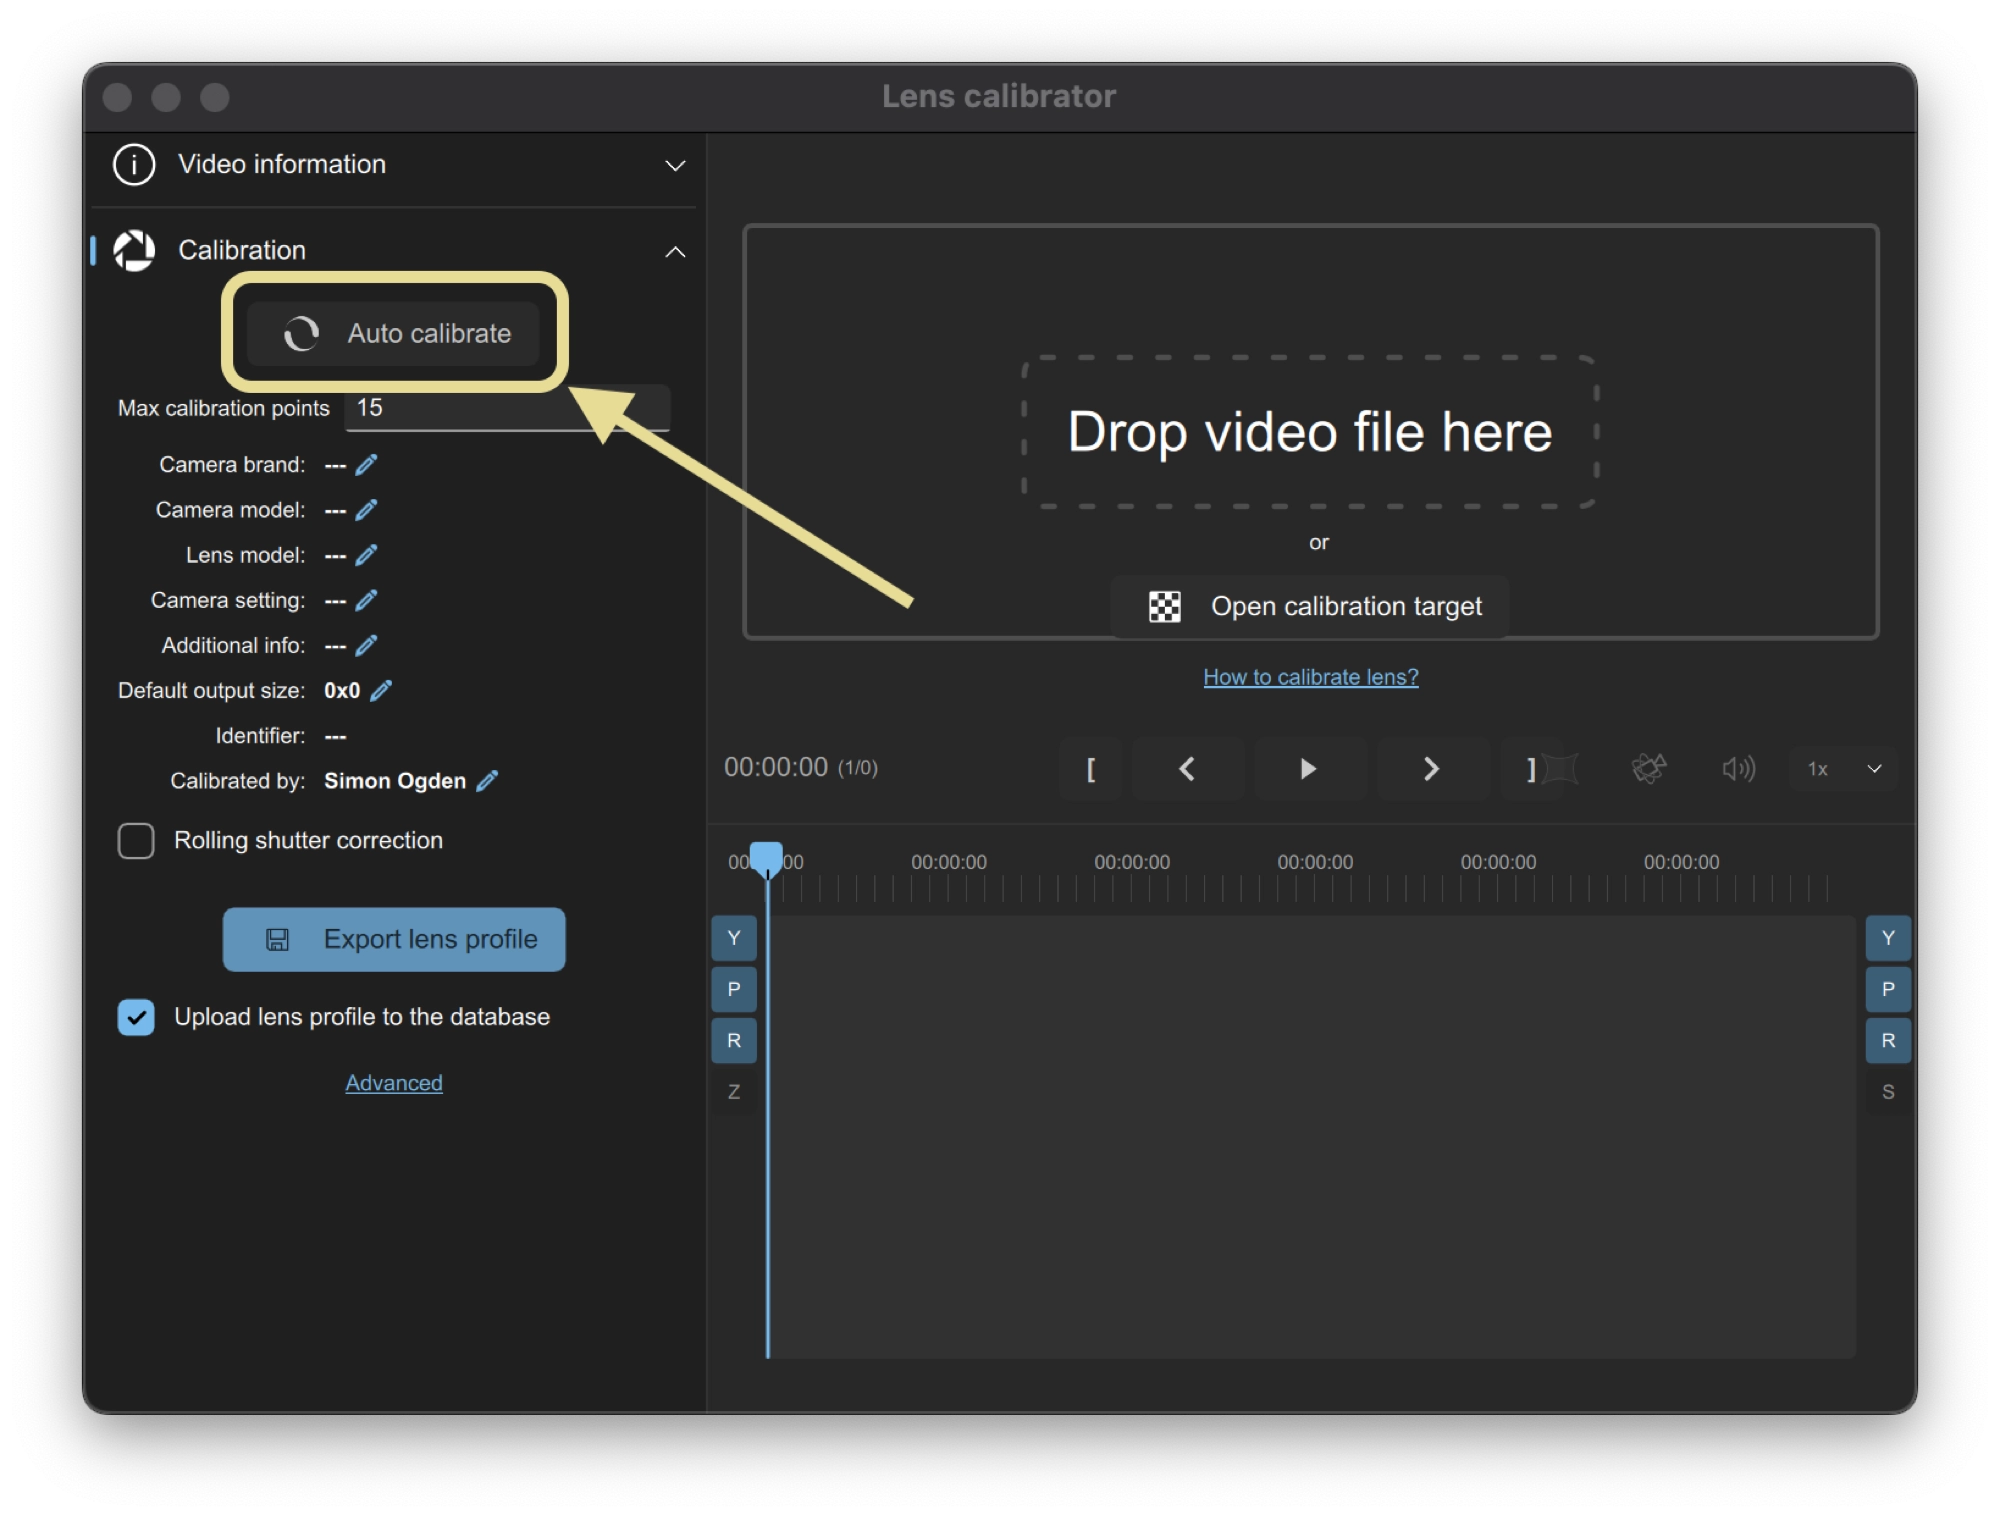
After you have processed the video, the undistorted video should have straight lines, and the reprojection error should be typically under 5 (pixels).
Once the calibration is successful, fill in the preset information and export the lens profile.
Make sure to add all relevant information about the camera/lens combination, including field of view setting and lens focal length (if applicable).
If you know the rolling shutter information in advance, you can fill in the frame readout time.
Now you can use the new lens preset, which is stored as a .json file.
How To Synchronize Gyro Data in Gyroflow
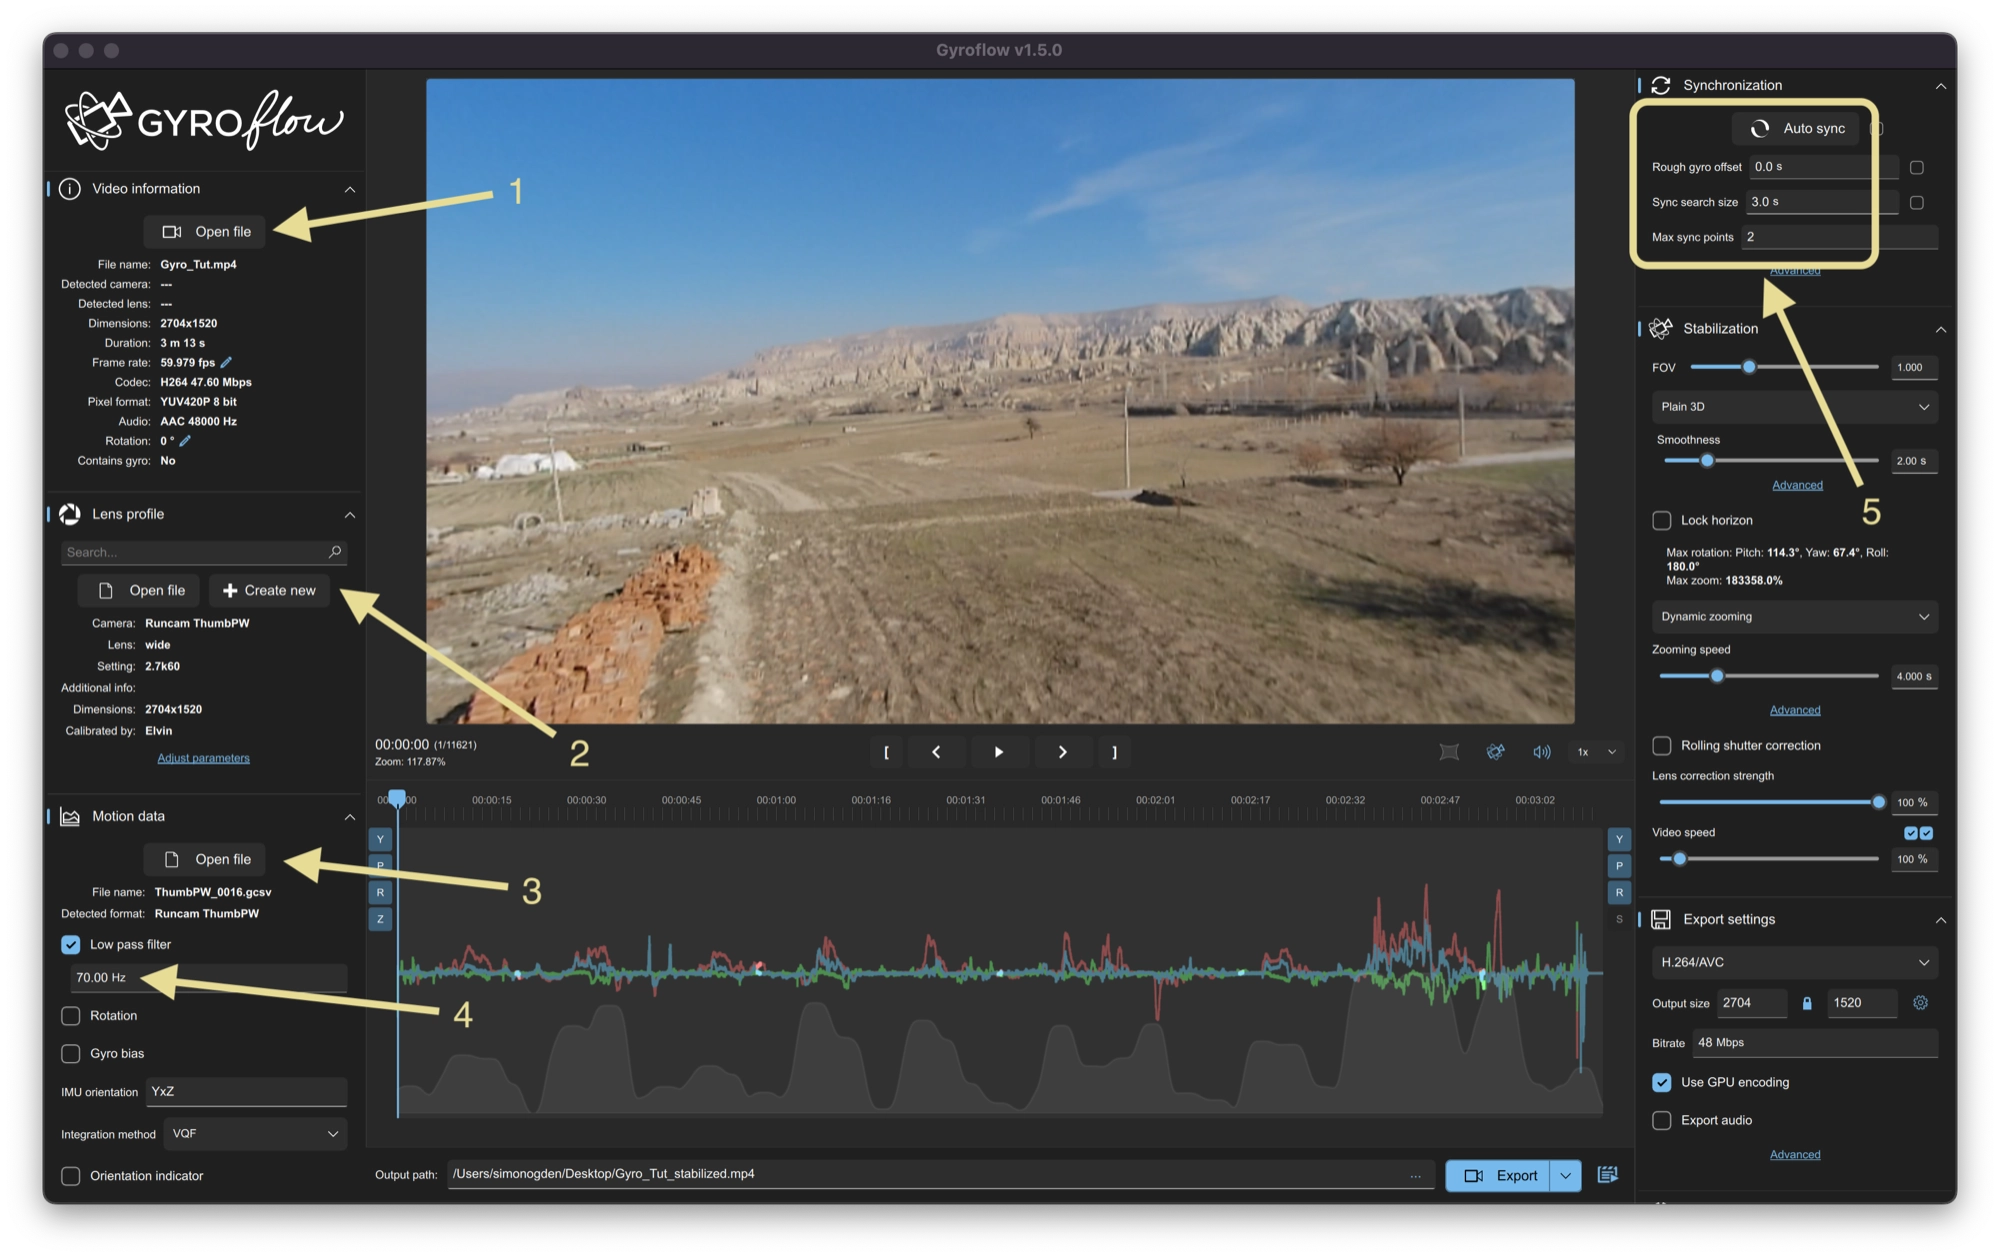
In order to synchronize your gyro data, you must first input it into Gyroflow. Click the Open File button under the Motion data section and choose your gyro data file.
See this article for information on how to extract your gyro data from a black box log.
With a suitable gyro data file loaded, you will see the gyro data present in the gyro data window at the bottom of the screen.
Next, we can change the necessary motion data settings.
Motion Data Settings
Before we dive into this, let’s take a quick look at those settings:
Low Pass Filter
The low pass filter can be used to clean up any high frequency noise in the gyro data that could degrade the end result.
For example, the following screenshot shows some noisy raw gyro data.
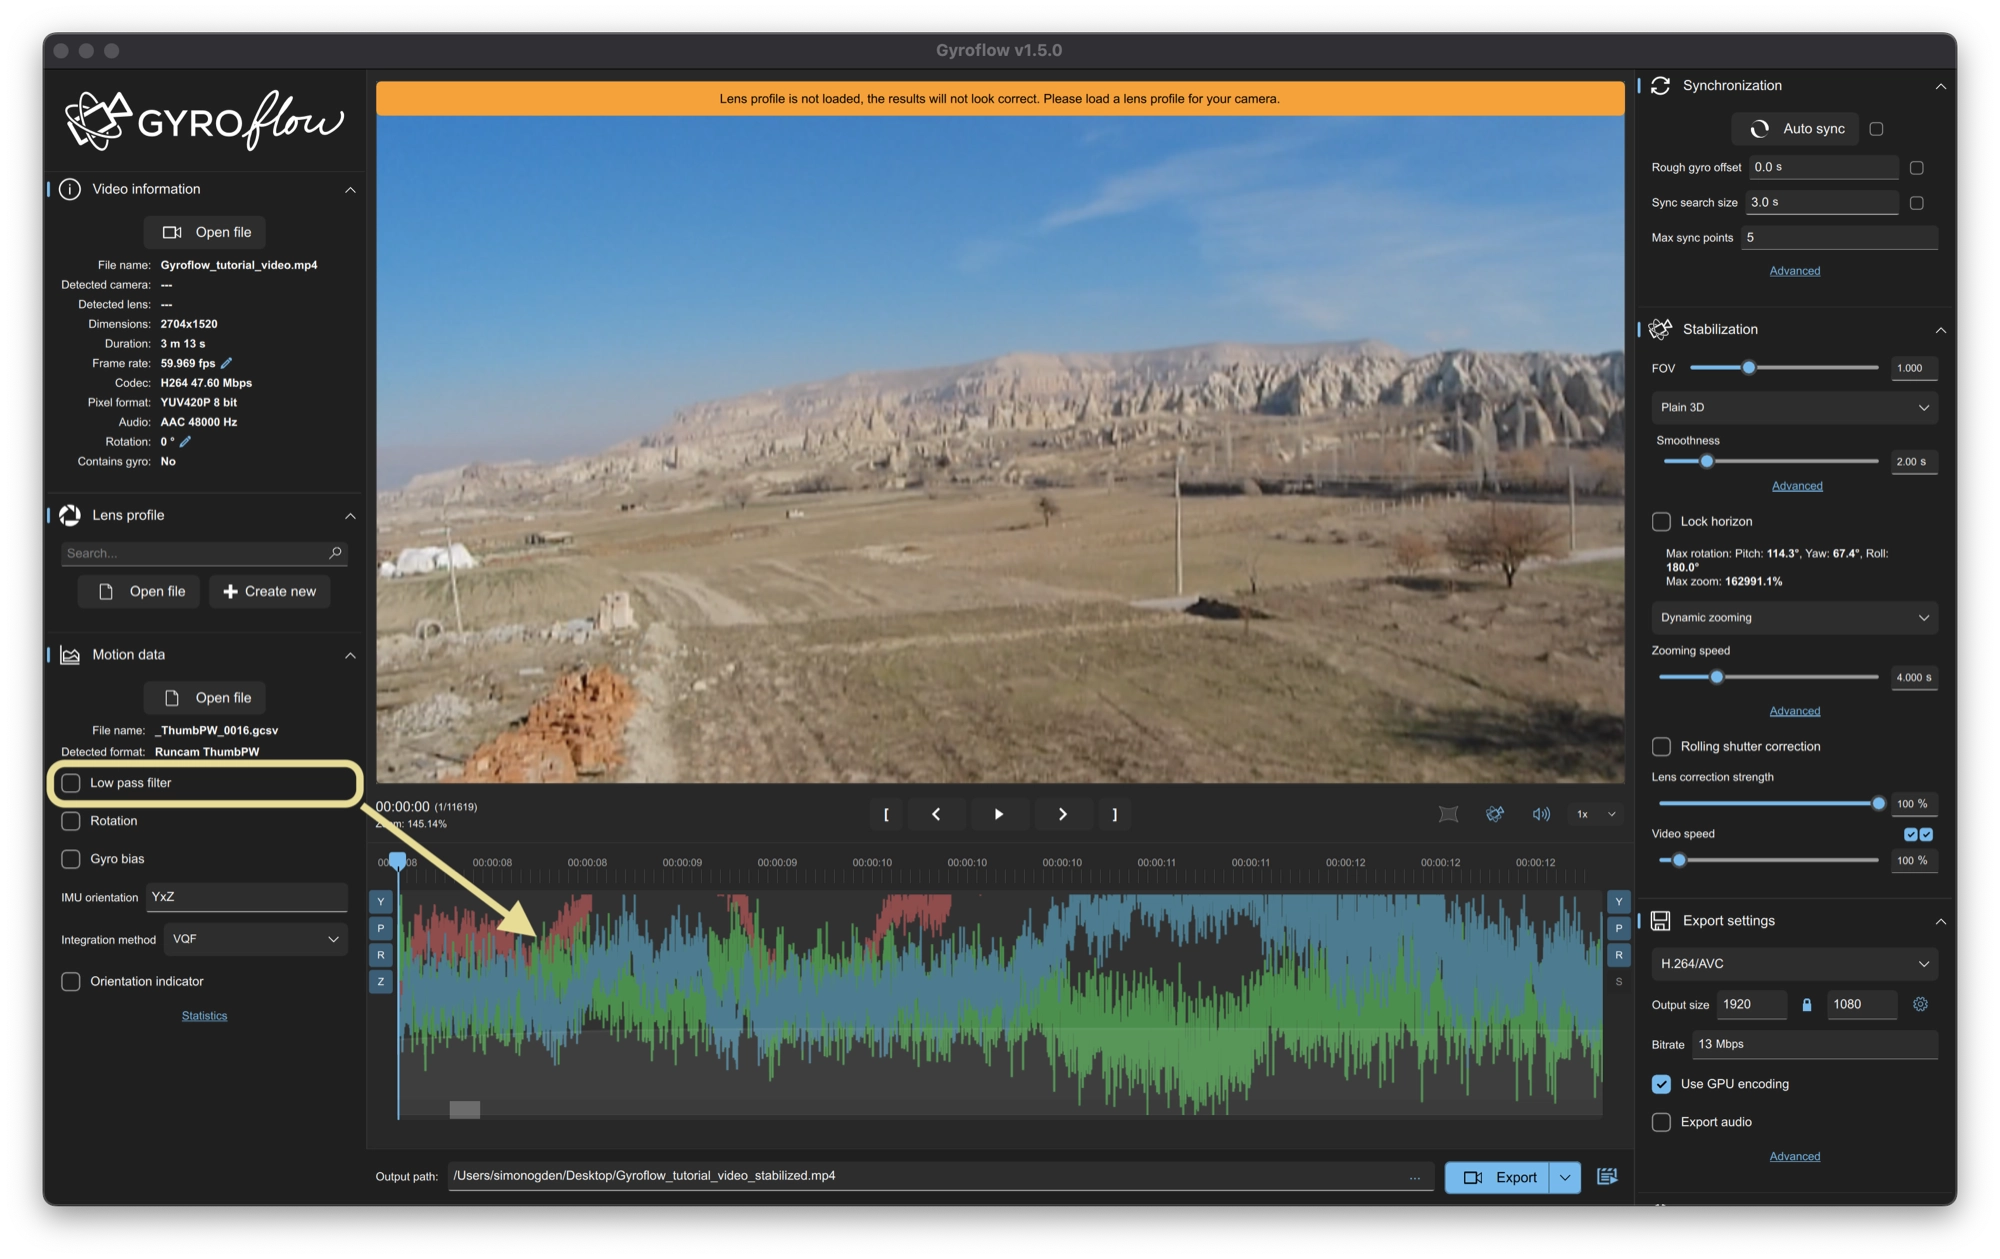
If we apply a low pass filter, usually a value of 50-70Hz works well, you can see that the noise is removed and the gyro data is far more clear.

Rotation
Allows you to adjust the rotation of the gyro (IMU) relative to the camera.
If the forward direction of your IMU is not pointing in the forward direction of the camera, you can compensate for it here.
IMU Orientation
This allows you to switch around the axes in case of any discrepancies. For example if your Z and X axes are reversed, you can change it here.
Integration Method
The integration method is the mathematical method used to calculate the camera position in space, using the data from the IMU.
Some cameras, such as the GoPro and DJI cameras already calculate this value and therefore the integration method for these cameras should be set to none.
In mostly every other case, the best setting to use is VQF.
For further information, see this article.
How To Align Gyro Data in Gyroflow
Now we are ready to begin the process of aligning the gyro data with the video:
- Load the video file that you wish to stabilize.
- Load the lens profile for the camera that you used to shoot the footage.
- Load the gyro data file.
- If your gyro data is noisy, set a low pass filter (50-70 Hz is usually a good value).
- Set up the synchronization options:
- Rough gyro offset is the gap between the start of the gyro data and start of the video footage, you can set it if you know it and it can be a positive or negative value.
- Leave sync search size set to 3.0 s.
- Set the max sync points to 2 (in most cases we only need two in order to manually align).
- Click the Auto Sync button in the synchronization tab.
The process that we have just completed has created what is known as the optical flow data. This means that the computer has actually predicted the gyro movement by visually analysing the video.
The optical flow data will not be quite as accurate as the data from the gyro sensor, however it is perfect to use as an aid for synchronizing the gyro data to the video.
Therefore our goal is to align the optical flow data with the gyro data.
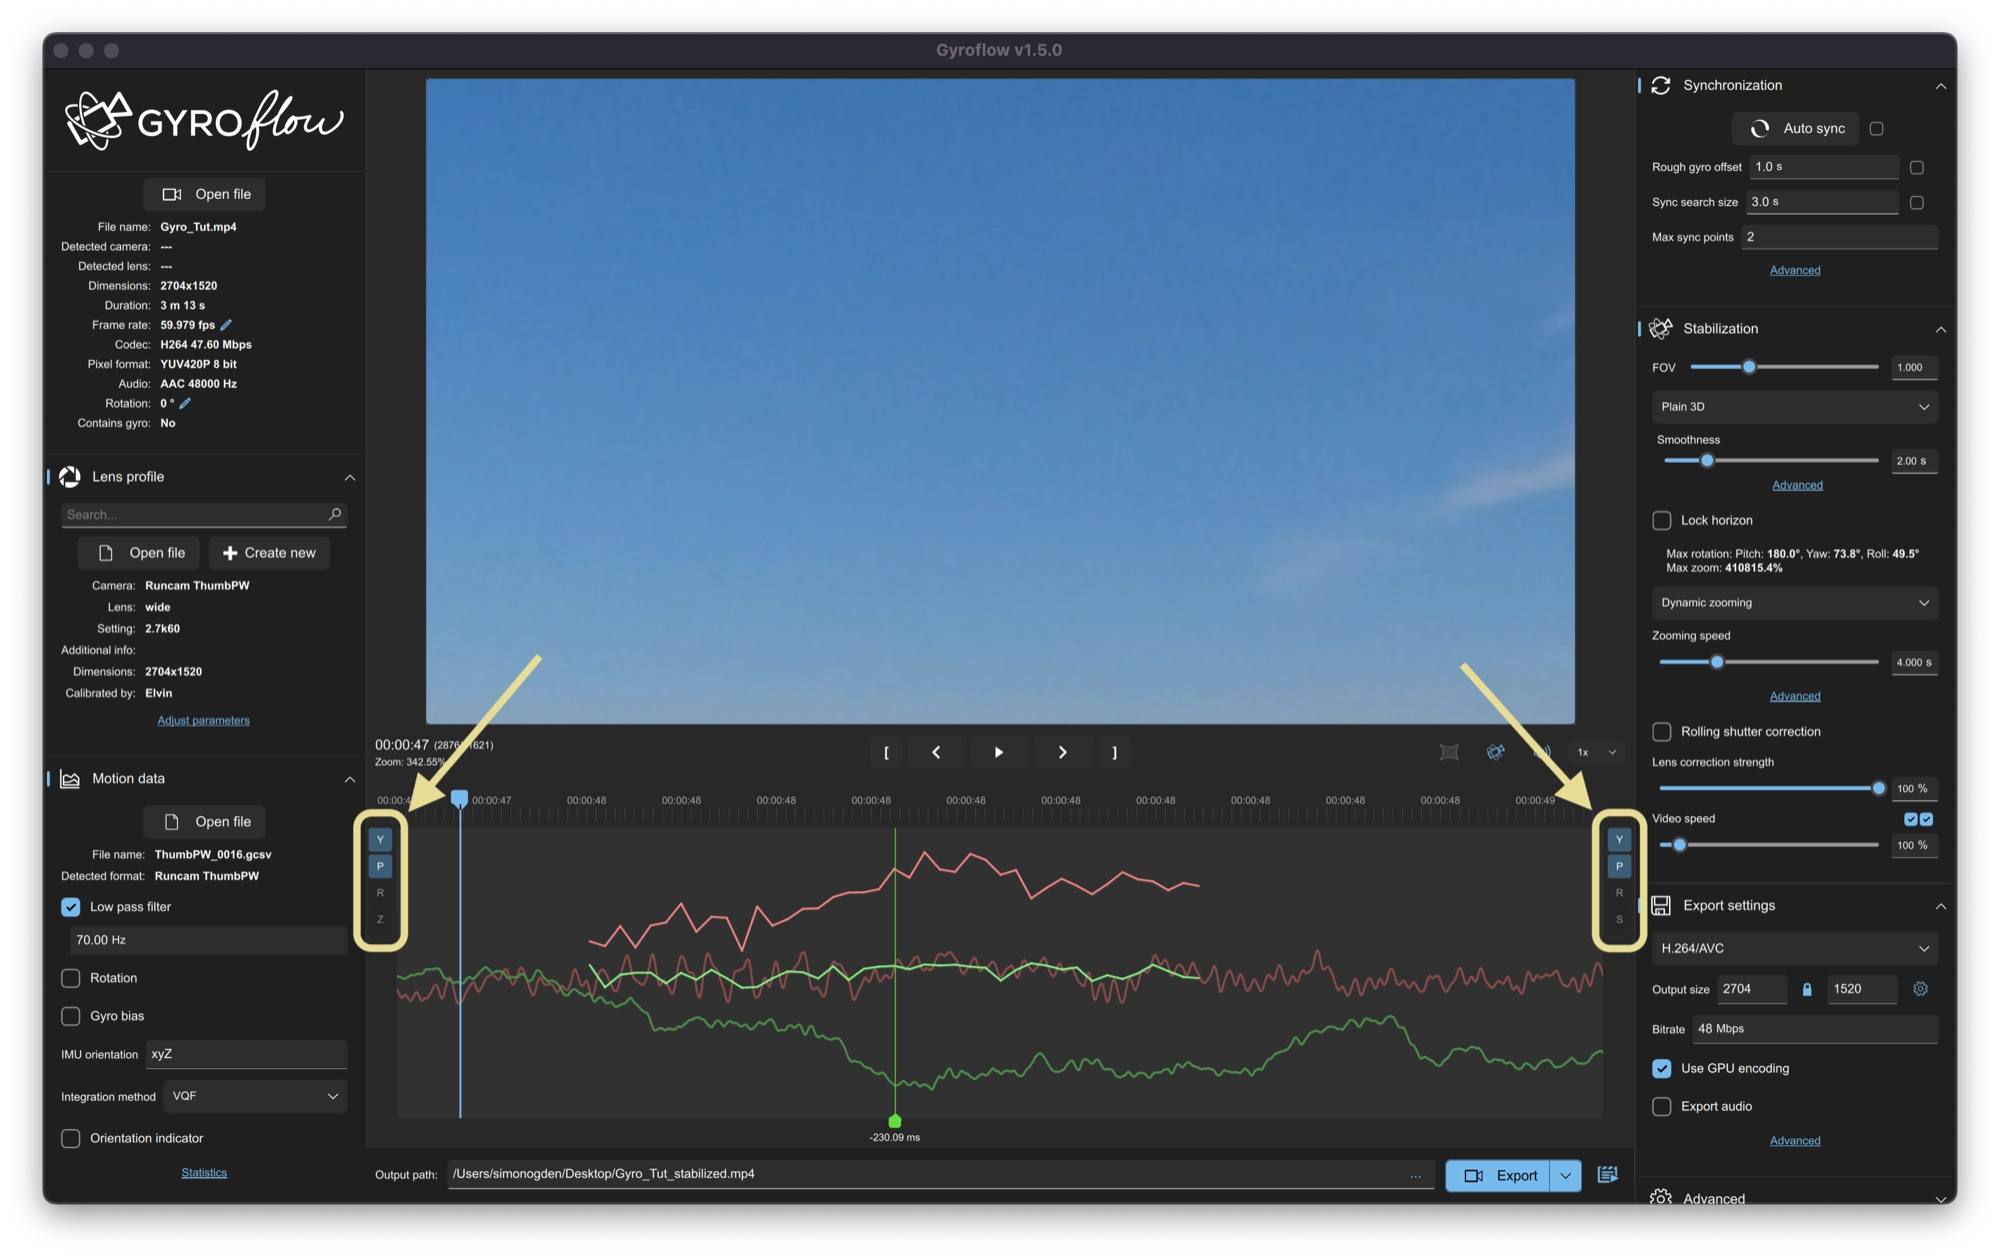
You should now see that two sync points have appeared on in the gyro data. We need to zoom in to the data at the first point, circled below:
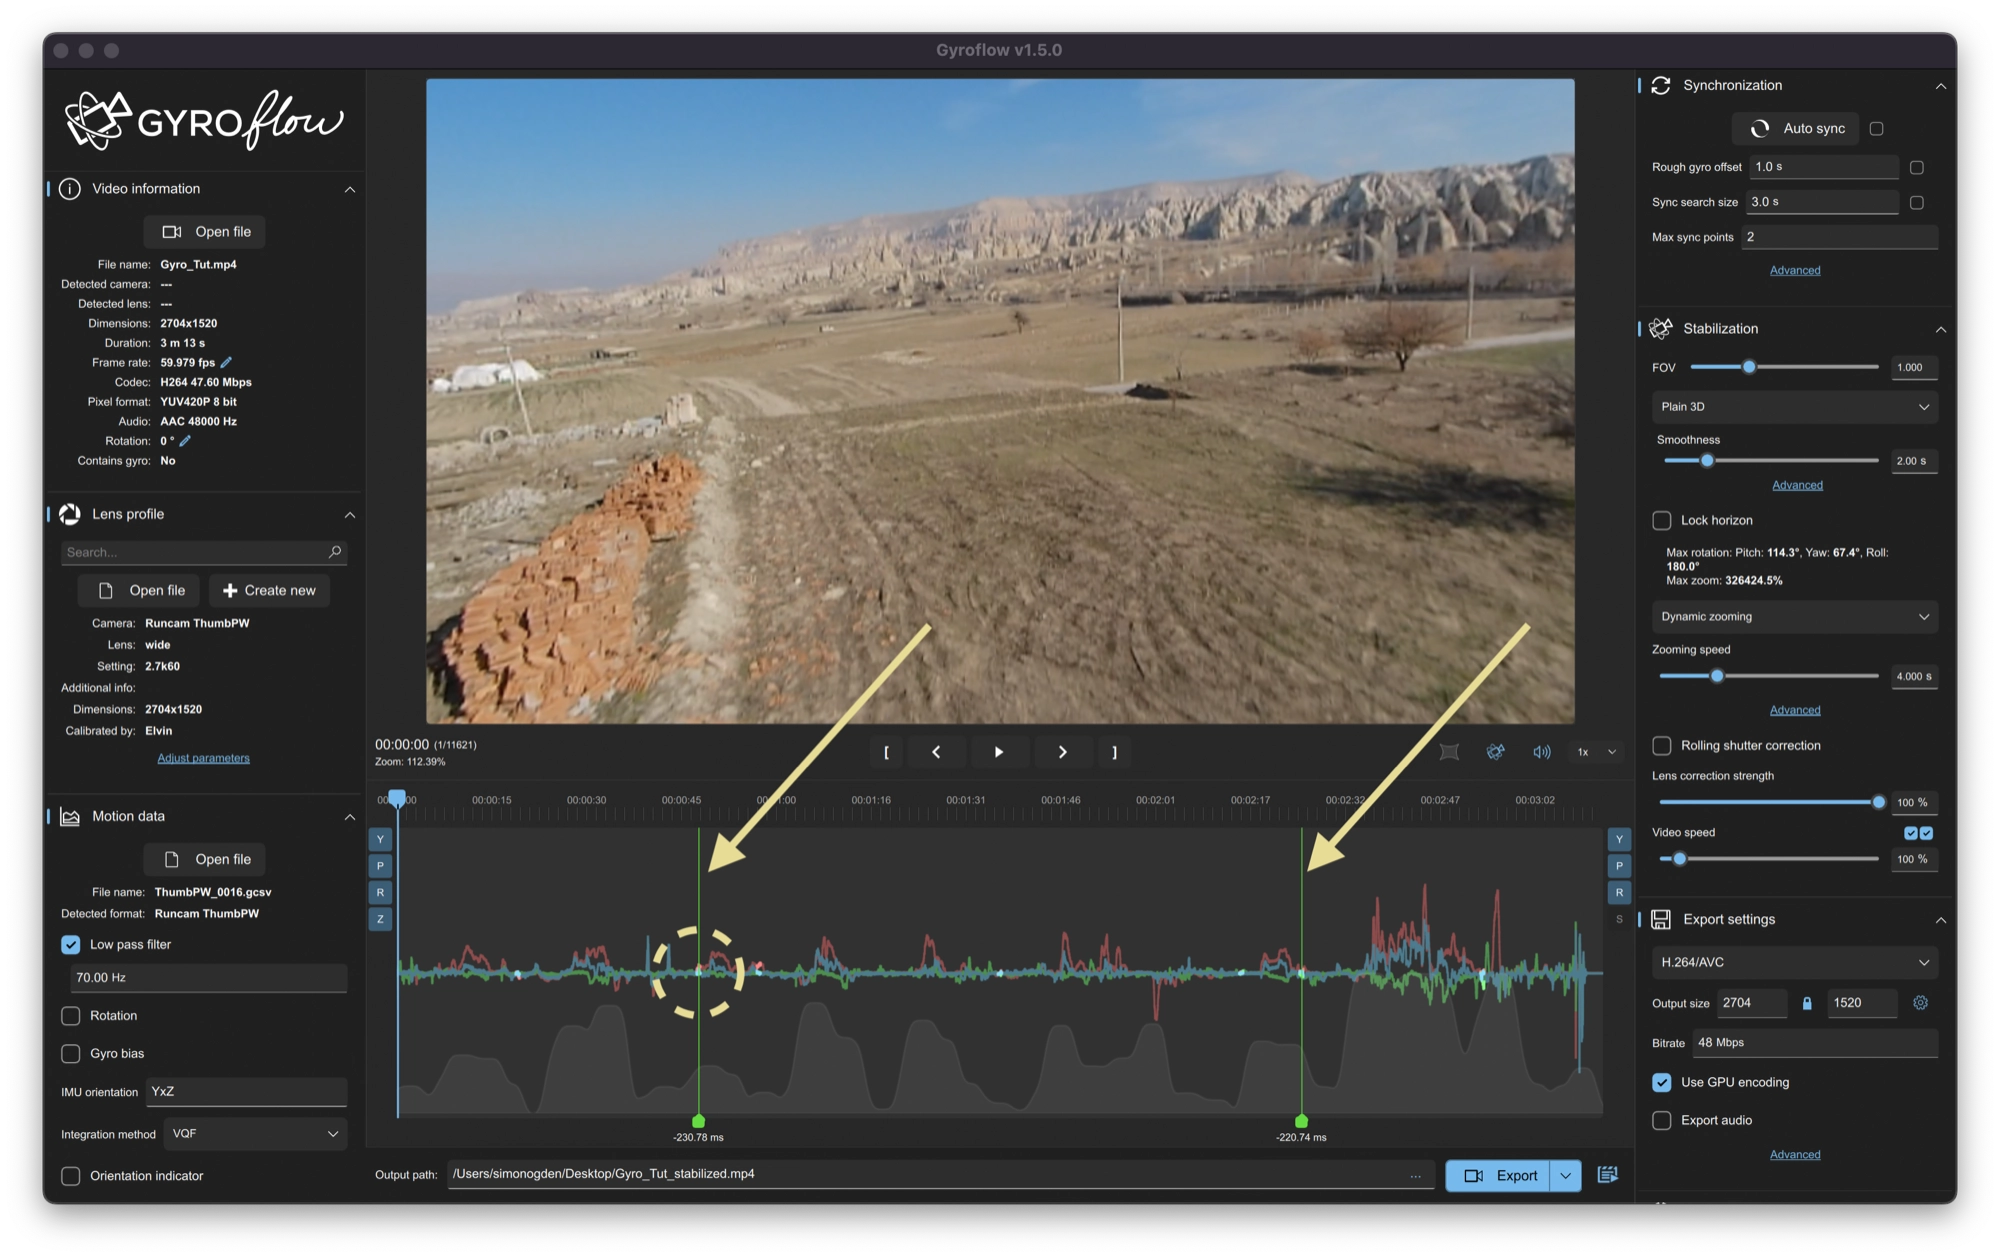
Zooming in to this area will reveal both the optical flow and gyro data, each of which has 3 axes shown in red, green and blue. The gyro data is shown in a slightly darker red, green and blue.
You can show and hide this information for both gyro [1] and optical [2] data.
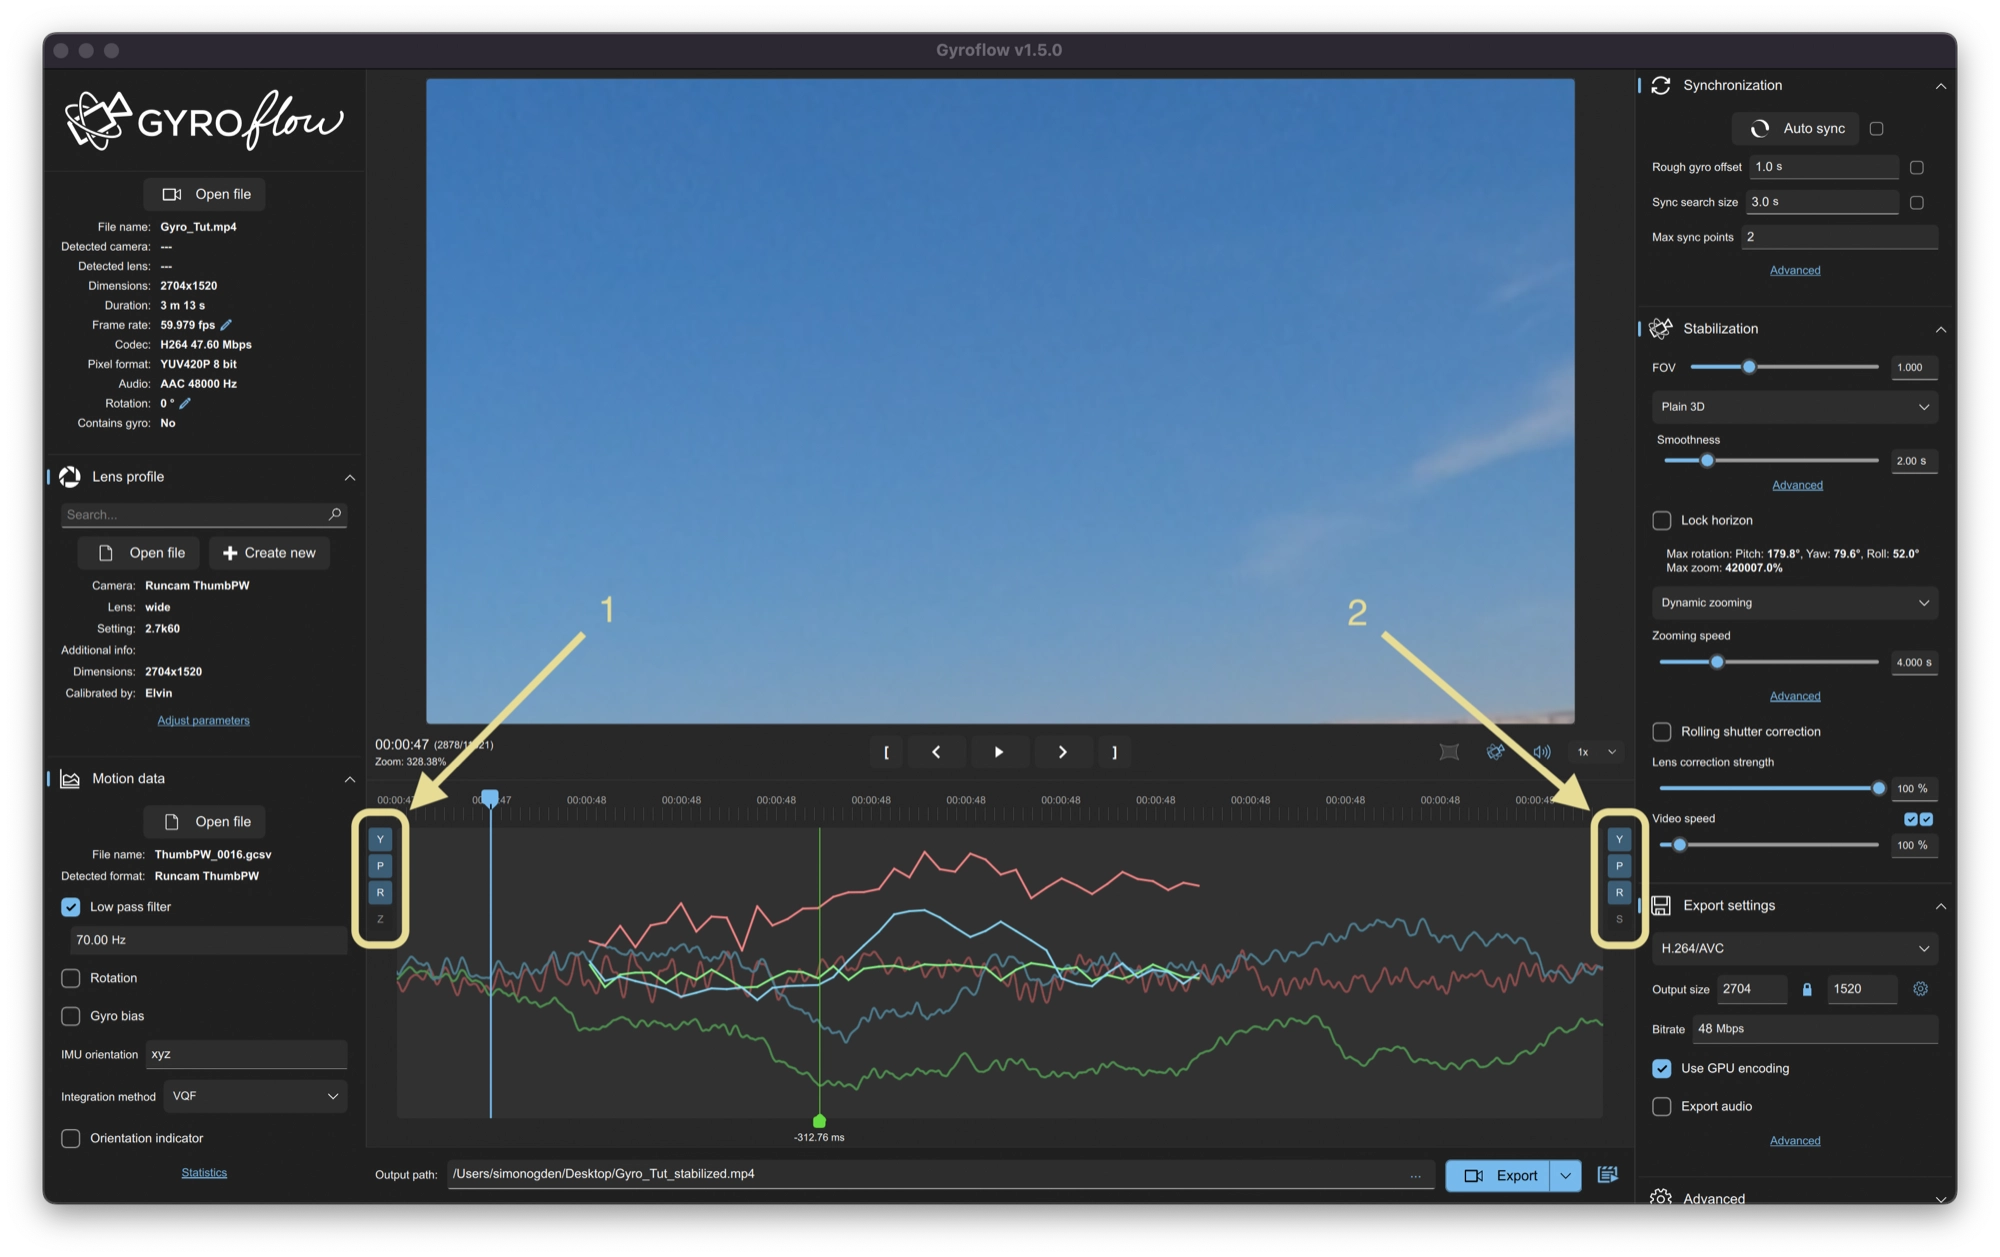
The data above is a worst case example in order to demonstrate how the functionality of the software works. You may be lucky and find that some of all of the graph is matching!
The goal is to match the dark red line with the red line, the dark blue line with the blue line and the dark green line with the green line.
The first thing we need to do is look at each axis separately. In this example we will look at the roll axis first, which you can do by unselecting the other axes.
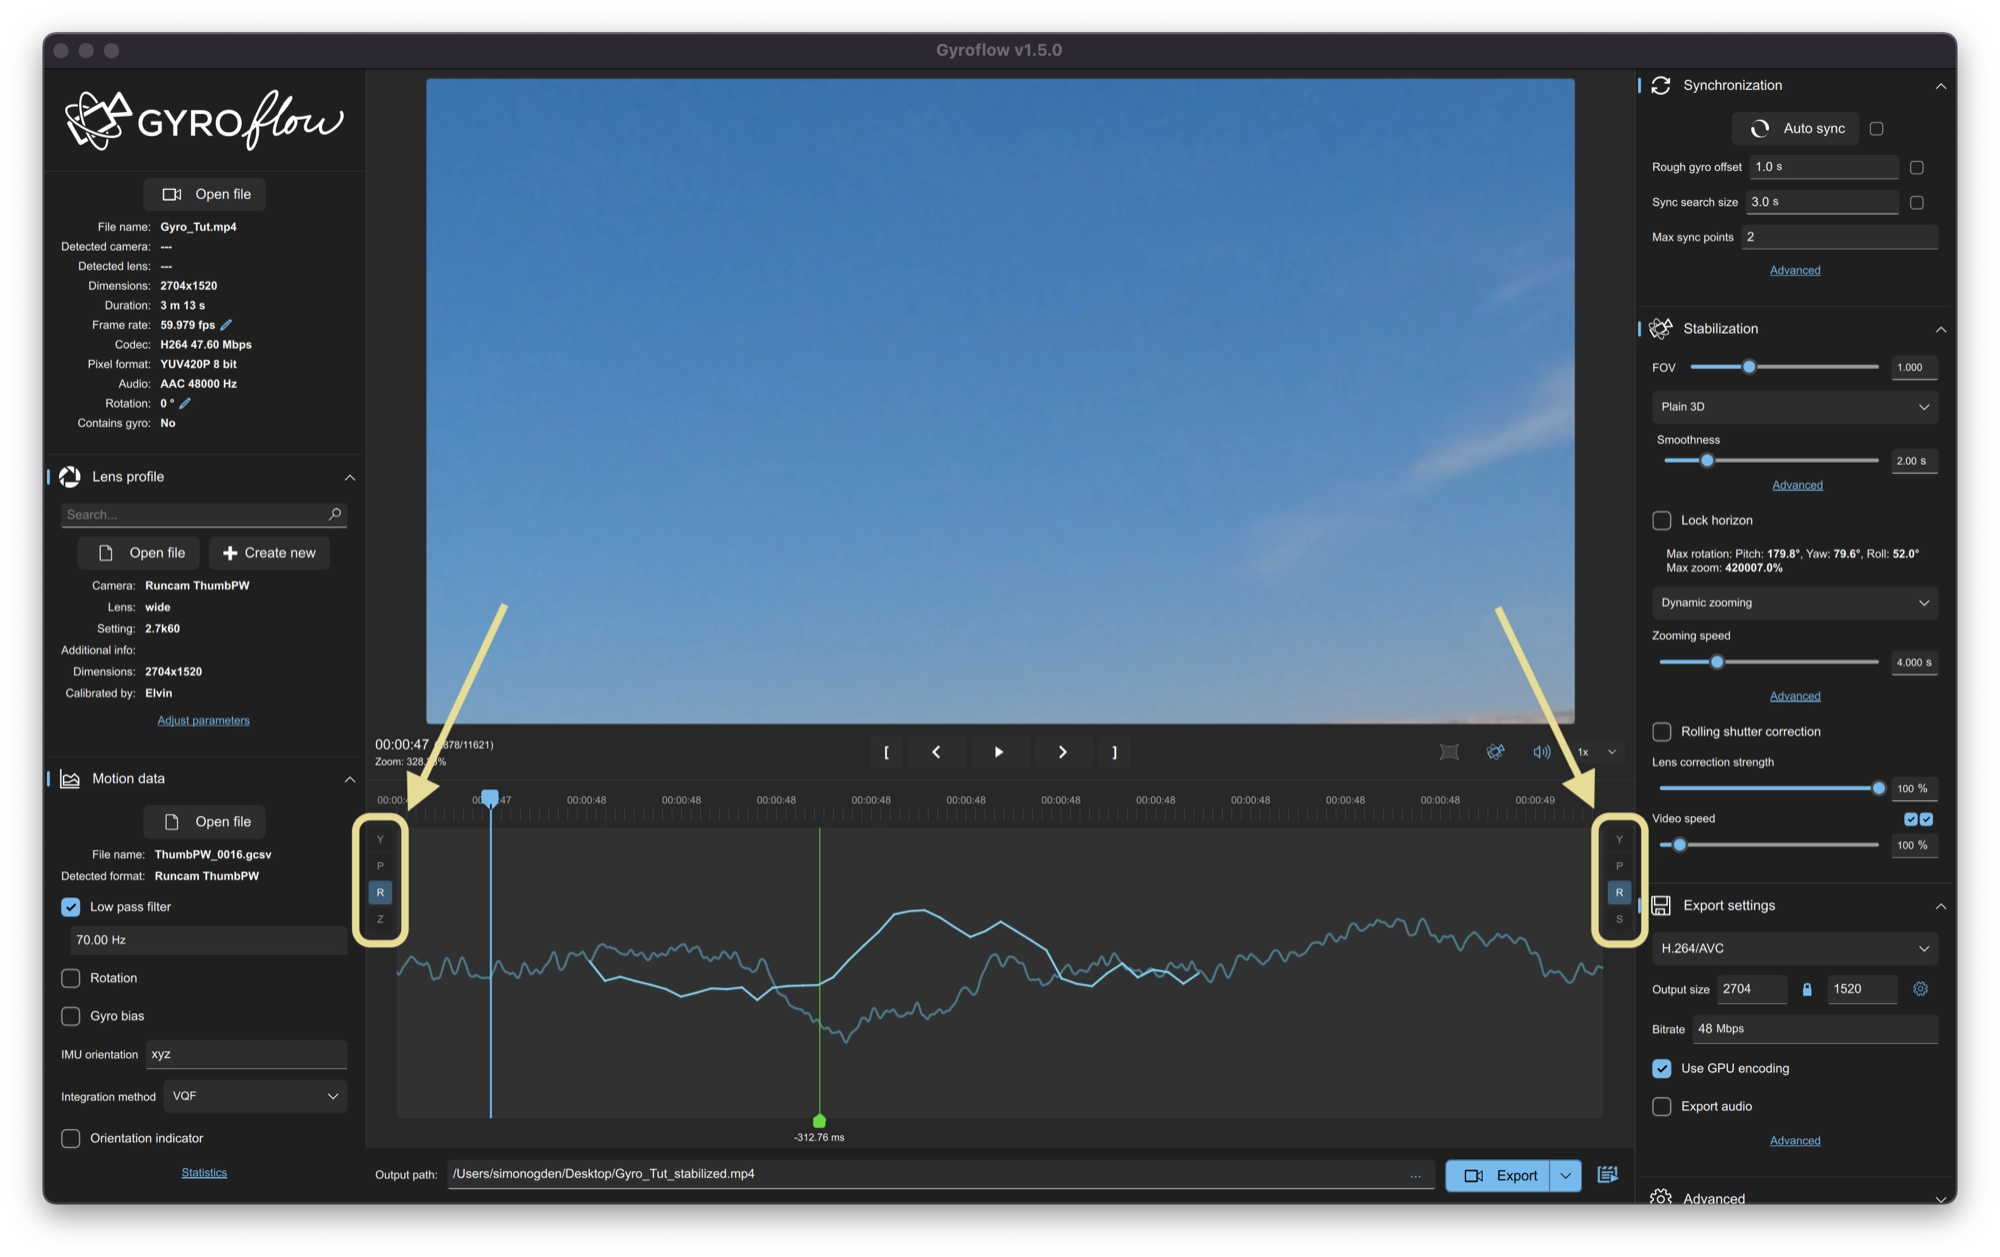
We can see that the optical flow data (lighter blue line) in the data above looks to be the correct axis, however it is inverted and not quite lining up correctly.
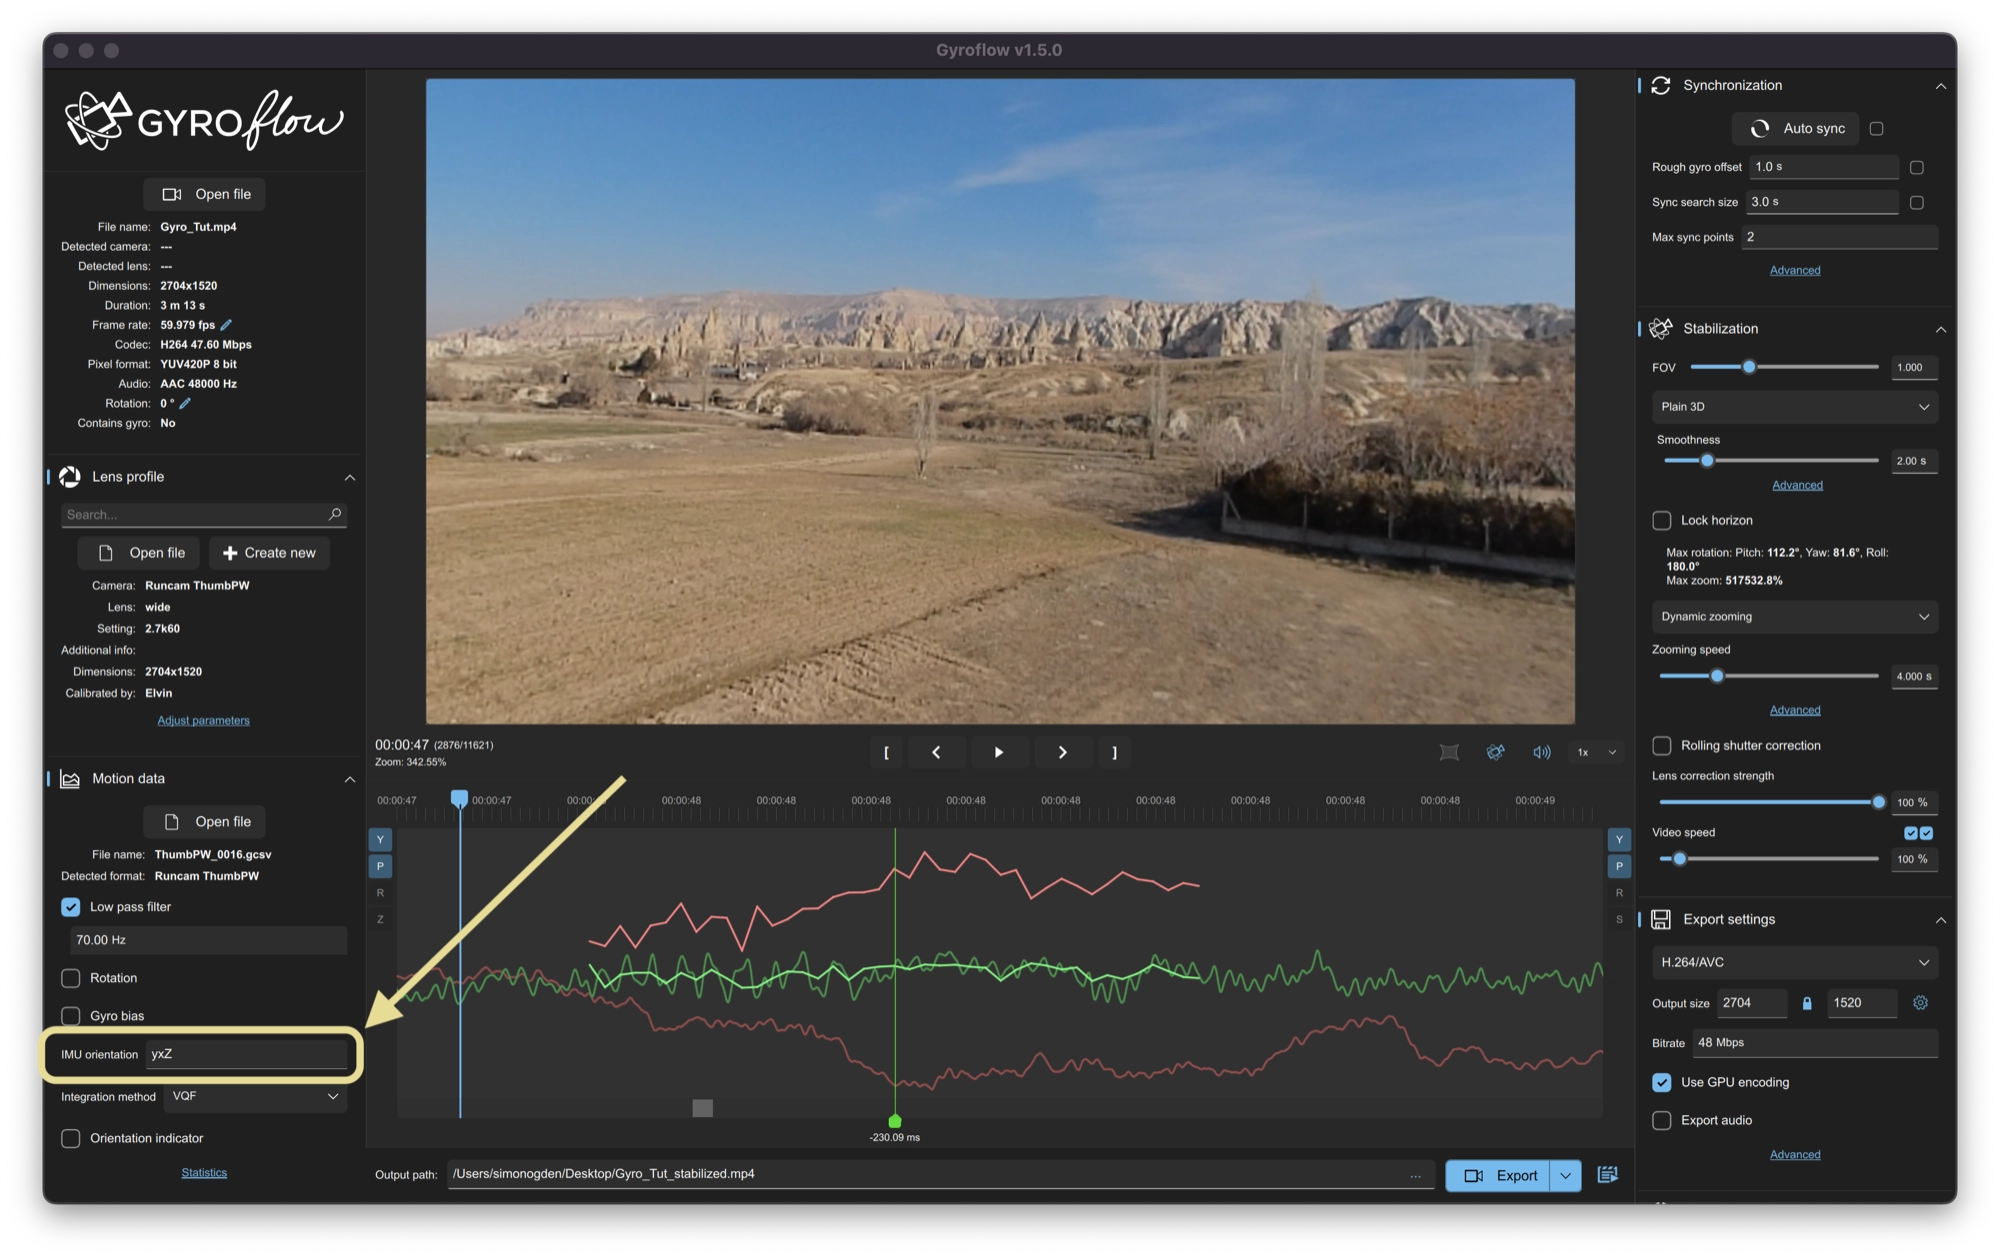
First, lets invert the axis and see if it makes an improvement. You can invert the gyro data axis by switching the axis between small and capital letters.
In our example we have changed xyz to xyZ in order to flip the roll axis:
This is now looking better! However we still need to adjust the timing so that the graphs line up left to right.
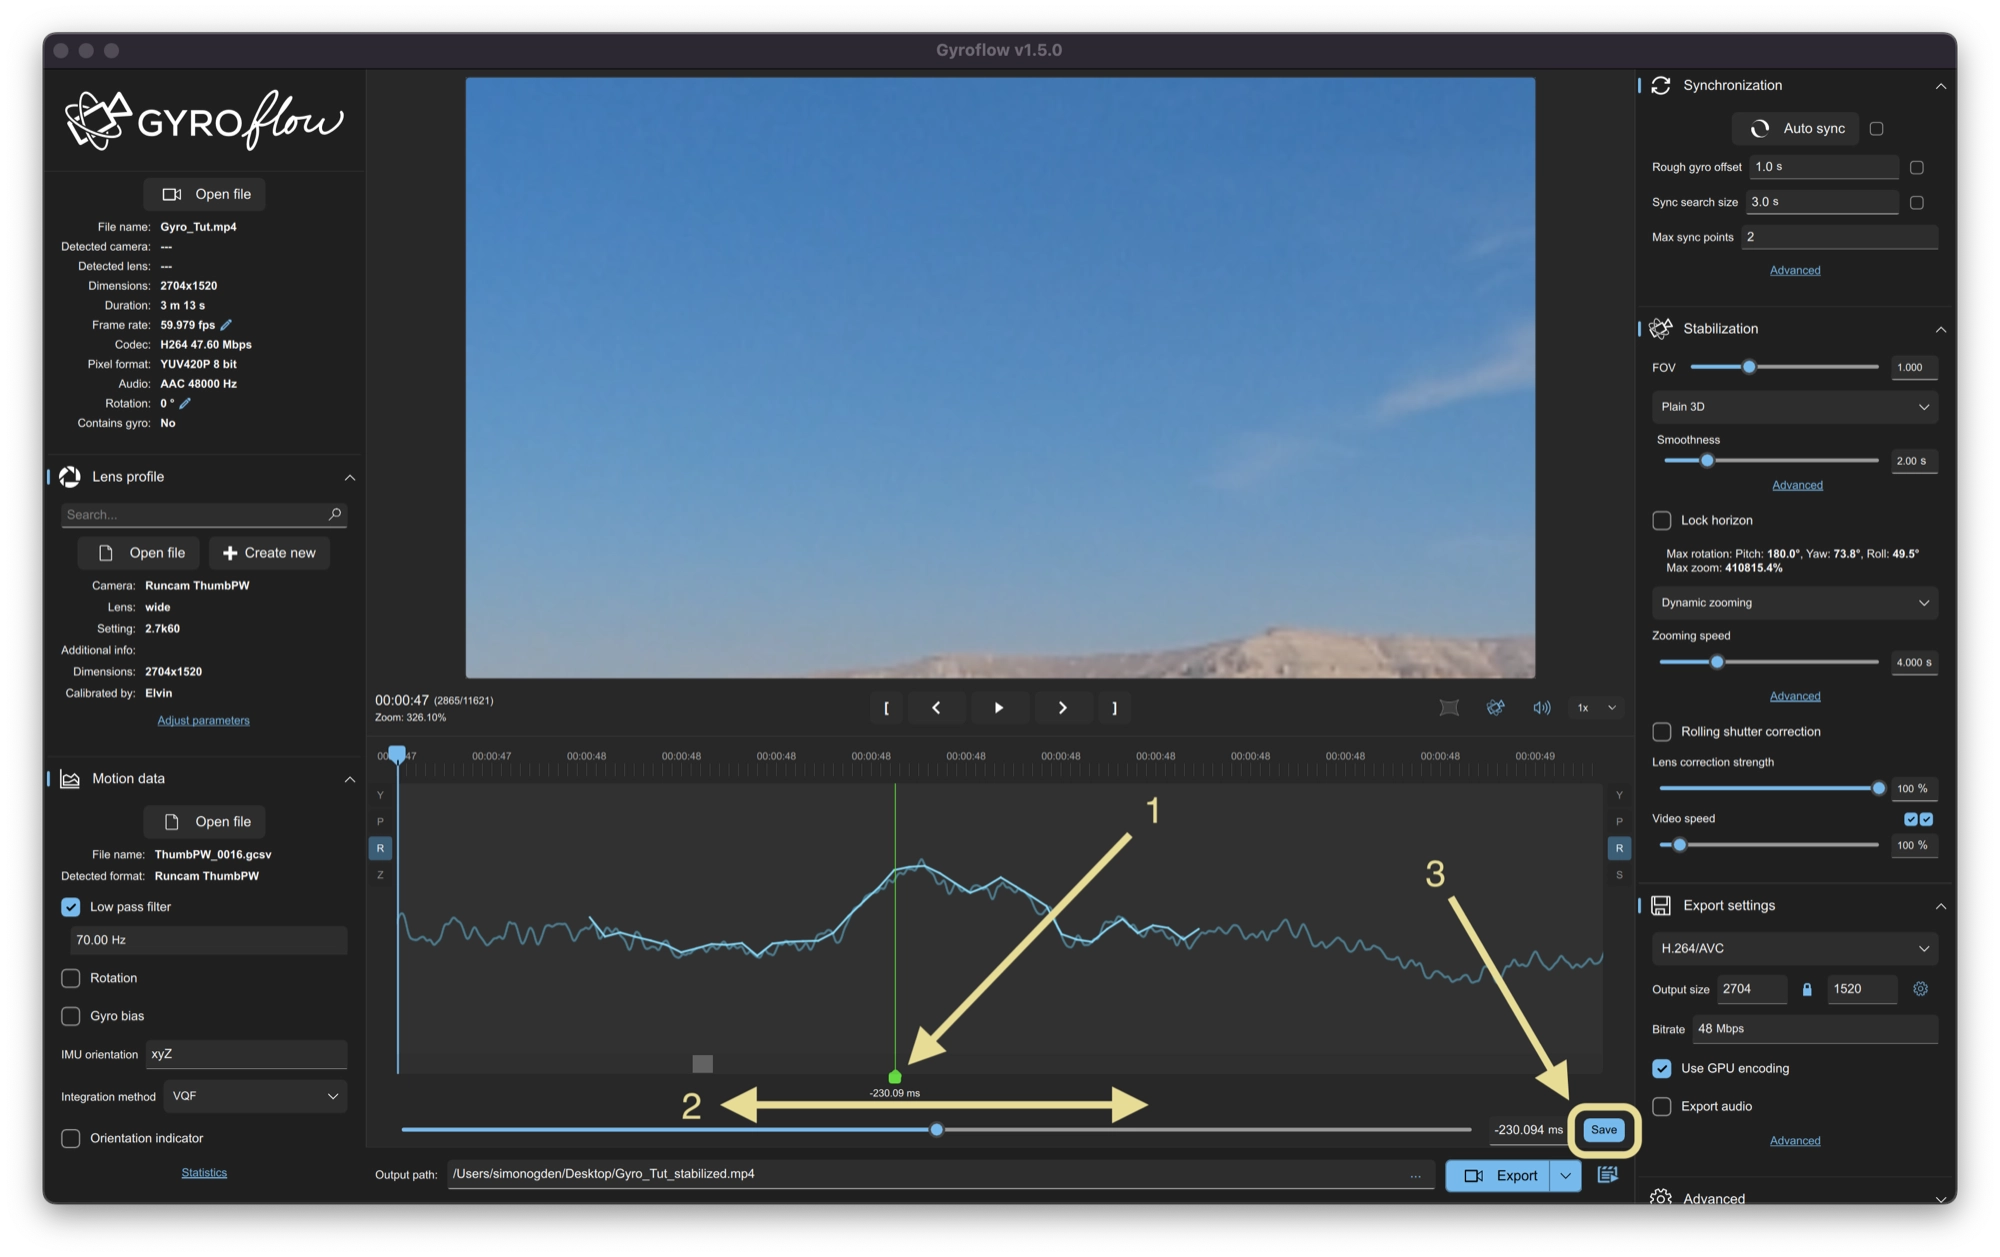
- Click the green sync marker in order to show the adjustment slider.
- Move the slider until the graph lines up correctly.
- Click the save button to save the new position.
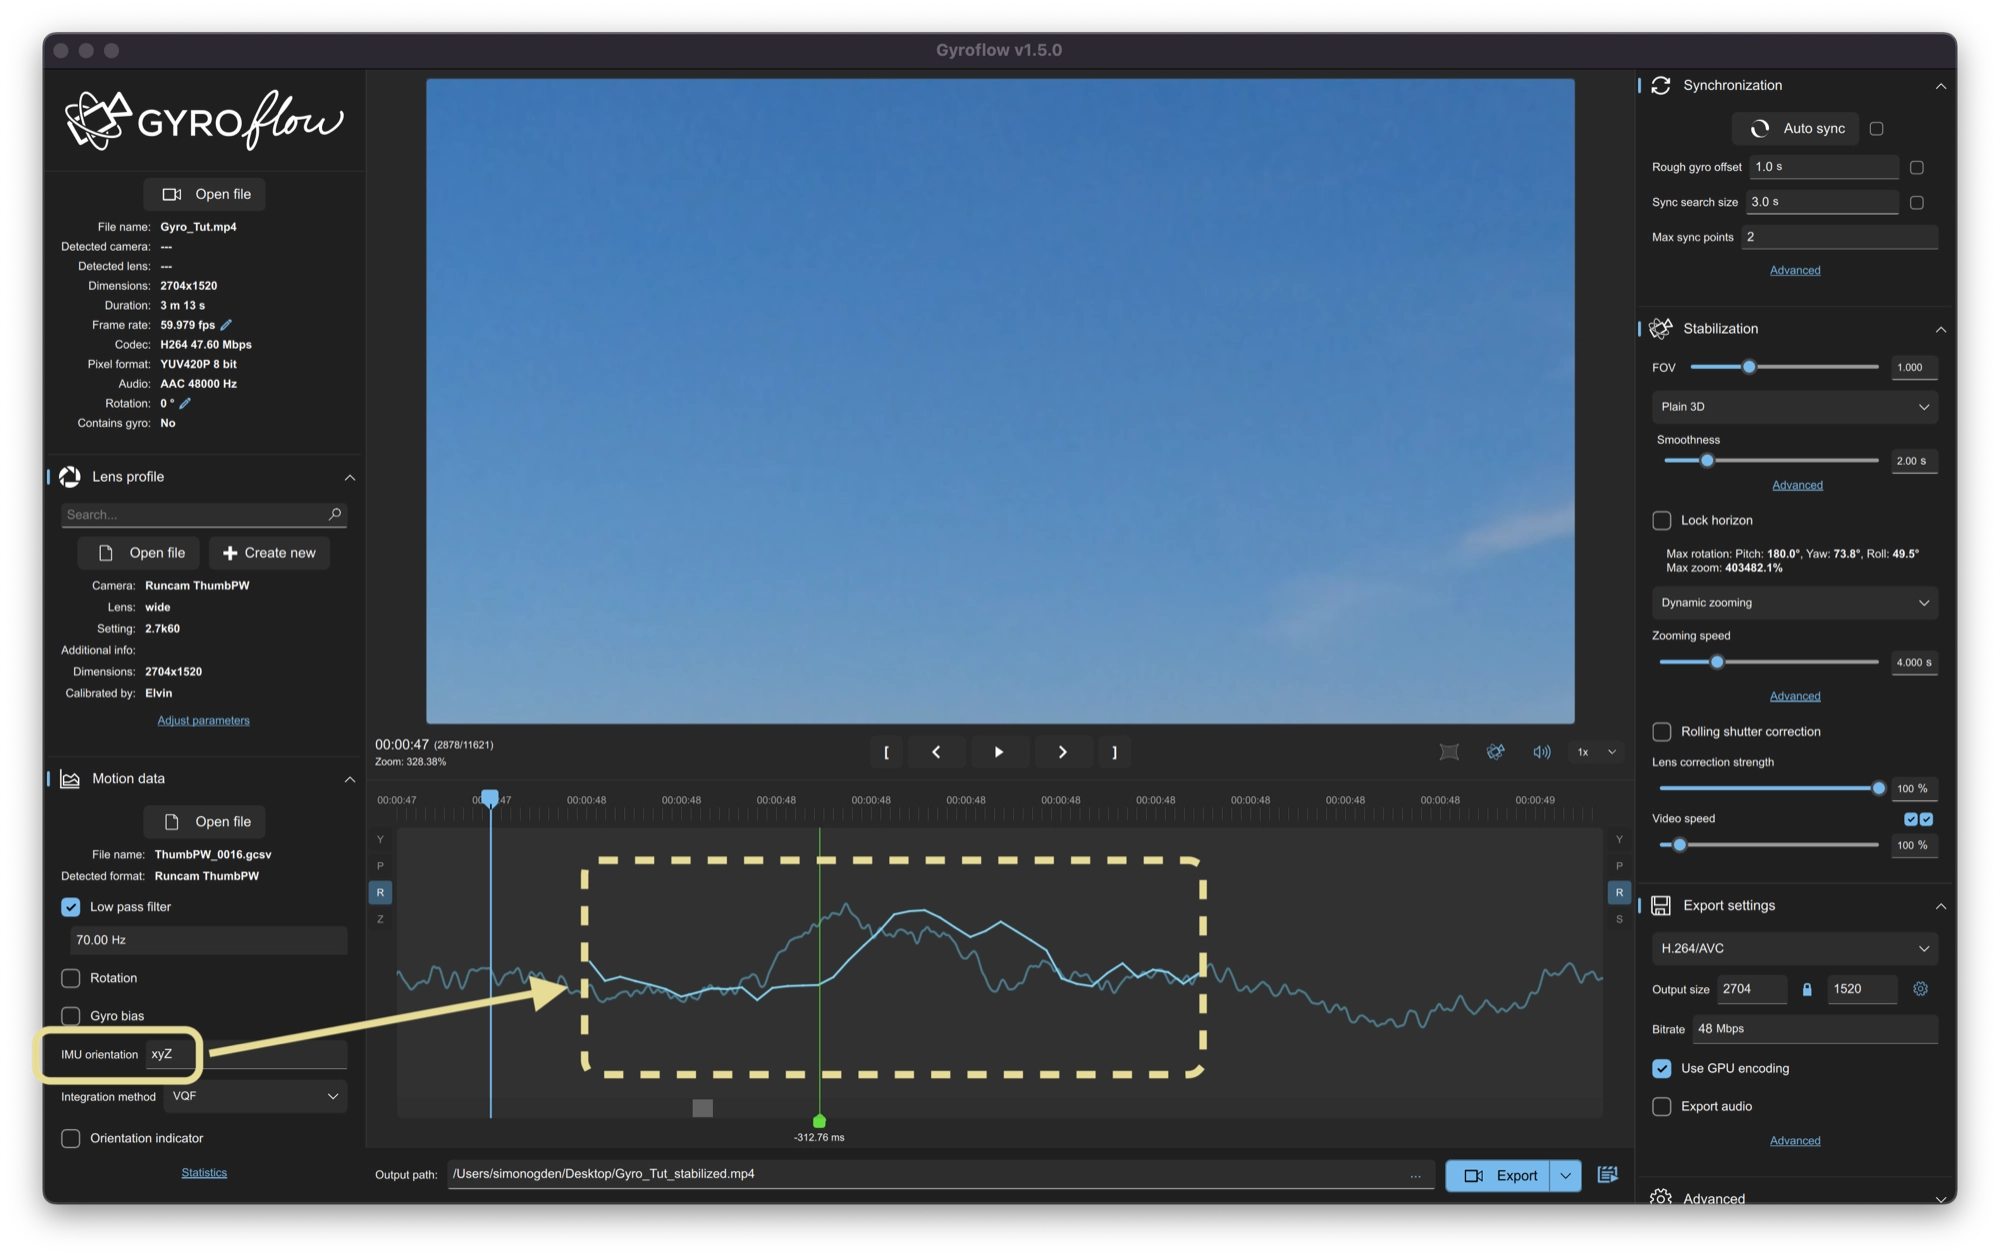
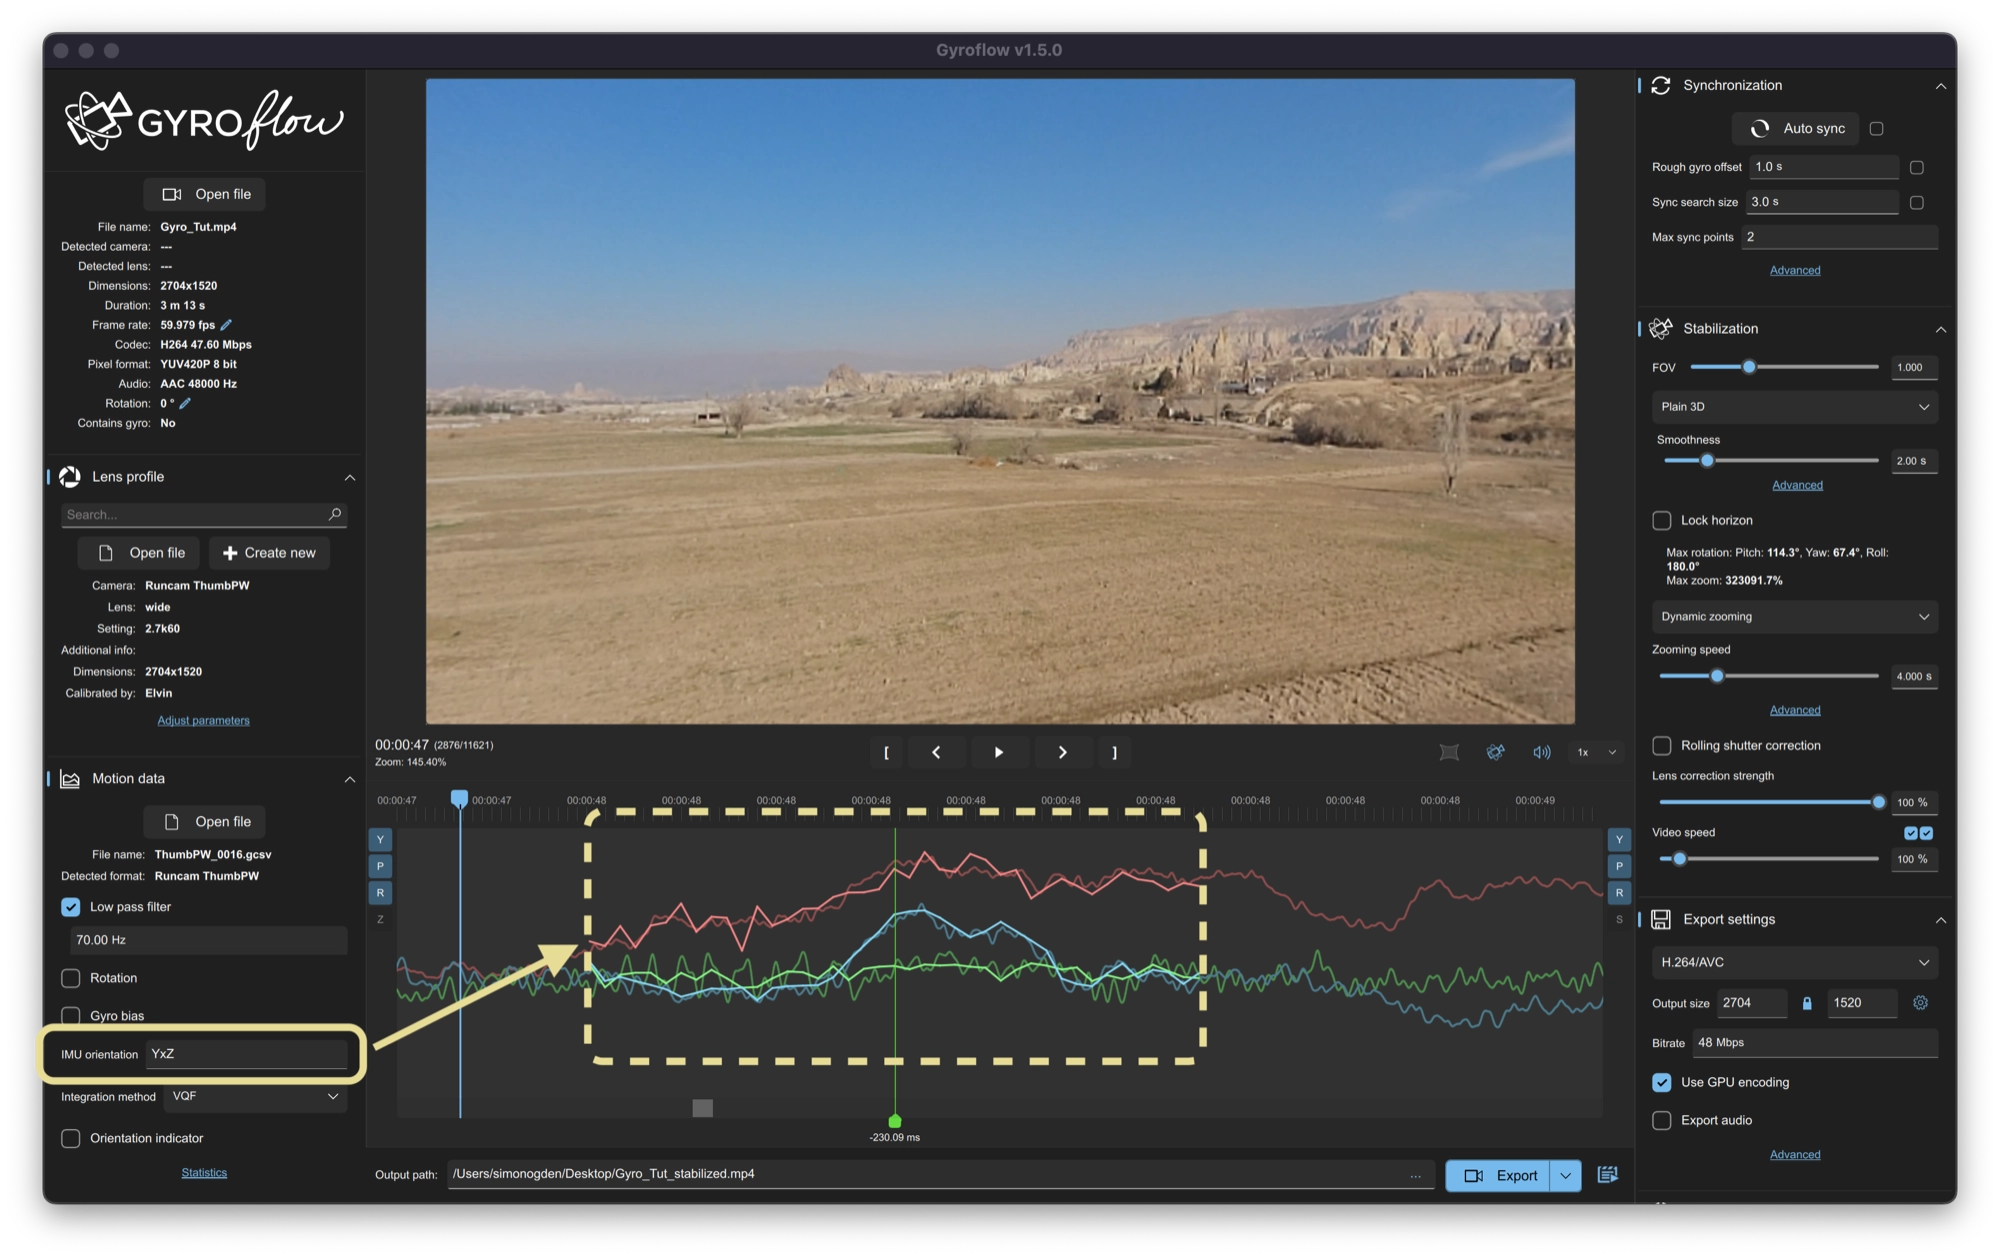
Now that we have the roll axis set up correctly, we can move on to the yaw and pitch axes. In our example we can see that the light green line currently matches up with the darker red line.
We can fix this by switching around the two remaining axes. We can do this by changing the IMU orientation from xyZ to yxZ, switching the position for the x and y axes.
The last axis that we need to fix is the yaw axis, which simply need inverting. In order to do this we just need to change the small y to a capital Y, so that yxZ becomes YxZ.
Now when when look at all three axes together, we can see that the gyro data matches the optical flow data.
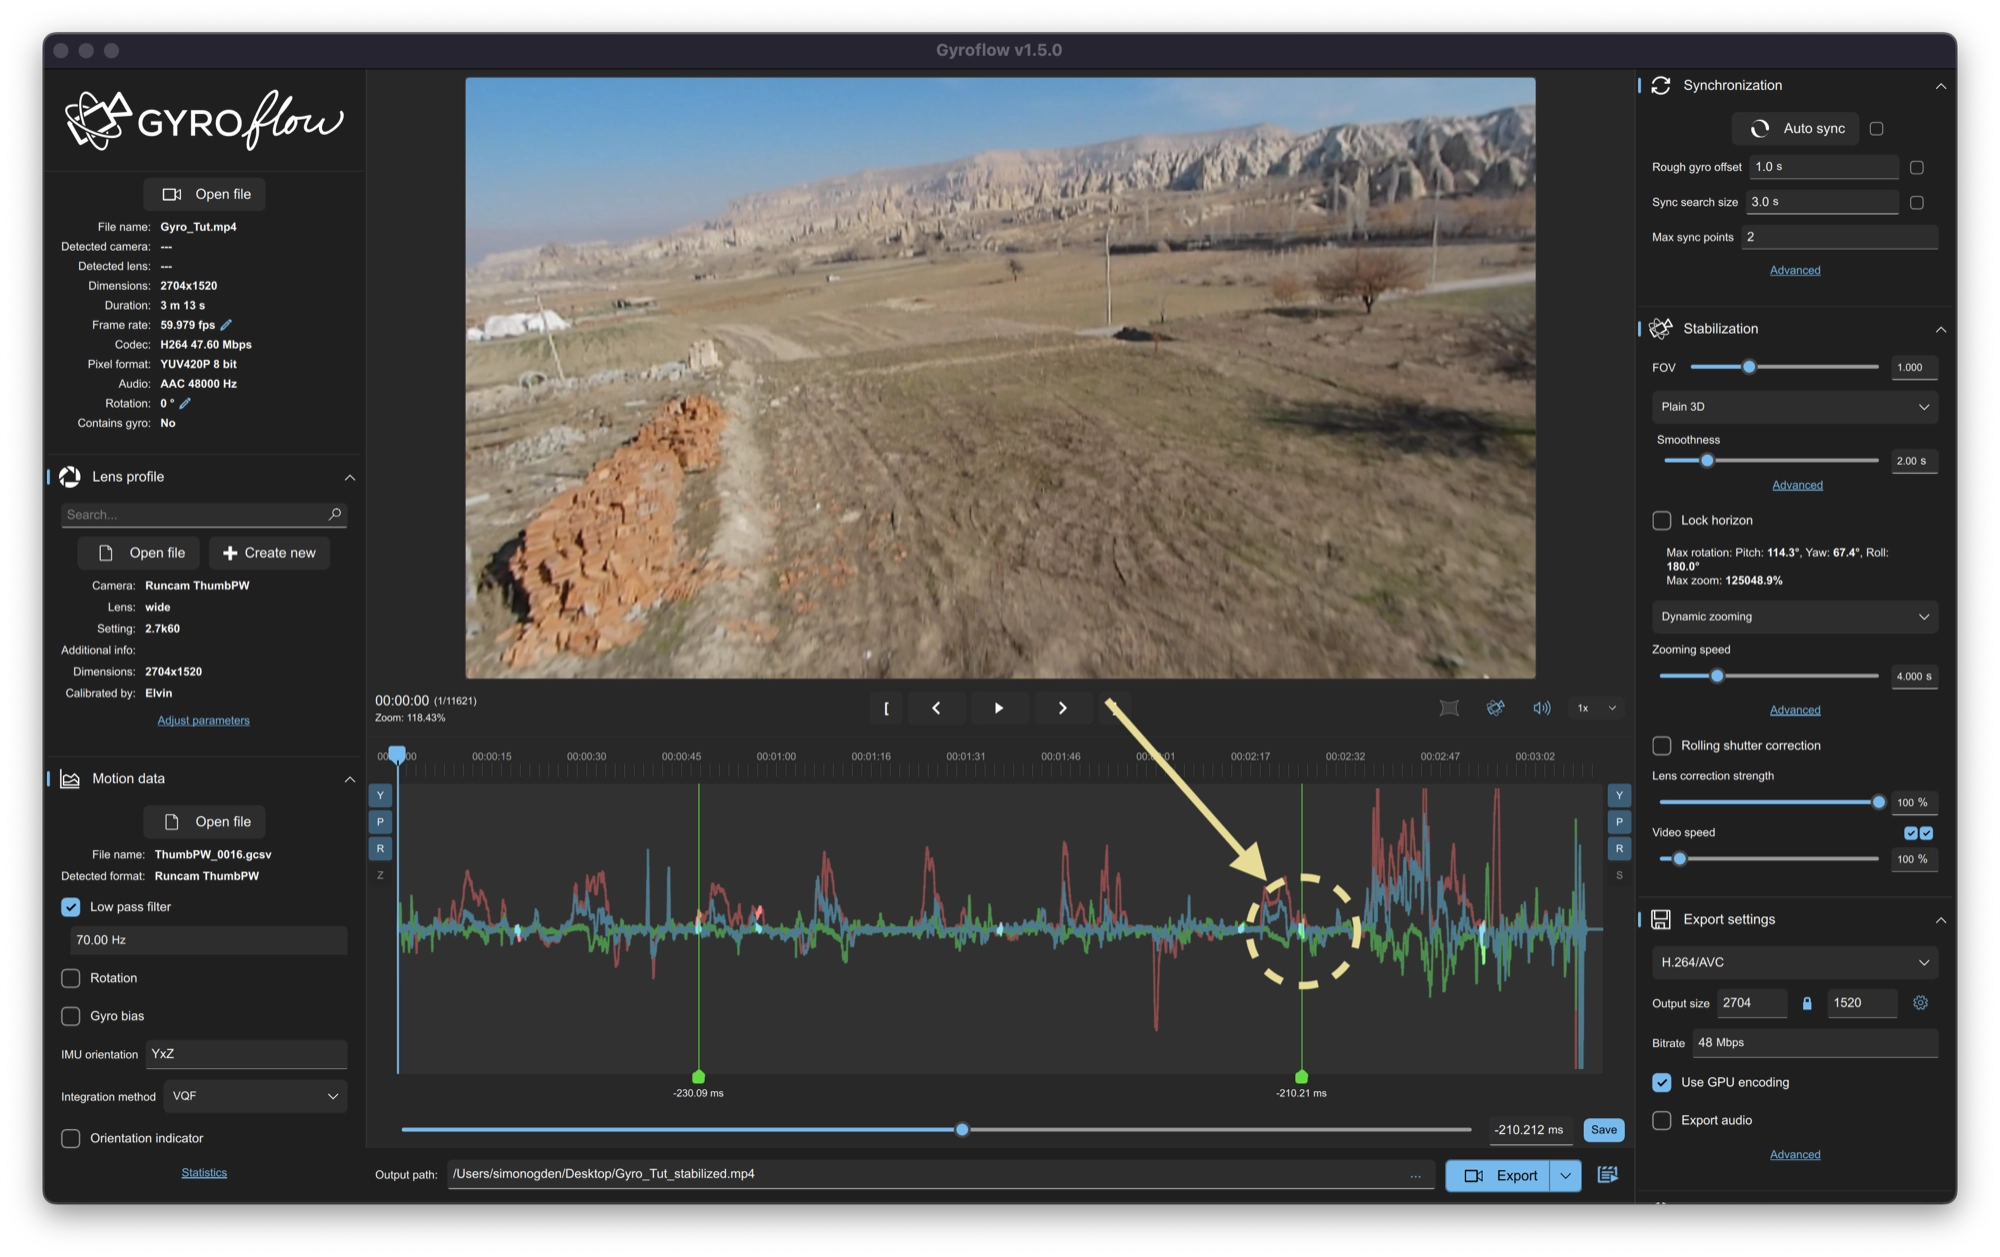
Lastly, you should zoom in and check the second sync point. You may need to adjust the timing for this point in order to line up the data throughout the whole video.
That’s it! You should now be able to watch back your stabilized footage. Be sure to check out the next section for a description of the stabilization settings.
How To Configure Gyroflow
Once you have loaded the video that you want to stabilize into Gyroflow and matched it up with the gyro data, your footage will play back stabilized.
However you may want to tweak some of the settings in order to optimize the output.
The Gyroflow Stabilization Menu
The stabilization options allow you to fine tune the settings in order to optimize the end result produced by Gyroflow.
The following section explains the settings that you might want to change 99% of the time. In most cases the default settings work well.
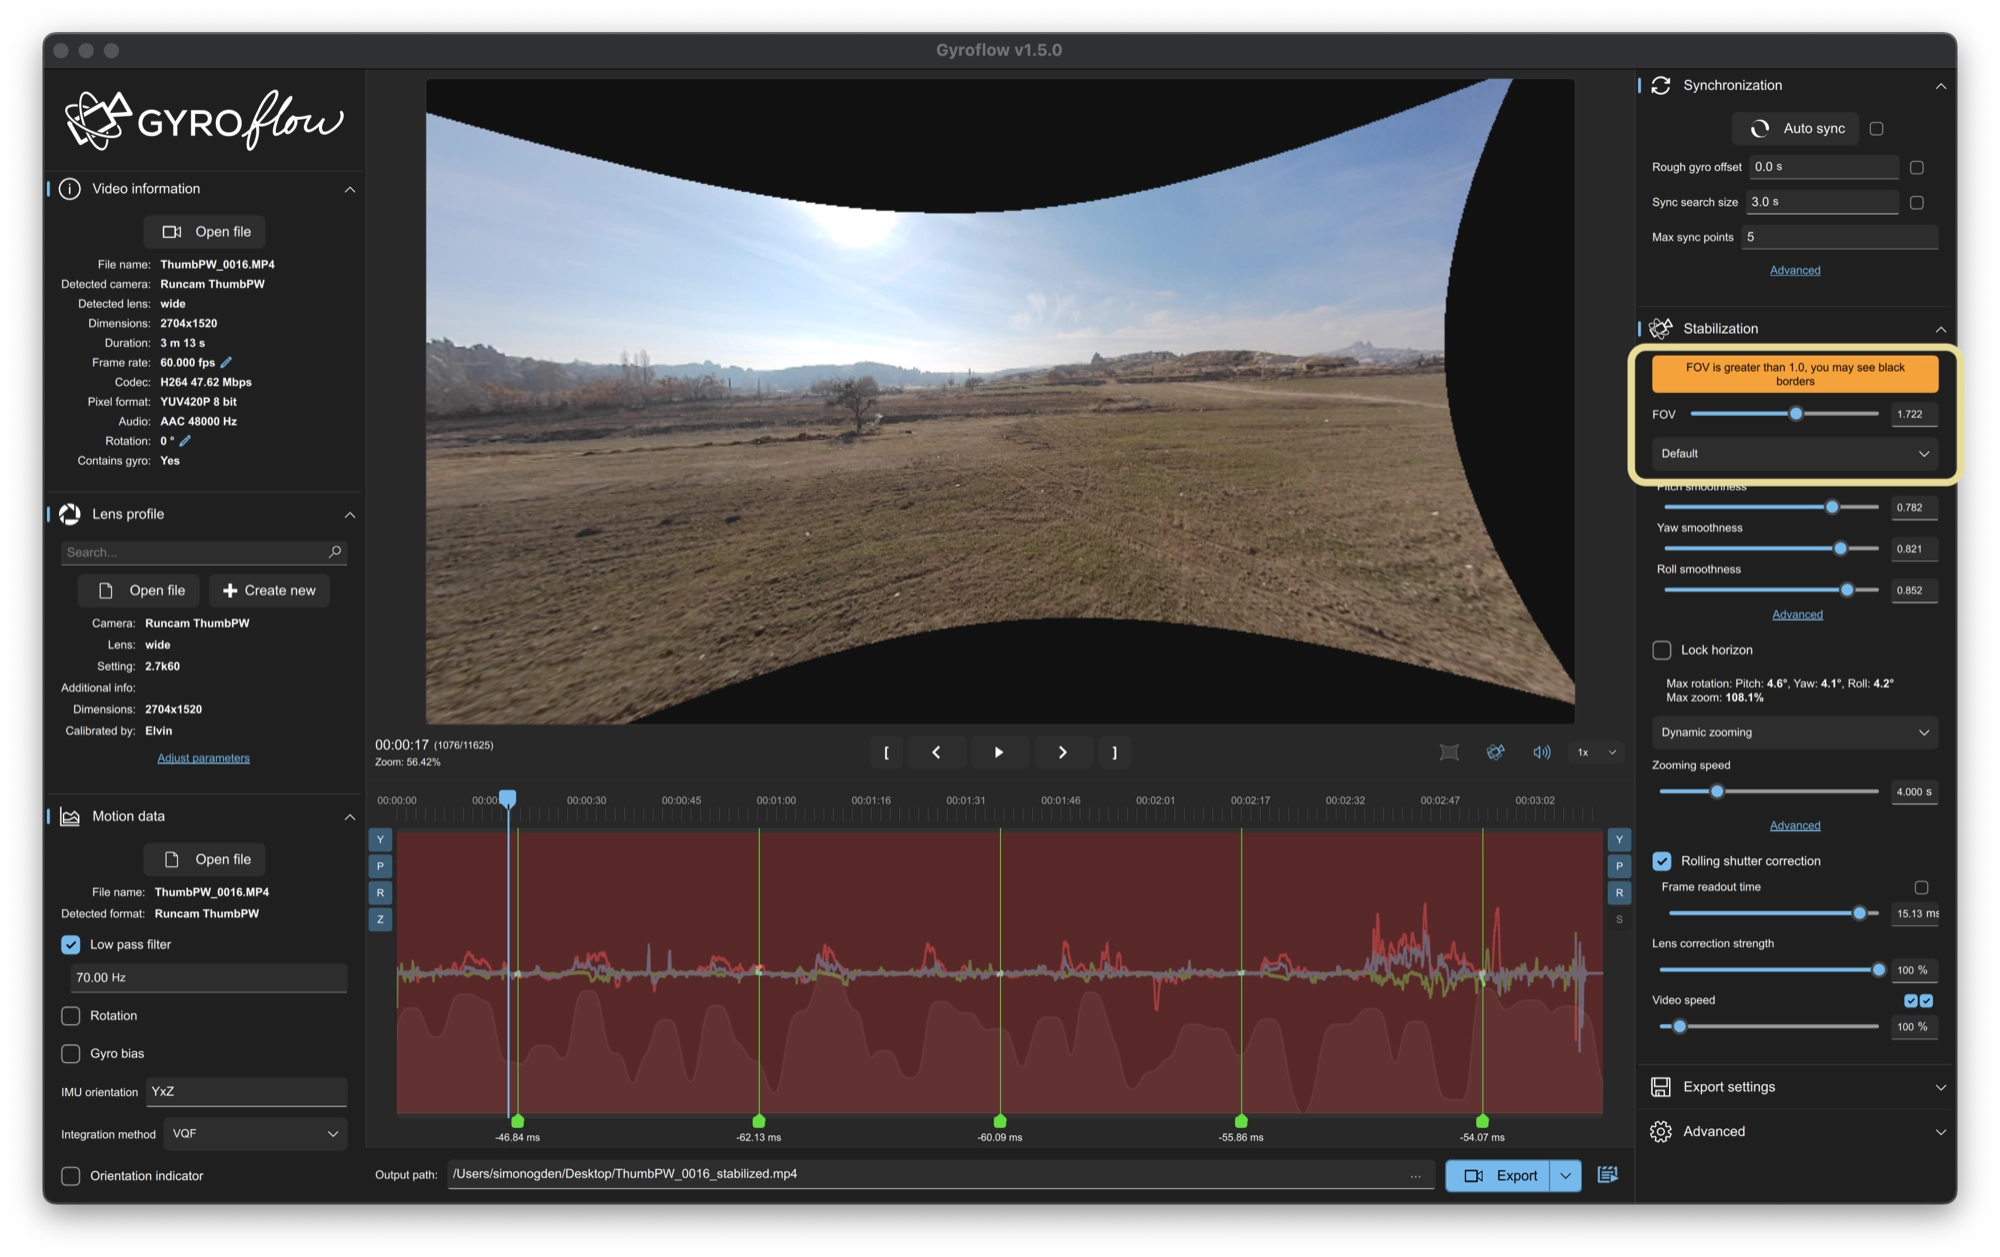
FOV (Field Of View)
The FOV slider can be used to zoom in to and out of the footage. Lowering the number below 1.0 will zoom in to the footage and increasing it above zoom out.
In mostly all cases this value should just be left set to 1.0.
However it is useful to sometimes temporarily increase the FOV in order to zoom out and see what the stabilization is doing.
There is also an option to change the algorithm. In 99% of cases this should be left set to default.
Pitch, Roll and Yaw smoothness
I would recommend clicking advanced settings and turning the per axis on, so that smoothness can be controlled individually for each axis.
These three sliders control the individual amount of smoothness on each of the 3 axes. Usually values between about 0.5 and 1 can work well, but you can experiment to find the best values.
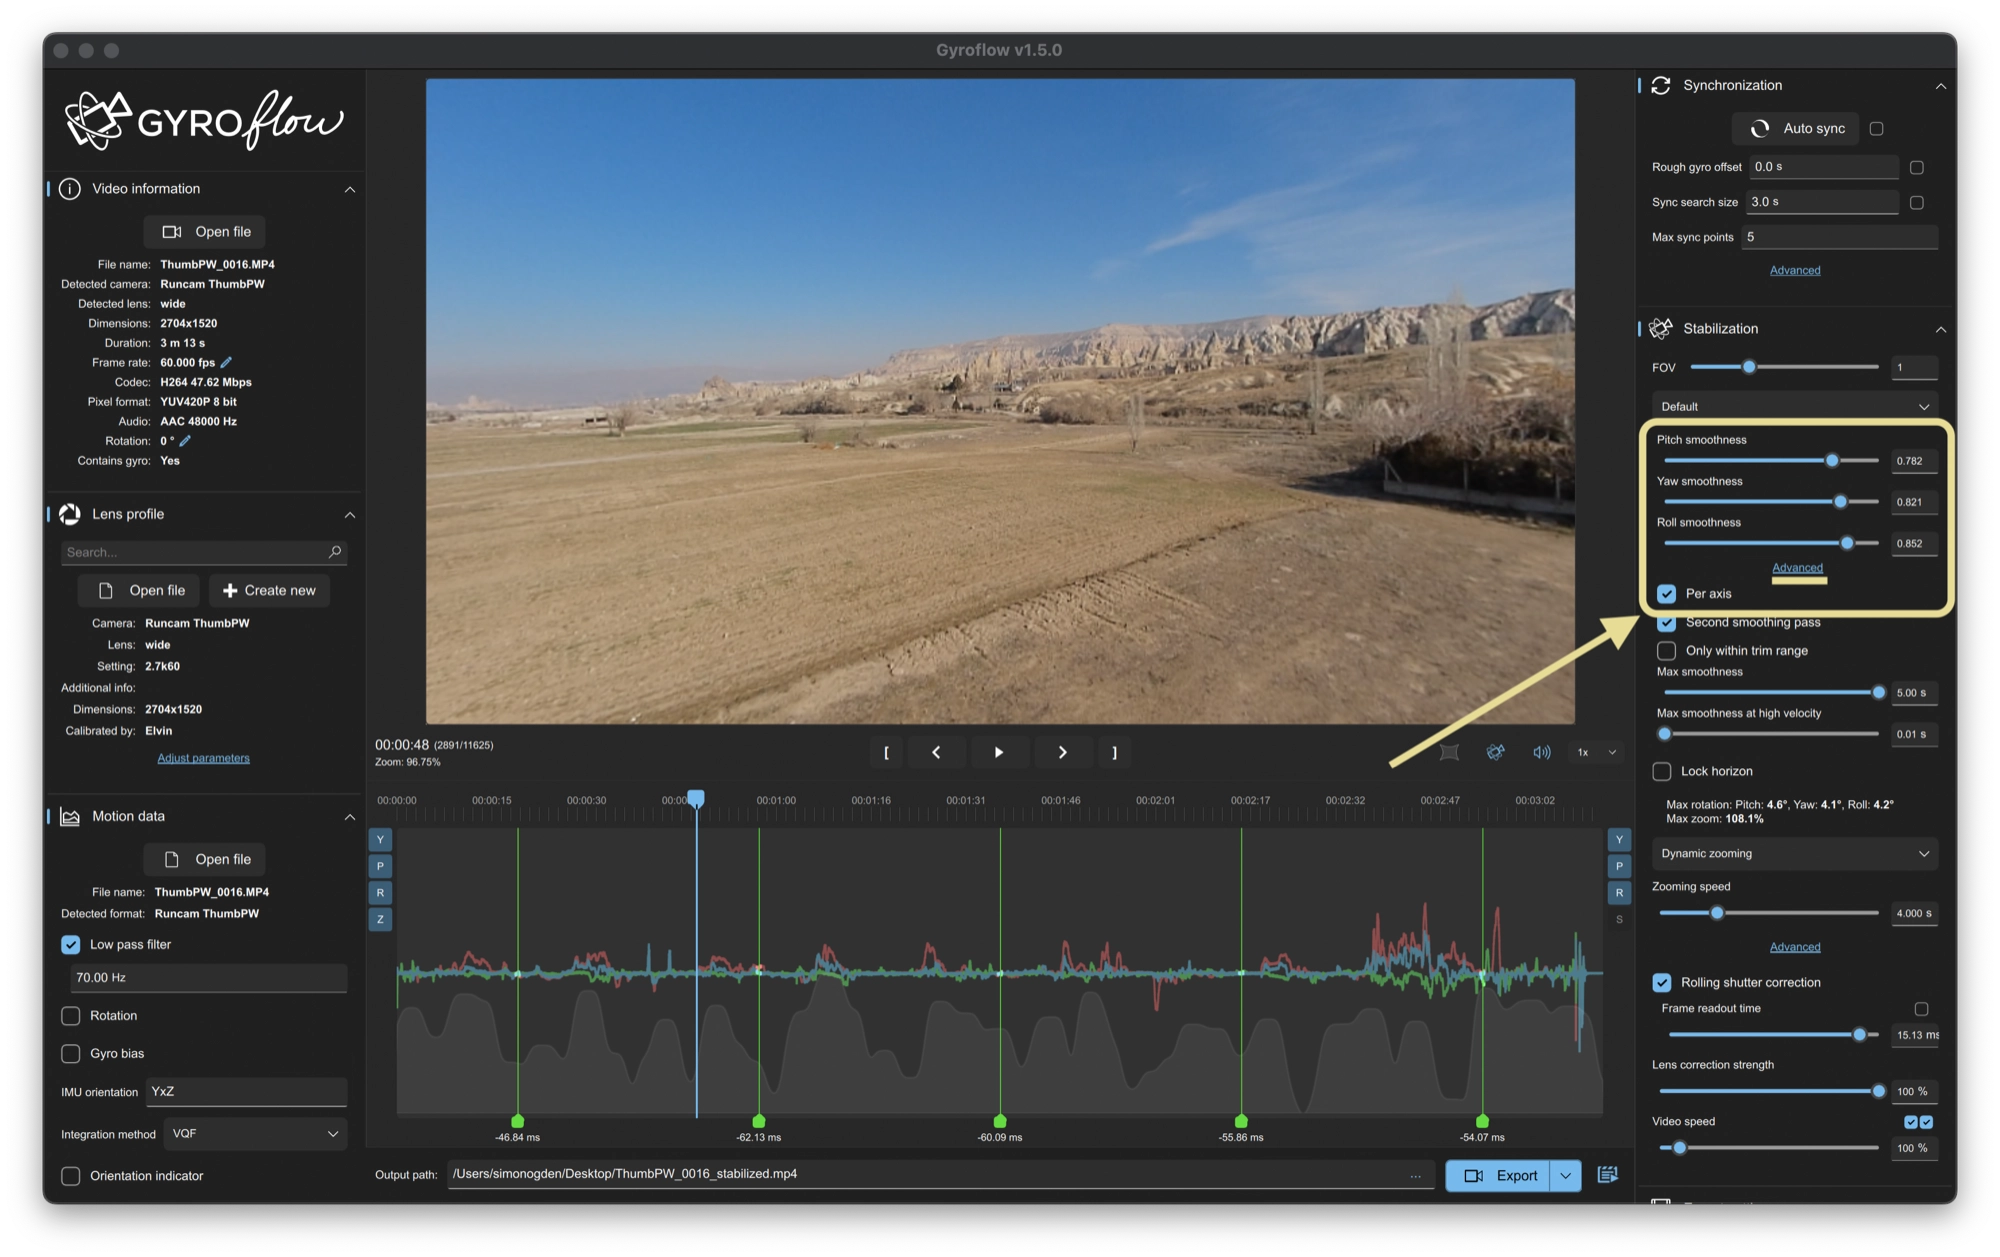
Increasing the smoothness will give you a better stabilization effect at the expensive of cropping your footage more.
Individual control of the axes allows for more granular control over the end result. For example you may prefer more smoothing on the roll axis, where less smoothing on the yaw axis is acceptable.
You may find that reducing the yaw smoothing does not make a huge difference to the stabilization, but reduces the cropping a non-trivial amount.
This means that you can optimize the stabilization, getting the desired result with the minimum amount of cropping.
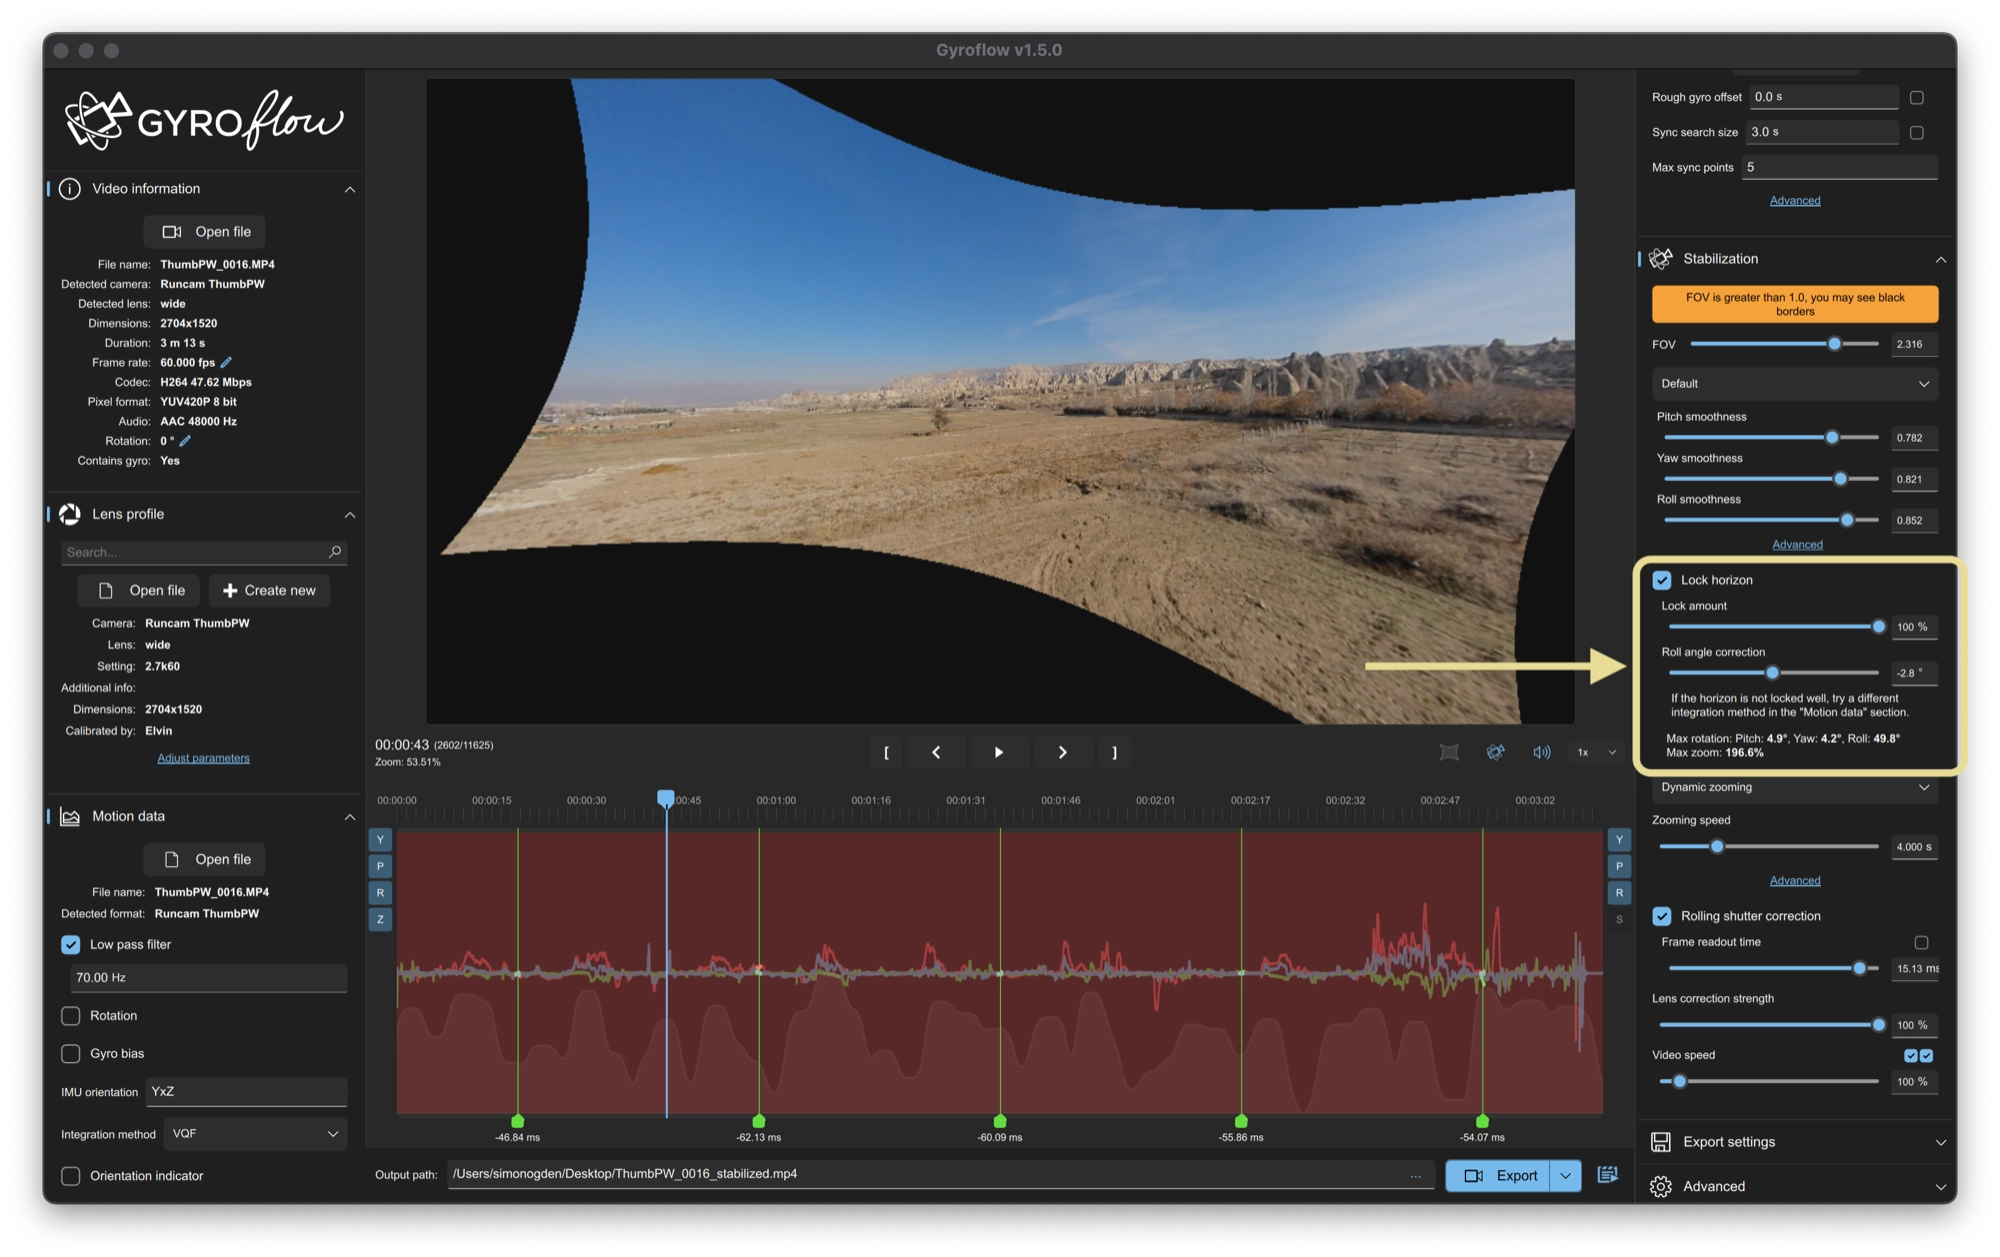
Horizon Lock
Horizon lock causes the horizon to be locked into a level position. While stabilizing other axes, the final video will maintain a level horizon.
As a result, the video will zoom in more since Gyroflow won’t have as many pixels to deal with when the frame is rotated to maintain a level horizon.
If the horizon is not level when enabling horizon lock, roll angle correction can be used to level out the horizon.
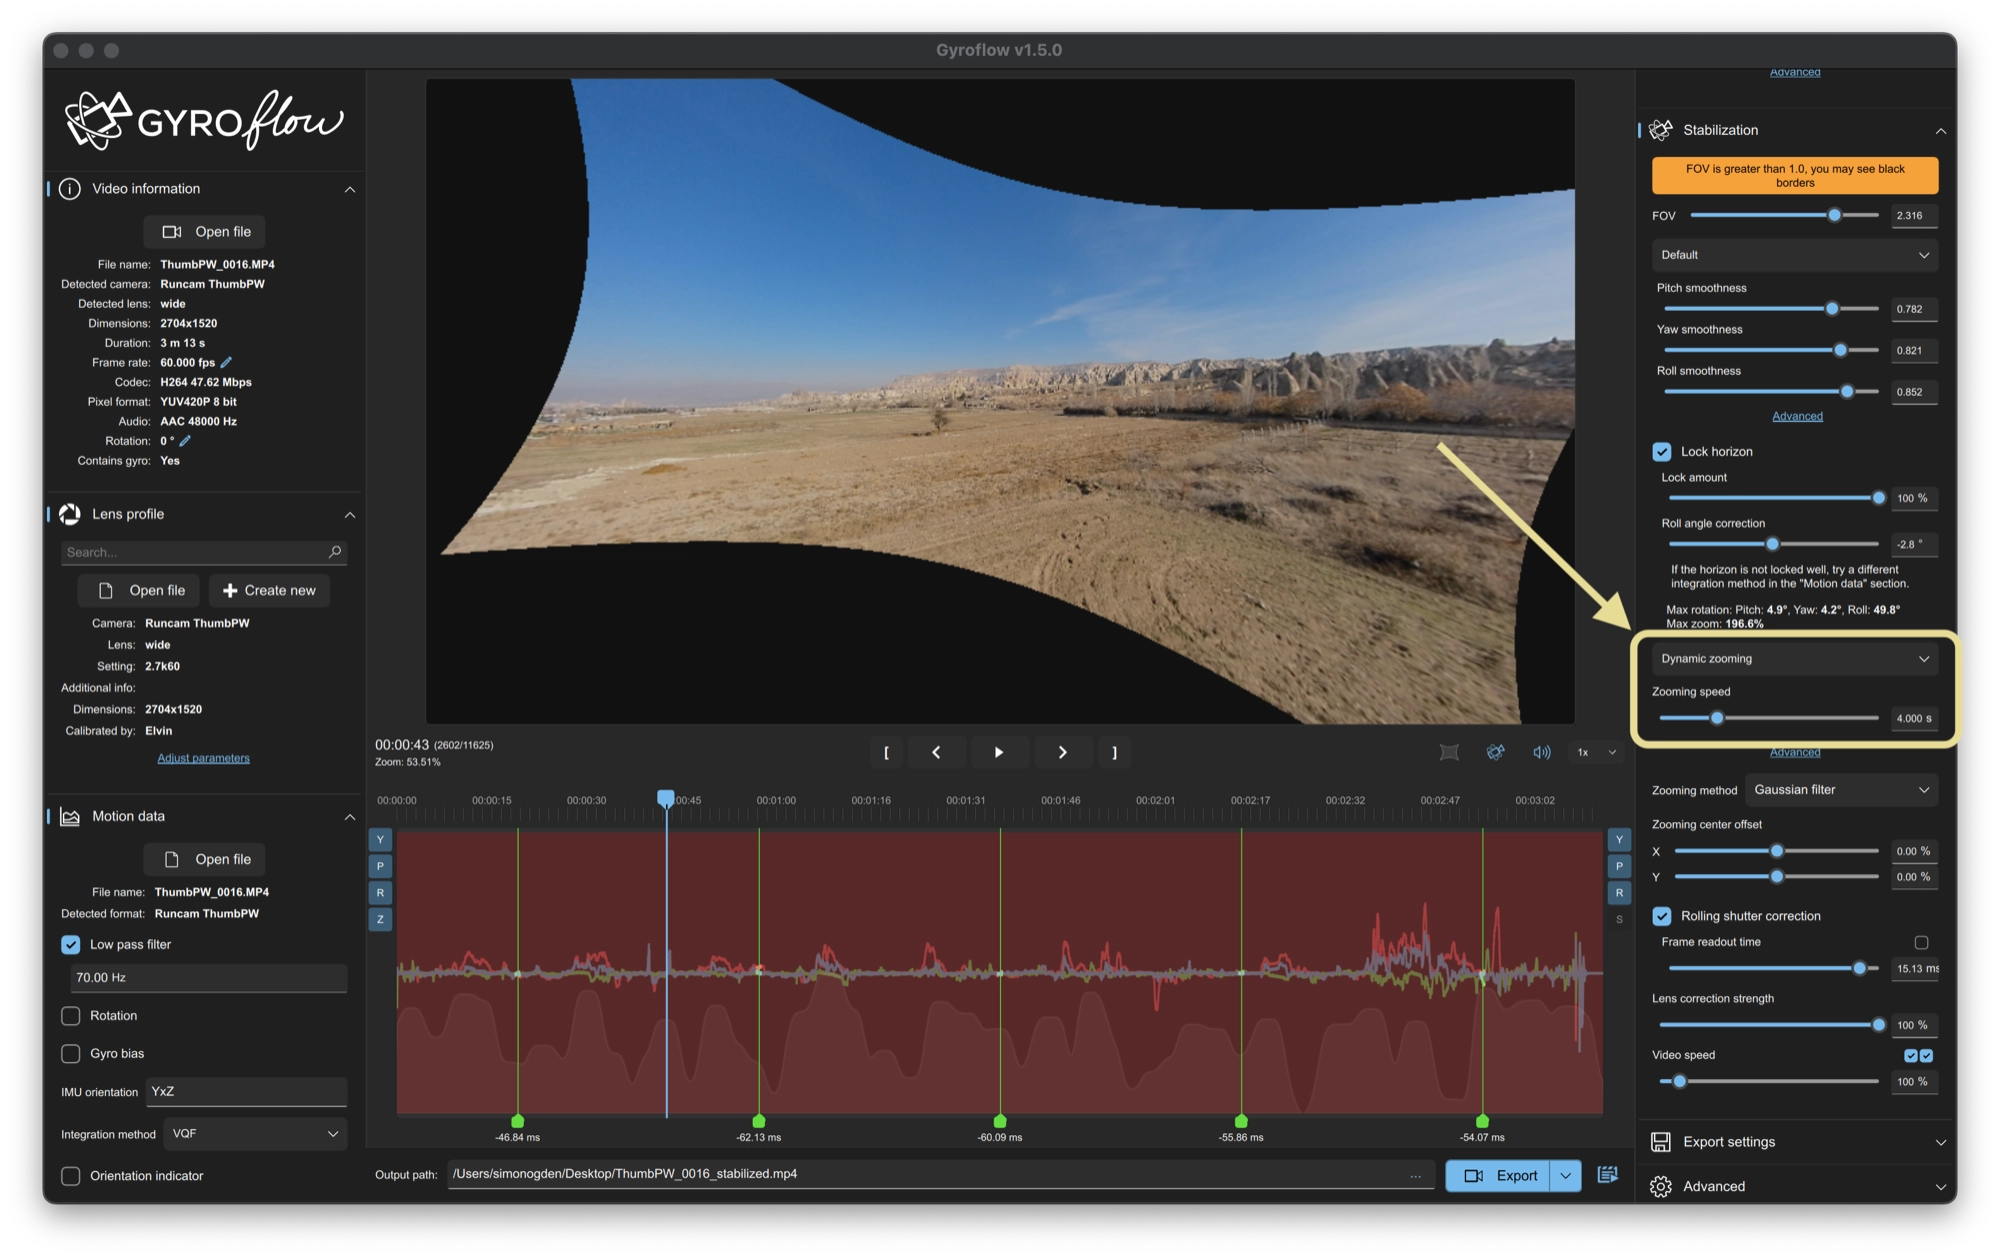
Zooming
When applying stabilization, the available information is limited to what the sensor captured, and moving the image around the screen to compensate for camera movement and lens correction results in black areas around the edges of the image.
In order to fix this and create a complete image, Gyroflow will zoom in to the image in order to crop out the parts of the image that are missing.
There are three zooming modes available in Gyroflow:
- No Zooming – disables all zooming and applies only stabilization.
- Dynamic Zooming – adjusts the zoom level throughout the video to use as much available pixels as possible, resulting in smooth transitions between zoom levels.
- Static Zoom – applies a single, static crop for the entire duration of the video. This mode eliminates the zooming effect, but may require a high zooming level, resulting in significant cropping.
While the static zoom mode may work in some cases, it is generally recommended to use the dynamic zooming mode instead.
If you wish to avoid the visible zooming effect, a high zooming speed, such as 20-30 seconds, can be used.
Rolling Shutter Correction
Rolling shutter correction is an important part of the stabilization process.
If you are using a camera that is supported by Gyroflow, such as the RunCan Thumb Pro, this setting will already be inputted correctly and does not require any modification.
If you are using a non-standard camera, whereby you have created a lens profile, you should input the frame readout time calculated during the lens calibration stage.
Export Settings
When you have the stabilization settings set as per your preference and you are happy with the result that Gyroflow is producing, it is time to output your video to a usable file.
Export settings allow you to specify the parameters of the output file, such as the resolution and type of compression used.
Render Range
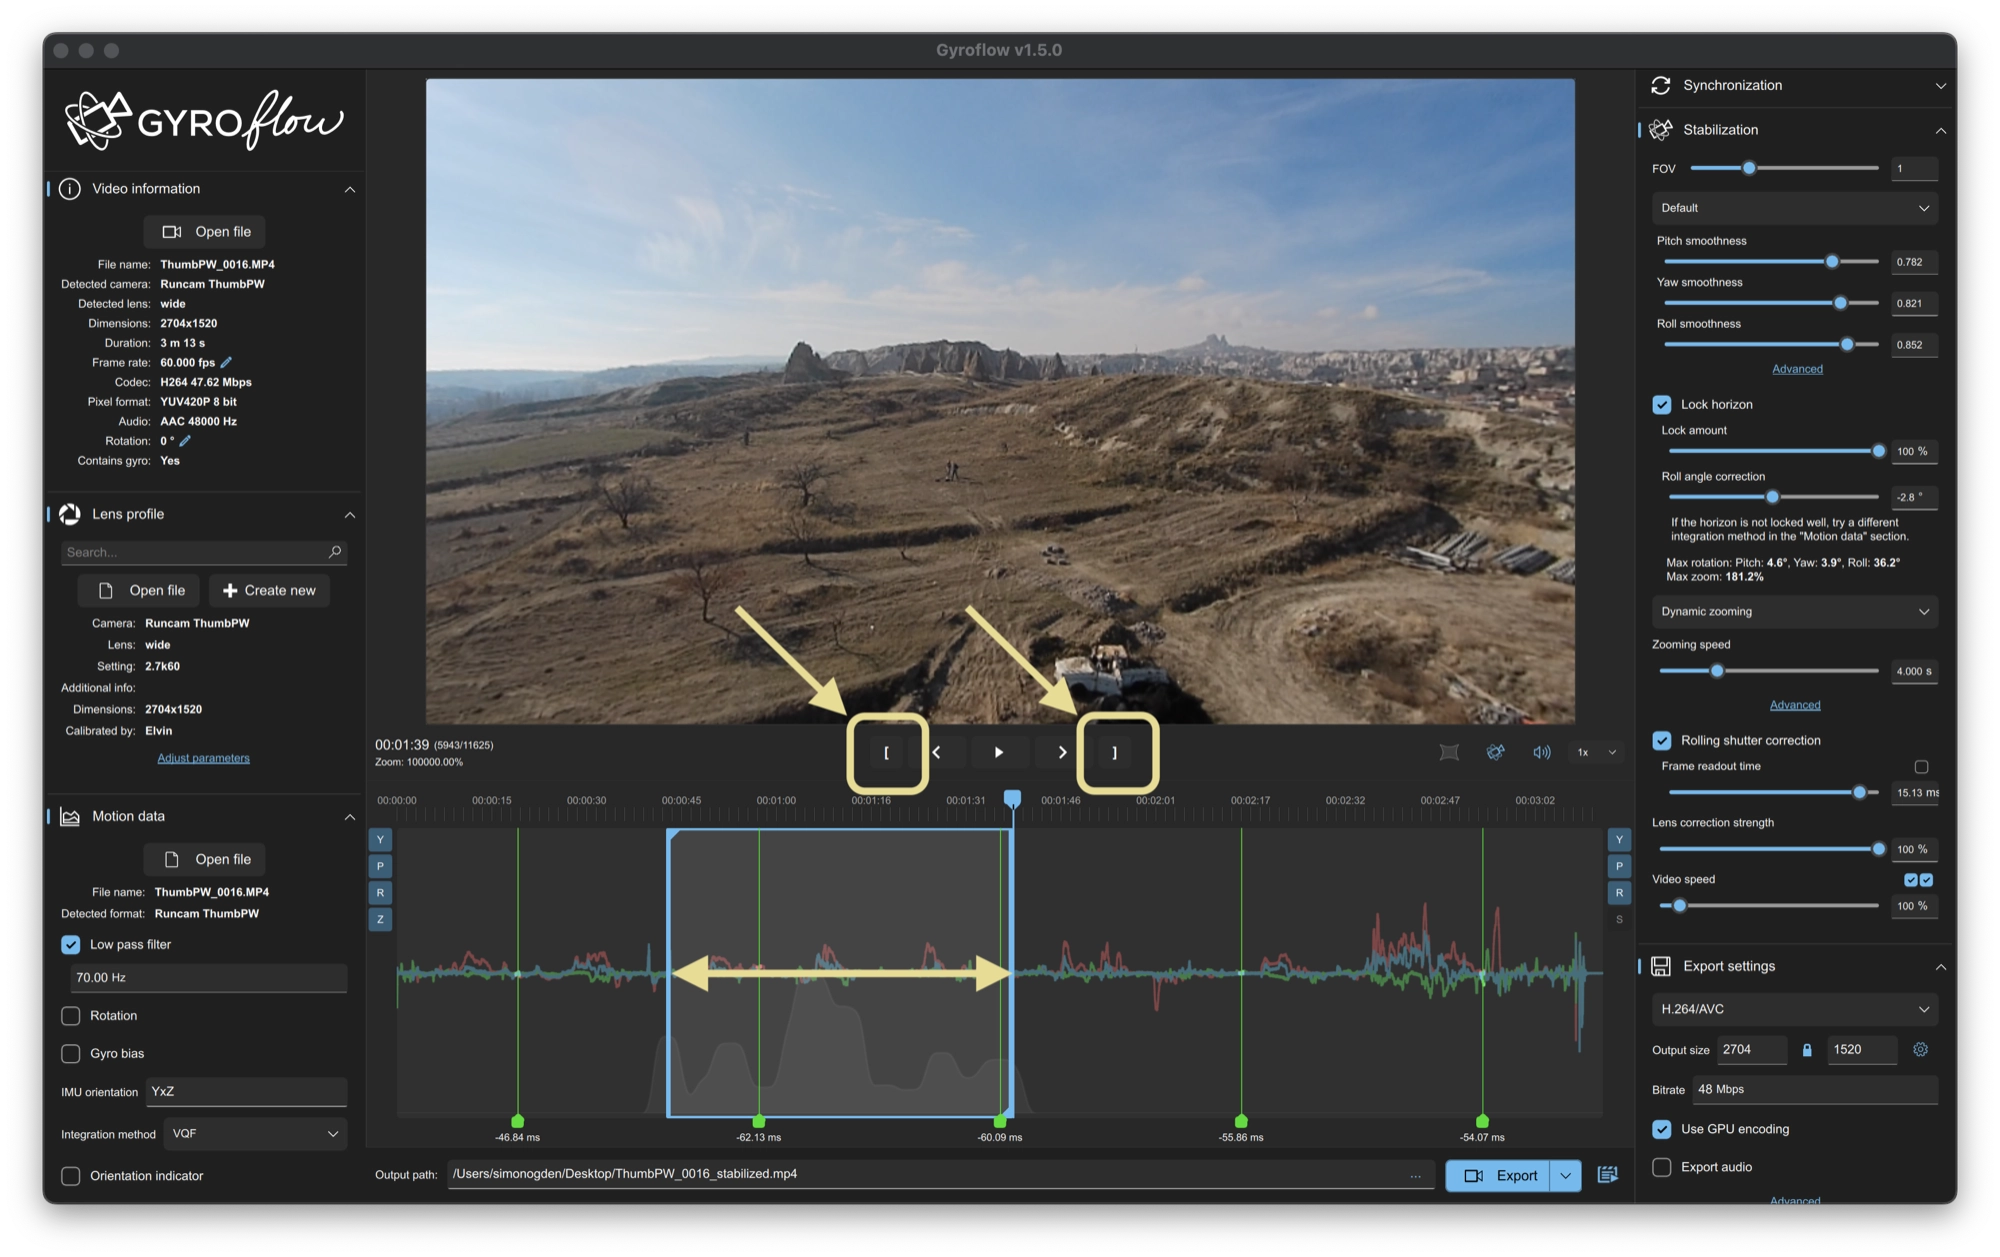
It is possible to specify the exact part of the video that you wish to output, should you not want to output the entire video.
Move the playhead to the location that you wish to specify and then use the [ and ] buttons to mark the range that you wish to output.
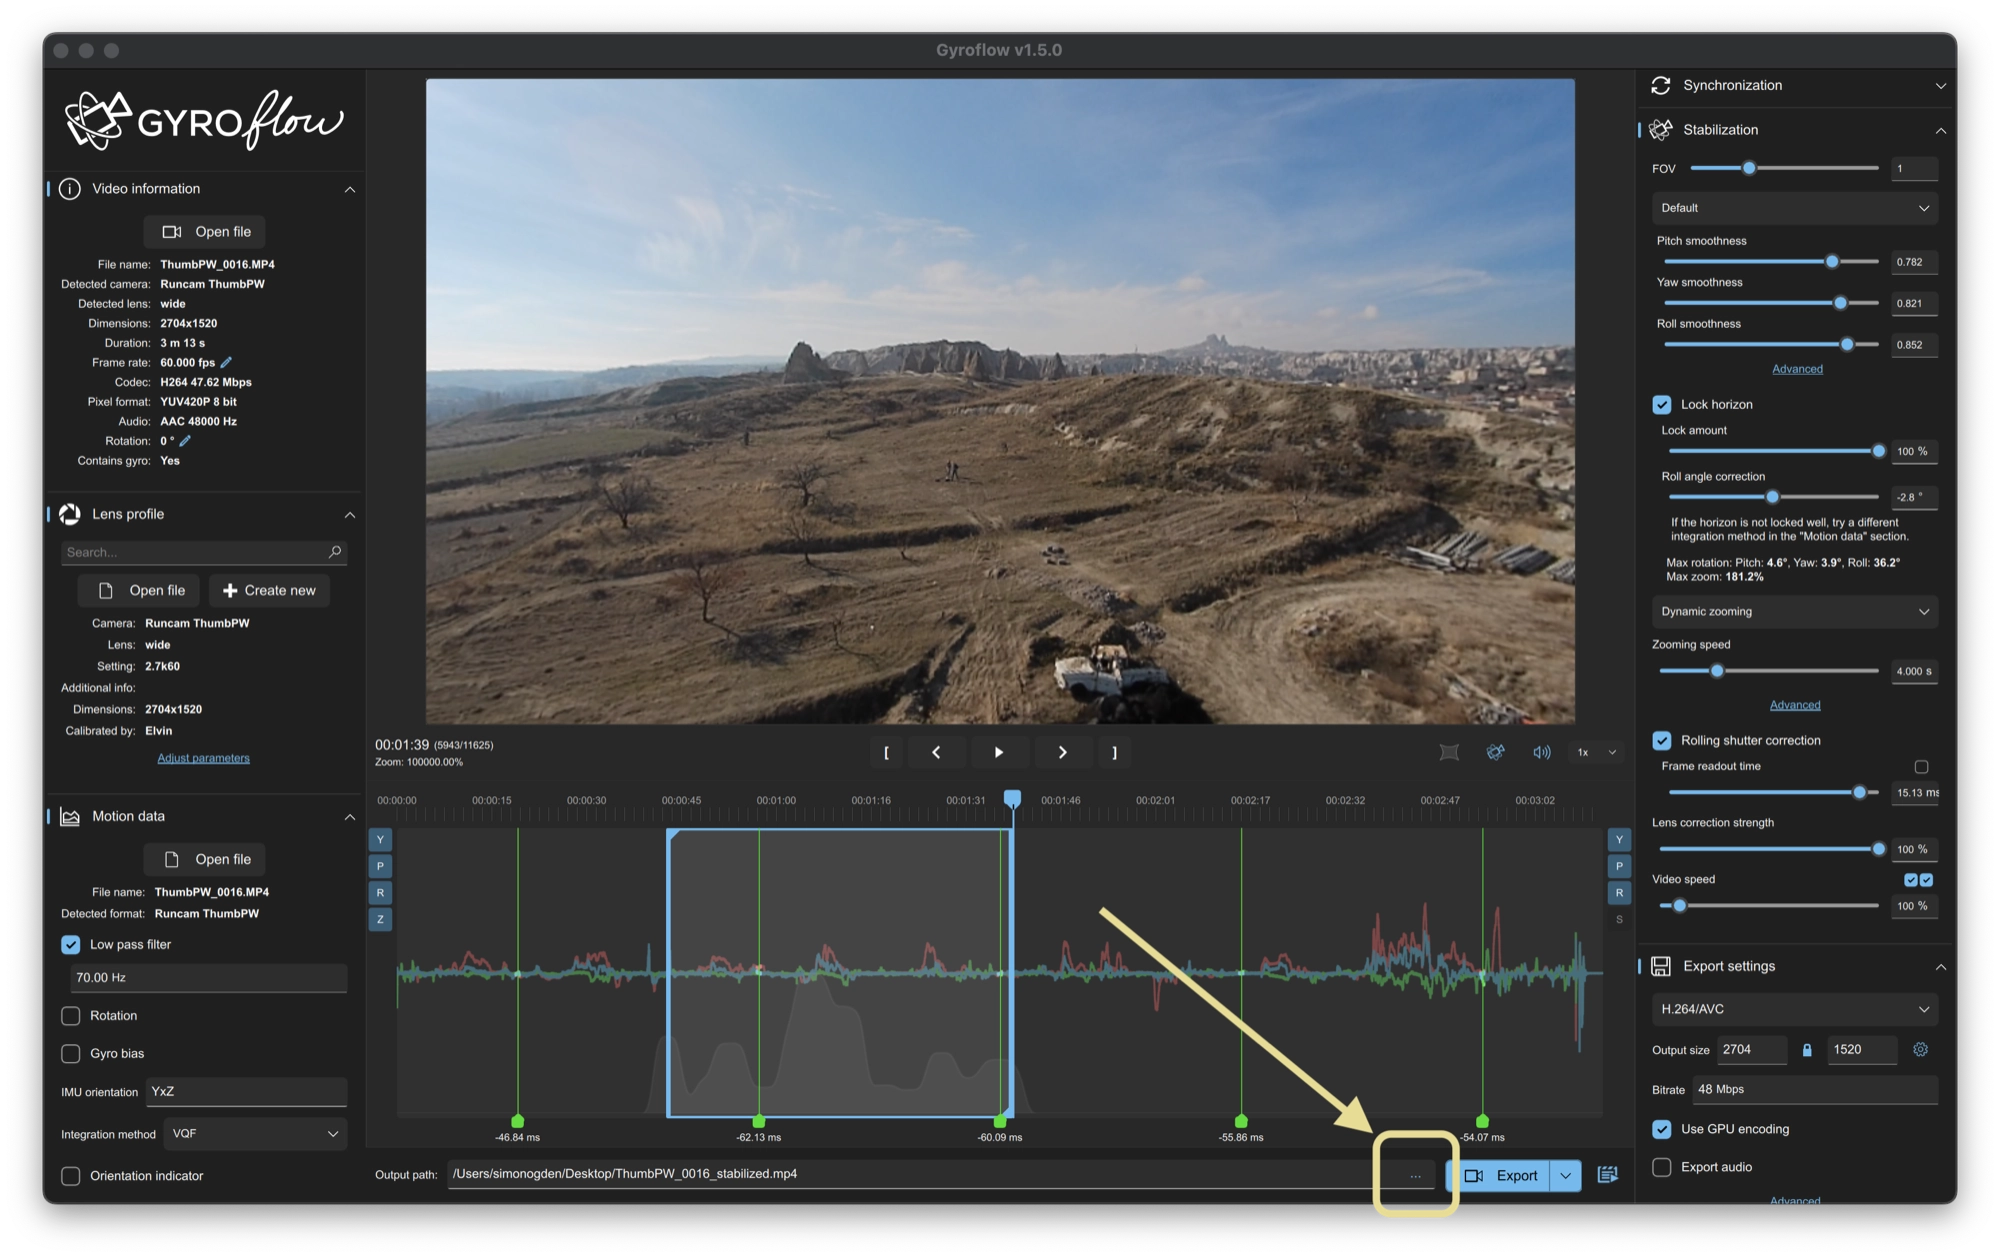
Output Path
The path to where your output file will be saved defaults to the same location as the inputted video. You can however change the path if you wish to save the file directly to a different location.
Click the three dots to the right-hand side of the file path to open the browser, in order to specify a new location.
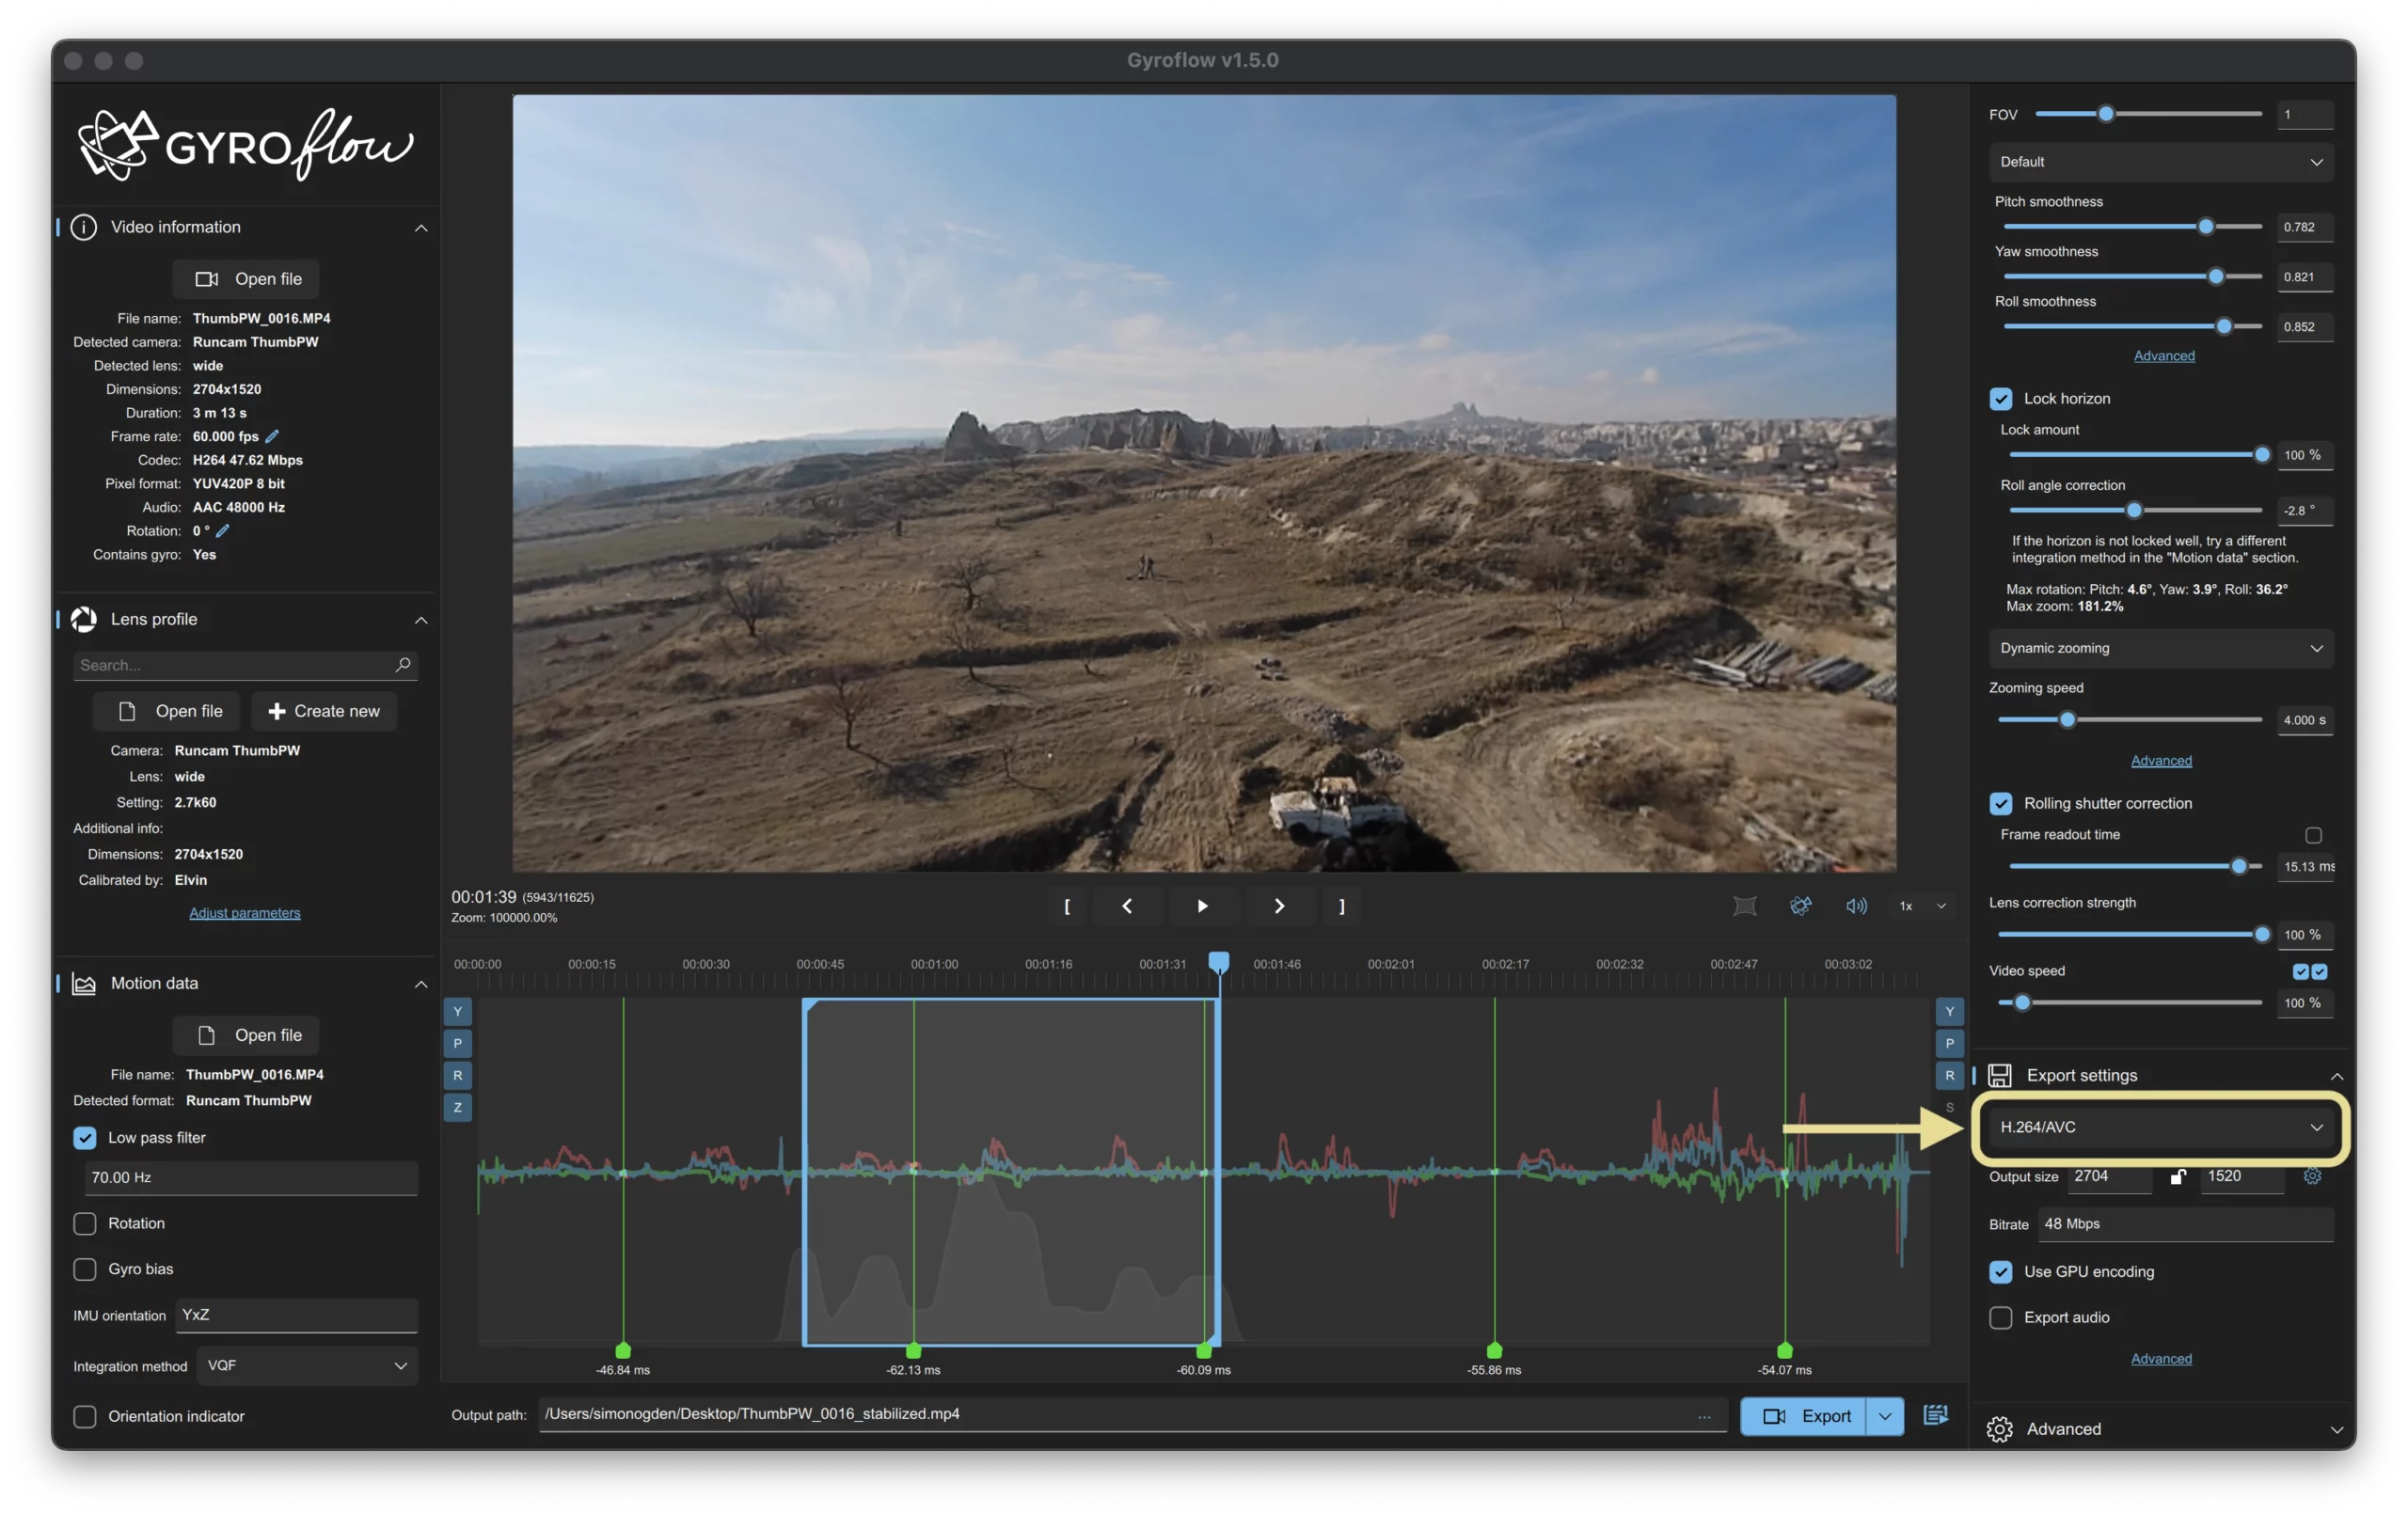
Export Codec
The choice of codec that you use will depend on what your end goal is. In most cases the best output codec to use will be either H.264/AVC if you want to share the video directly, or ProRes if you wish to transfer it to another video editing tool.
H.264/AVC is the most widely support and is likely to have the best device compatibility. It is the safest bet if you wish to share directly and you don’t know what hardware the viewer will be using.
H.265/HEVC is a newer and more efficient codec than H.264/AVC, a better choice if your viewers are using newer hardware, as you get more quality for the same bitrate.
ProRes is a professional video codec that will give you maximum video quality and it is also quick to decode at the expense of very large file sizes. Use this format to transfer your video to other video editing software.
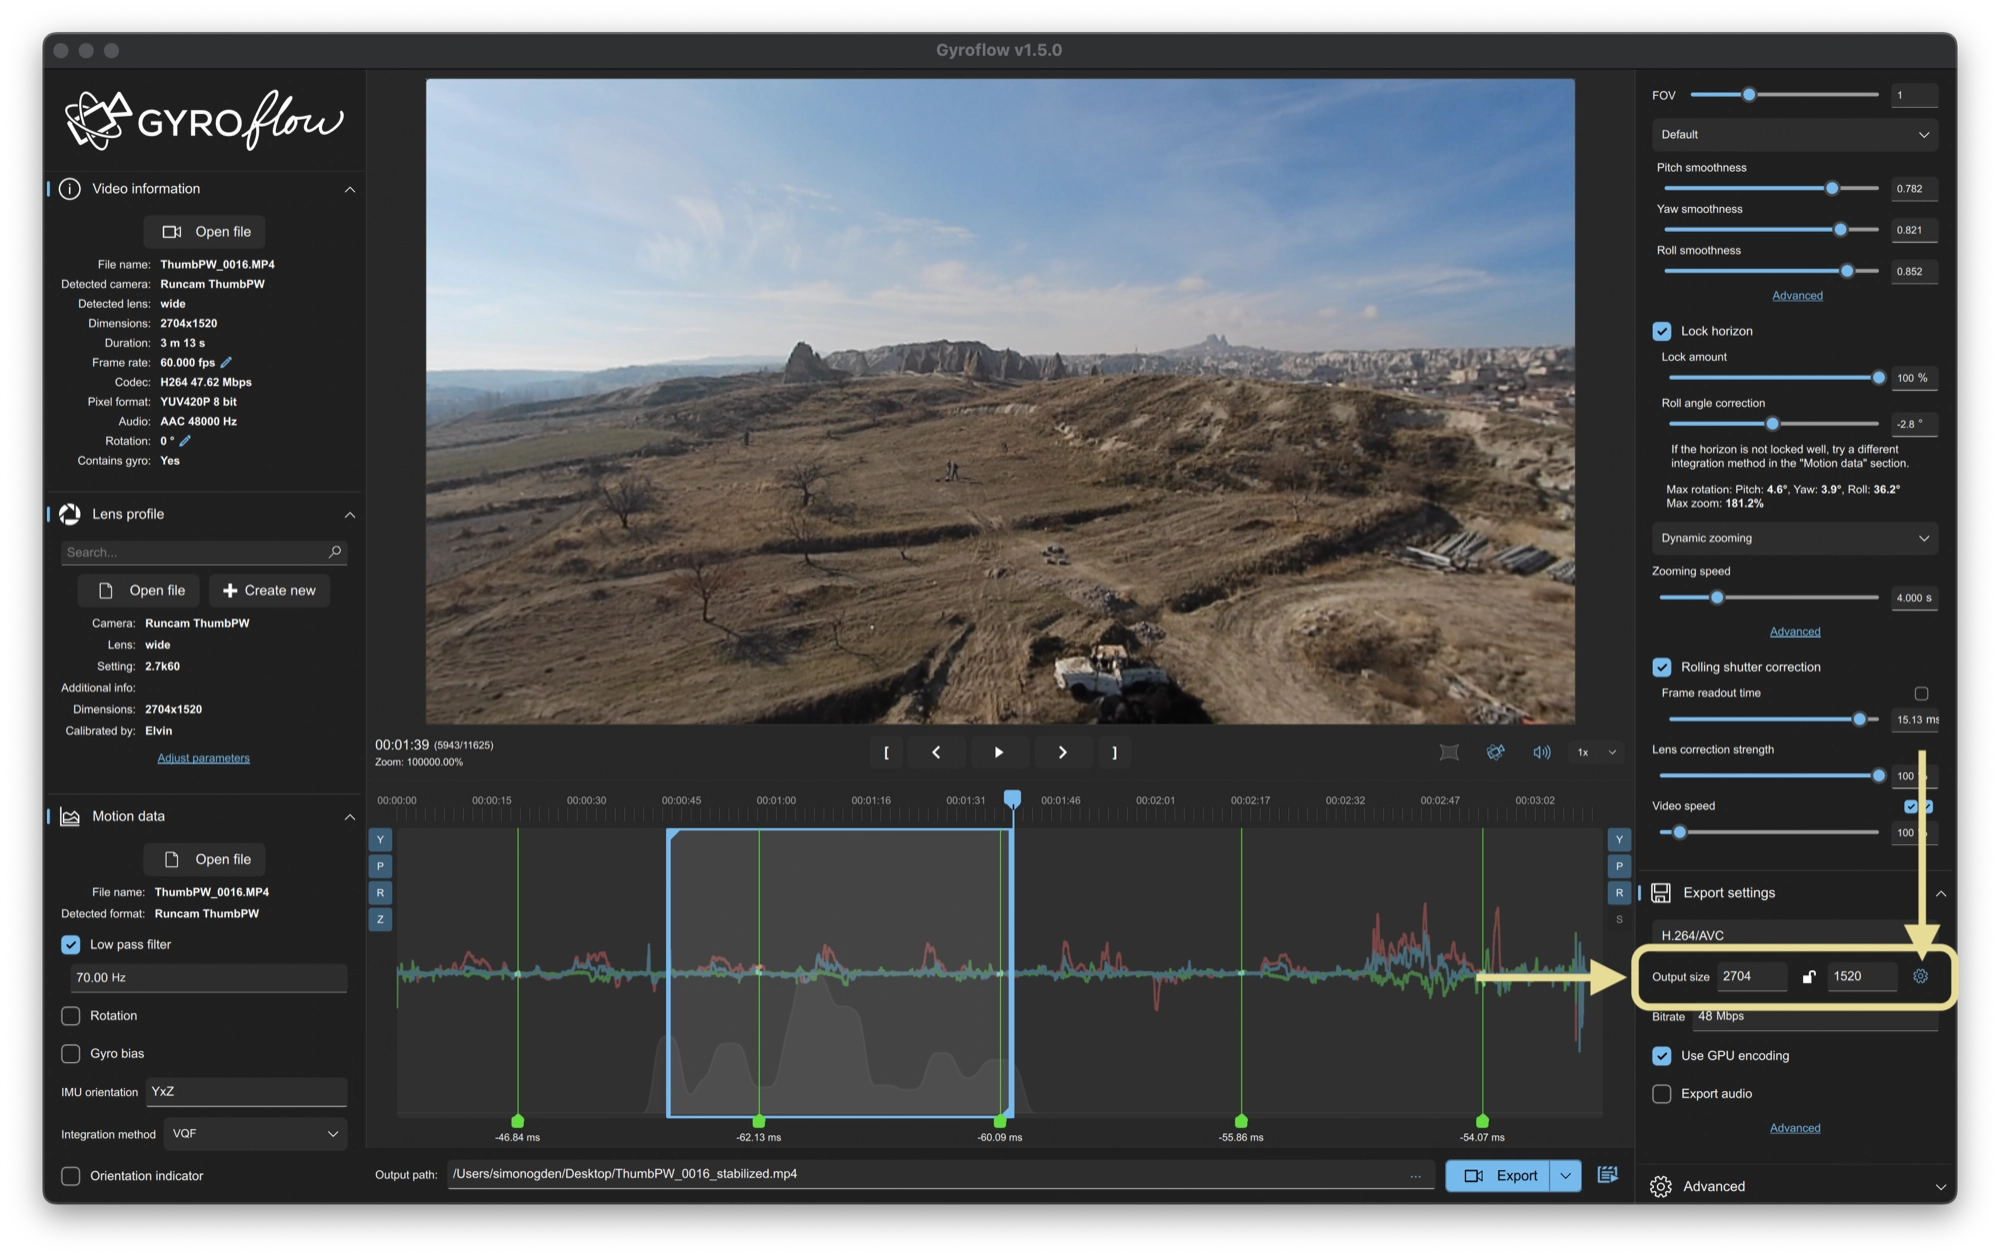
Output size
Specify the desired output size in pixels across the horizontal and vertical respectively.
You can also change the aspect ratio here, however be aware that this will not stretch the image so may affect the stabilization.
You can also select from common output sizes, such as 4K, 2K, 1080p etc. To see a list of common output sizes, click the gear icon next to the output pixel text boxes.
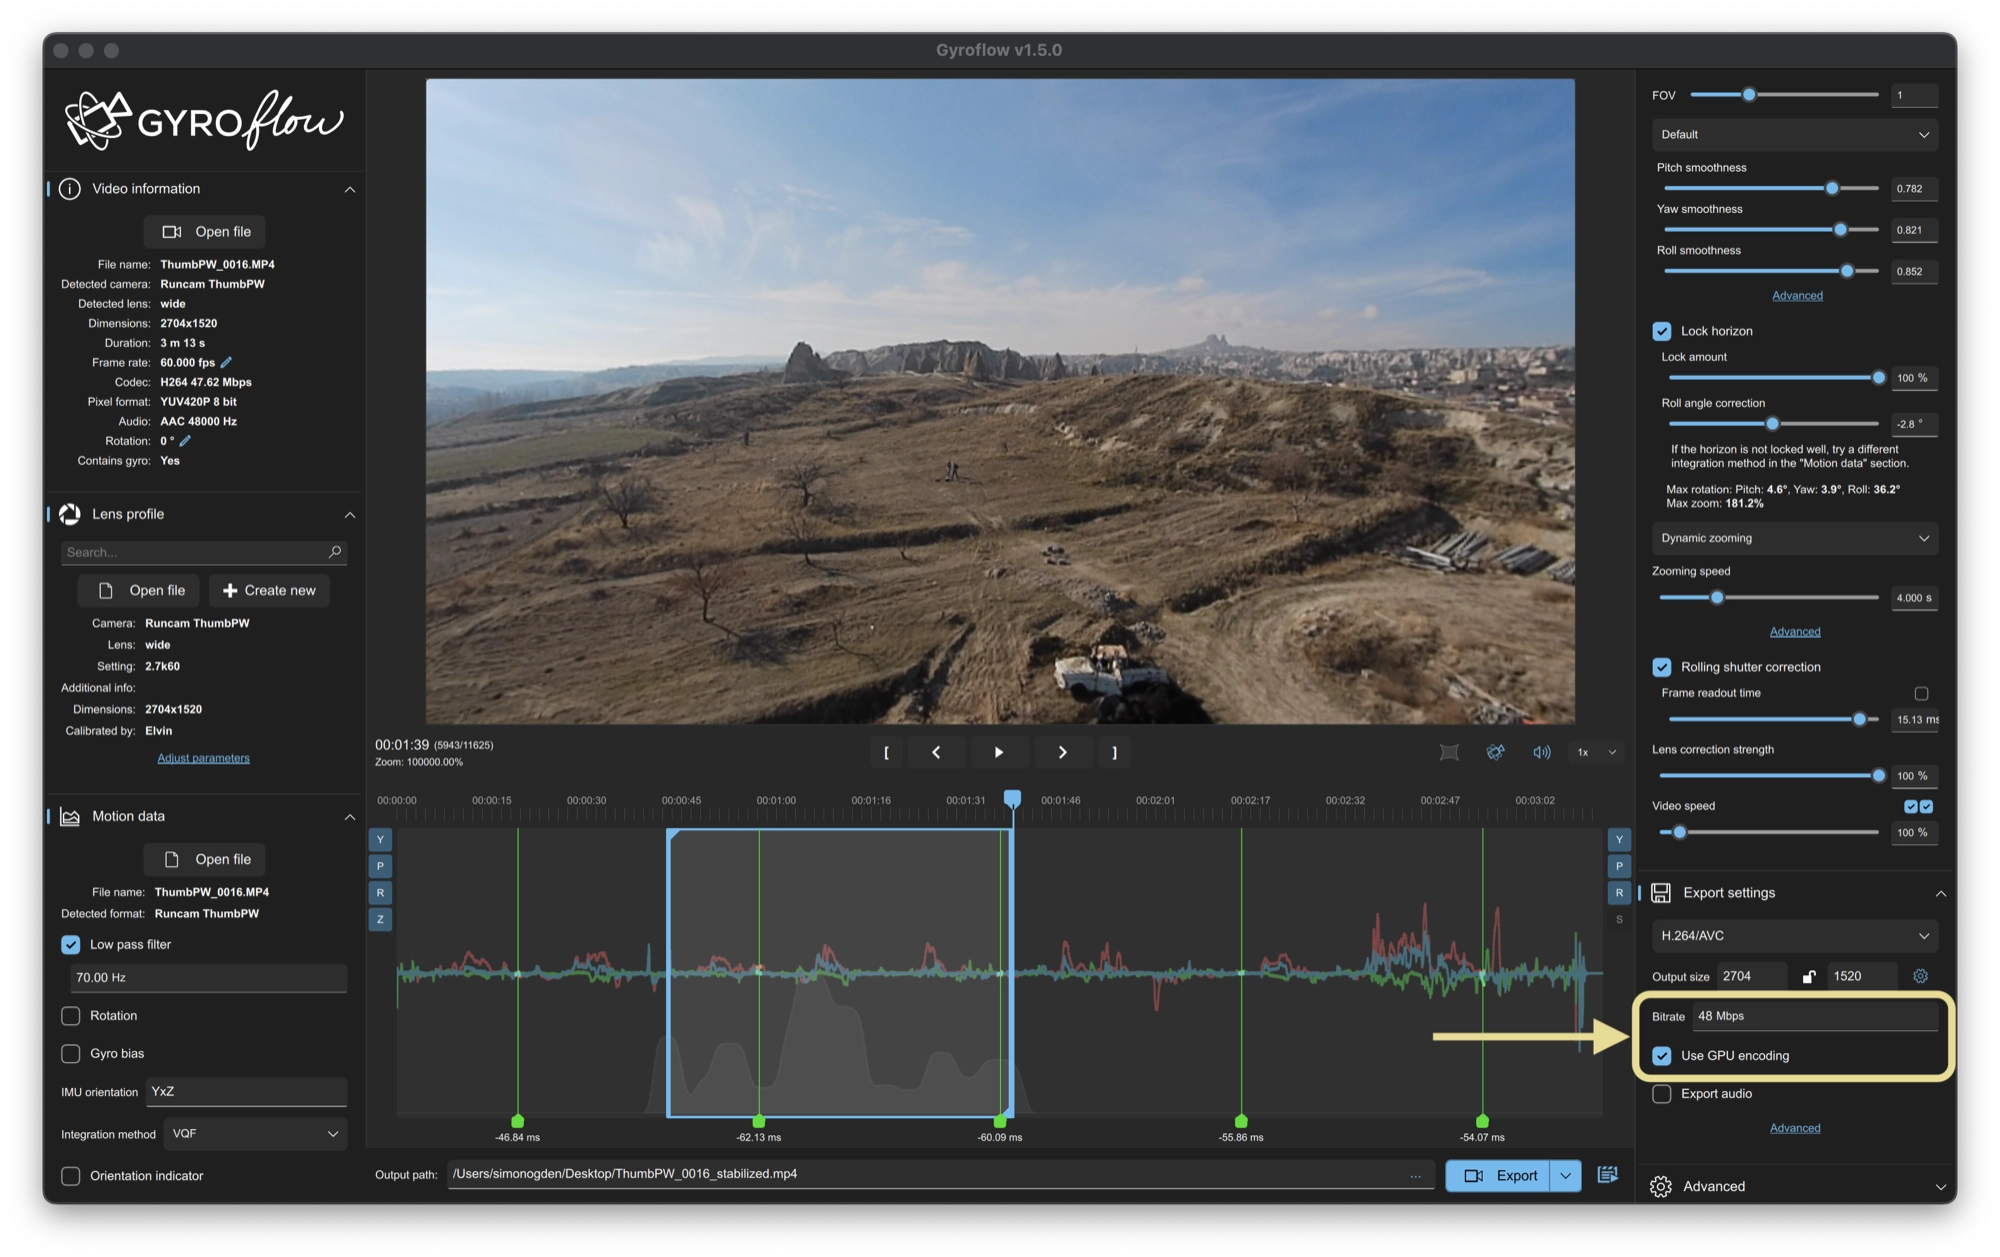
Bitrate & GPU Encoding
Bitrate refers to the amount of data that is stored per second in a video. A higher bitrate results in better quality but also leads to larger file sizes.
By default, Gyroflow sets the bitrate of the output file to be the same as that of the input file.
Disabling GPU encoding can provide the maximum possible encoding quality, but this comes at the cost of longer processing times.
Rendering on the CPU typically yields better results but is significantly slower. However, for most use cases, the difference in quality between CPU and GPU encoding is negligible.
As a result, enabling GPU encoding is generally preferred due to its faster processing speeds.
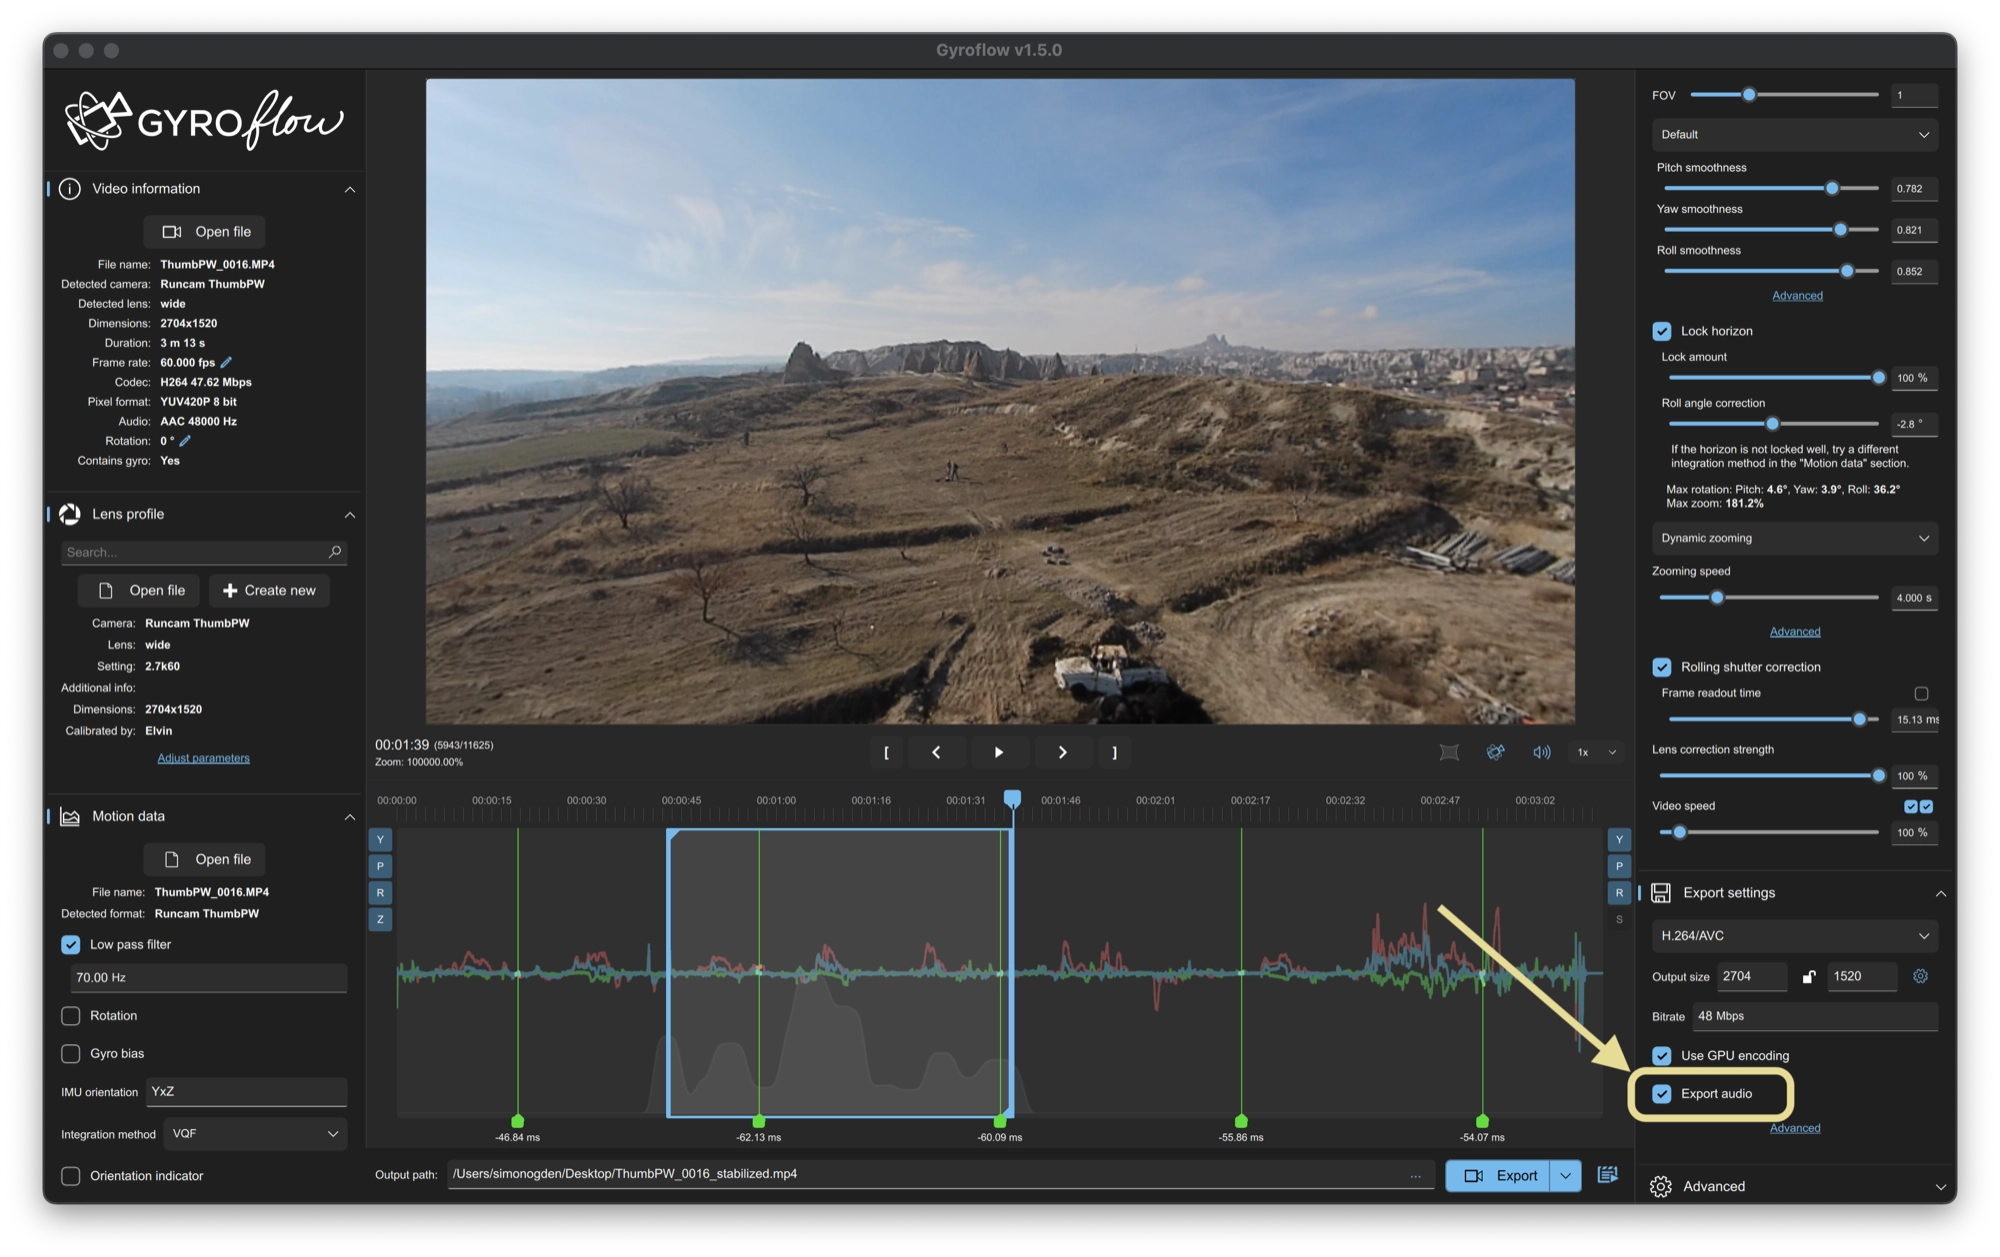
Export Audio
You can check the box in order to export audio with the video.
If your original video had audio (for example, you want to retain the prop noise) then this will be passed through the the encoder and encoded in the output file.
Conclusion
Gyroflow is a fantastic addition to the open source community and an extremely valuable tool for FPV pilots.
Whether you are using an inexpensive lightweight camera like the Thumb Pro, or a fully featured Red cinecam, Gyroflow can be used to get the pro stabilized footage that you are looking for.
Despite the plethora of options presented on the main screen, in most cases the default settings will work great.
However sometimes you may wish to tweak the settings in order to optimize the output, and this article provides a simple explanation of the main functions of interest, so be sure to bookmark it!
Hi, in your studies, does exporting a h264 video to pro res make any improvements to the image quality?
I have heard of upscaling(ex: exporting 1080p video to 4k) but I am not sure exactly what pro res scaling does, if anything(Besides increased file size).
Pingback: オープンソフトのジャイロ情報を利用した手ぶれ補正ソフトGyroflowとソニーカメラの使用上の注意 – 創作表現アルバム
Pingback: loperamide
Pingback: proscar price malaysia